Cloud Architecture Design
This page describes the high-level steps to design and deploy an OpenNebula cloud.
To familiarize yourself with deployment and daily operations, or if you want to quickly try an Edge, Hybrid or Multi-cloud deployment, we strongly recommend you begin with the Quick Start Guide. In the Quick Start, you can:
Deploy on-demand Edge Clusters on remote cloud providers
Deploy Virtual Machines and Kubernetes clusters
As you follow the tutorials you will learn the basic usage and operation of your cloud. This trial of a real cloud deployment can help you to plan for the most suitable features for performance and scalability, to get the most out of your OpenNebula cloud.
For a sequential outline of the tasks involved in designing an OpenNebula cloud, read on.
Step 1. Install the Front-end
The first step is the installation of the OpenNebula Front-end. The installation process is based on operating system packages for the most widely-used Linux distributions, and is the same for any underlying hypervisor or deployment model.
If you are planning for a system with a very large number of hypervisors, don’t forget to read the Large-scale Deployment section of the documentation. The general recommendation is that each OpenNebula instance handle up to 2500 servers and 10,000 VMs. Better performance and higher scalability can be achieved by tuning other components, such as the database where the state of the cloud is persisted. To grow the size of your cloud beyond the above limits, you can horizontally scale the cloud by adding new OpenNebula zones within a federated deployment. The largest OpenNebula deployment consists of 16 data centers and 300,000 cores.
To reduce downtime of core OpenNebula services, you can optionally set up a High-availability cluster. If planning for a large-scale infrastructure, you can configure a MySQL/MariaDB backend as an alternative to the default SQLite backend.
A single OpenNebula Front-end can manage multiple clusters geographically distributed across several data centers and cloud providers. However, you can choose a multi-zone deployment with data center federation if data centers belong to different administrative domains or if connectivity between them does not meet latency and bandwidth requirements. Multiple OpenNebula zones can be configured as a federation, where they will share the same user accounts, groups, and permissions across data centers.
Besides connecting your cloud to the public OpenNebula Marketplace and other third-party Marketplaces, you can build your own private marketplace to provide your users with an easy way of privately publishing, downloading and sharing your own custom Appliances.
Step 2. Deploy Edge Clusters
OpenNebula brings its own Edge Cluster configuration. Based on solid open-source storage and networking technologies, it is a much simpler approach than those of customized cloud architectures made of more complex, general-purpose and separate infrastructure components. OpenNebula automates the deployment of Edge Clusters on-demand, on virtual or bare-metal resources both on-premises and on your choice of public cloud or edge provider.
Step 3. Set Up Customized Clusters On-premises
OpenNebula is certified to work on top of multiple combinations of hypervisors, storage and networking technologies. In this model, you need to first install and configure the underlying cloud infrastructure software components, then install OpenNebula to build the cloud. Clusters can be deployed on-premises or on your choice of bare-metal cloud or hosting provider. If you are interested in an OpenNebula cloud fully based on open source platforms and technologies, please refer to our Open Cloud Reference Architecture. The reference architecture and the guide have been created from the collective information and experiences of hundreds of users and cloud client engagements. Besides the main logical components and interrelationships, the guide documents software products, configurations, and requirements of infrastructure platforms recommended for a smooth OpenNebula installation.
3.1. Choose Your Hypervisor
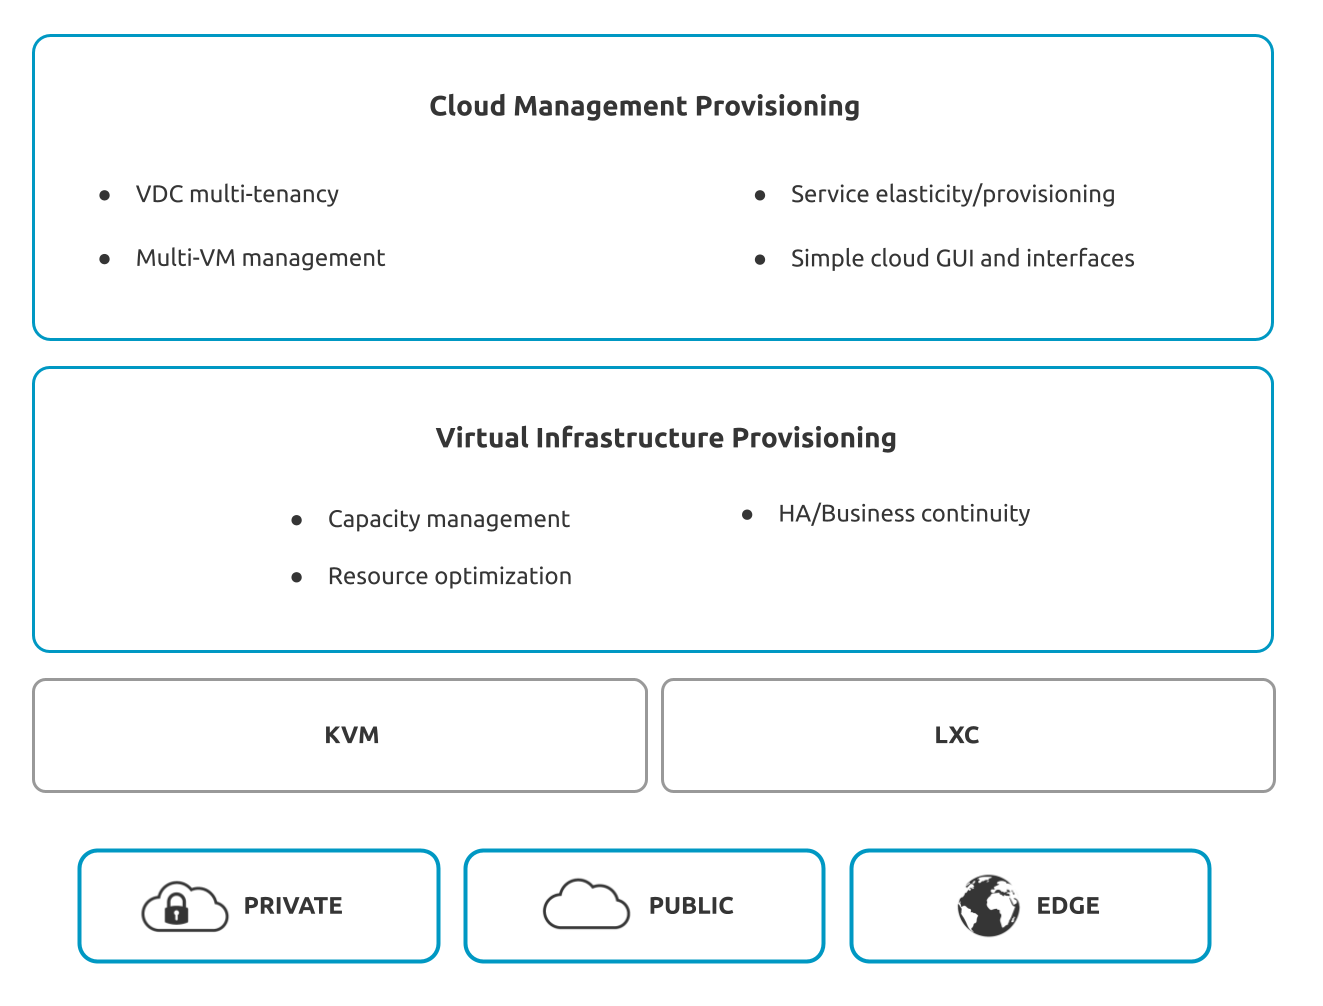
The first step in building a customized cluster is to decide on the hypervisor that you will use in your cloud infrastructure. The main OpenNebula distribution provides full support for KVM, one of the most efficient and widely-used hypervisors, as well as LXC system containers.
Virtualization and Cloud Management on KVM. Many companies use OpenNebula to manage data center virtualization, consolidate servers, and integrate existing IT assets for computing, storage, and networking. In this deployment model, OpenNebula directly integrates with KVM and completely controls virtual and physical resources, providing advanced features for capacity management, resource optimization, high availability and business continuity. Some of these deployments additionally use OpenNebula’s Cloud Management and Provisioning features for federating data centers, implementing cloud bursting, or offering self-service portals for end-users.
Containerization with LXC. Containers have a minimal memory footprint and avoid the compute-intensive and sometimes unacceptable performance degradation inherent to hardware emulation. You can have a very high density of containers per virtualization node and run workloads close to bare-metal metrics. LXC focuses on system containers, unlike similar technologies such as Docker, which focuses on application containers.
OpenNebula allows you to deploy heterogeneous multi-hypervisor environments managed by a single OpenNebula instance, so after after having installed the cloud with one hypervisor, you can add another. The ability to gradually integrate open source hypervisors helps to protect existing IT investments and facilitates evaluation and testing, at the same time avoiding vendor lock-in by using open-source components.
3.2. Install the Virtualization Hosts
After selecting the hypervisor(s) for your cloud, you are ready to add the virtualization nodes. The OpenNebula packages bring support for KVM and LXC nodes. As mentioned earlier, you can add different hypervisors to the same OpenNebula instance.
3.3. Integrate with Data Center Infrastructure
Now you should have an OpenNebula cloud up and running with at least one virtualization node. The next step is to configure OpenNebula to work with your infrastructure. OpenNebula directly manages the hypervisor, networking and storage platforms; and you may need additional configuration:
Networking setup with 802.1Q VLANs, Open vSwitch or VXLAN.
Storage setup with NFS/NAS datastore, Local Storage datastore, SAN datastore, Ceph, Dev, or iSCSI datastore.
Host setup with the configuration options for the KVM hosts, LXC hosts, Monitoring subsystem, Virtual Machine HA or PCI Passthrough.
Authentication setup, OpenNebula includes by default an internal user/password authentication system, but it can also use an external authentication driver such as SSH, x509, LDAP or Active Directory.
3.4. Configure Cloud Services
OpenNebula runs a set of specialized, coordinated daemons and services to provide specific functions. For an in-depth overview of the main OpenNebula components, their configuration files, start/stop procedures and logging facilities please refer to the the OpenNebula Services Guide.
Step 4. Operate your Cloud
4.1. Define a Provisioning Model
Before configuring multi-tenancy and defining the provisioning model of your cloud, we recommend you consult the introduction to the OpenNebula Provisioning Model. In a small installation with few Hosts, you can use OpenNebula without giving much thought to infrastructure partitioning and provisioning; however, for medium and large deployments you will probably want to provide some level of isolation and structure.
OpenNebula helps you to define a provisioning model based on two concepts:
Users and Groups. OpenNebula features advanced multi-tenancy with powerful user and groups management, implemented through an Access Control List mechanism that allows for differential role management based on fine-grained permissions that can be applied over any resource. The resource quota management subsystem lets you track and limit the use of computing, storage and networking resources.
Virtual Data Centers or VDCs allow you to assign one or more user groups to a pool of physical resources. You can also create logical pools of resources which may physically belong to different clusters and zones, and allocate them to user groups.
Finally, the accounting and showback modules allow you to visualize and report resource usage data, produce usage reports, and integrate with chargeback and billing platforms.
4.2. Manage Virtual Resources
Now everything is ready for operation. OpenNebula provides you with full control to manage virtual resources, as outlined below.
Virtual machine image management allows you to store disk images in catalogs (termed datastores), that can then be used to define VMs, or be shared with other users. The images may be OS installations, persistent datasets or empty data blocks created within the datastore.
Virtual network management allows you to organize Virtual networks in catalogs, as well as to provide means to interconnect virtual machines. This type of resource may be defined as IPv4, IPv6, or mixed networks, and may be used to achieve full isolation between virtual networks. Networks can be easily interconnected by virtual routers, and may be hardened by dynamic configuration of security groups.
Virtual machine template management implements a template catalog that allows you to register virtual machine definitions to be instantiated later as Virtual Machines.
Virtual machine instance management includes a number of operations to control the life cycle of virtual machine instances, such as migration (live and cold), stop, resume, cancel, power-off or backup.
OneFlow implements multi-VM application and auto-scaling to define, execute and manage multi-tiered elastic applications, or services composed of interconnected Virtual Machines with deployment dependencies between them, using auto-scaling rules.
Application insight with OneGate allows Virtual Machine guests to pull and push VM information from OpenNebula. Users and administrators can use it to gather metrics, detect problems in their applications, and trigger OneFlow elasticity rules from inside the VM.
Reference guides are provided with more information about definition files, templates, and the CLI.
4.3. Add contents to your Cloud
OpenNebula offers multiple options for adding Applications to your cloud, from using your existing disk images to downloading them from public or private Marketplaces. For information on creating new applications, see the Creating Images section.
Step 5. Integrate with other Components
This step is optional and only for integrators and builders.
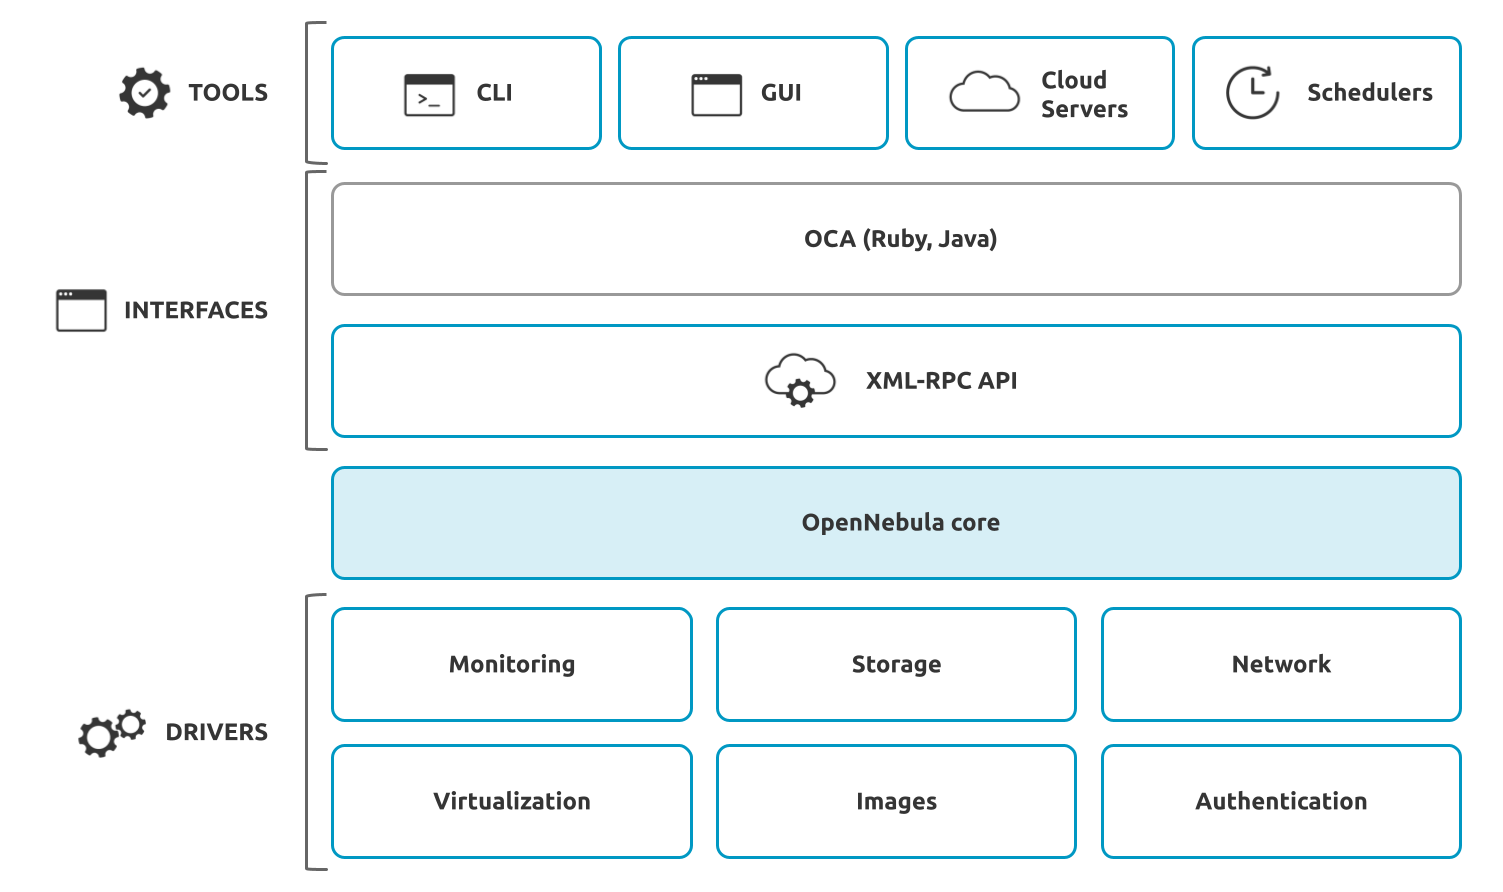
Because no two clouds are the same, OpenNebula provides many different interfaces that can be used to interact with the functionality offered to manage physical and virtual resources.
A modular and extensible architecture with customizable plugins for integration with any third-party data center infrastructure platform for storage, monitoring, networking, authentication, virtualization and market.
A rich API set that offers all the functionality of OpenNebula components, with bindings for Ruby and Java as well as the XML-RPC API. These APIs will ease the integration of your cloud with higher-level tools such as chargeback, billing or self-service platforms.
The OneFlow API to create, control and monitor multi-tier applications or services composed of interconnected Virtual Machines.
A Hook Manager to trigger administration scripts upon resource state changes or API calls.