OneFlow Services Management
OneFlow allows users and administrators to define, execute and manage multi-tiered applications, which we call Services, composed of interconnected Virtual Machines with deployment dependencies between them. Each group of Virtual Machines is deployed and managed as a single entity and is completely integrated with the advanced OpenNebula user and group management.
What Is a Service
The following diagram represents a multi-tier application. Each node represents a Role, and its cardinality (the number of VMs that will be deployed). The arrows indicate the deployment dependencies: each Role’s VMs are deployed only when all its parent’s VMs are running.
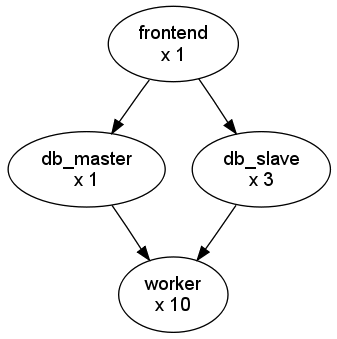
This Service can be represented with the following JSON template:
{
  "name": "my_service",
  "deployment": "straight",
  "ready_status_gate": true|false,
  "roles": [
    {
      "name": "frontend",
      "vm_template": 0
    },
    {
      "name": "db_master",
      "parents": [
        "frontend"
      ],
      "vm_template": 1
    },
    {
      "name": "db_slave",
      "parents": [
        "frontend"
      ],
      "cardinality": 3,
      "vm_template": 2
    },
    {
      "name": "worker",
      "parents": [
        "db_master",
        "db_slave"
      ],
      "cardinality": 10,
      "vm_template": 3
    }
  ]
}
Defining a new Service: Templates
OneFlow allows OpenNebula administrators and users to register Service Templates in OpenNebula, to be instantiated later as Services. These Templates can be instantiated several times, and also shared with other users.
Users can manage the Service Templates using the command oneflow-template, or Sunstone. For each user, the actual list of Service Templates available is determined by the ownership and permissions of the Templates.
Create and List Existing Service Templates
The command oneflow-template create registers a JSON template file. For example, if the previous example template is saved in /tmp/my_service.json, you can execute:
oneflow-template create /tmp/my_service.json
ID: 0
To list the available Service Templates, use oneflow-template list:
oneflow-template list
ID USER            GROUP           NAME         REGTIME
 0 oneadmin        oneadmin        my_service   10/28 17:42:46
To check details about a Service Template, use oneflow-template show:
oneflow-template show 0
SERVICE TEMPLATE 0 INFORMATION
ID                  : 0
NAME                : my_service
USER                : oneadmin
GROUP               : oneadmin
REGISTRATION_TIME   : 10/28 17:42:46

PERMISSIONS
OWNER               : um-
GROUP               : ---
OTHER               : ---

TEMPLATE CONTENTS
{
  "name": "my_service",
  "roles": [
    {

....
Templates can be deleted with oneflow-template delete.
You can also delete VM templates associated to the service template:
--delete-vm-templates: this will delete all the VM templates associated and the service template.--delete-images: this will delete all the VM templates and images associated and the service template.
You can also create and manage Service Templates from Sunstone.
Automatic delete service if all roles are terminated
Service VMs can be terminated using scheduled actions or VM charters. This can lead to a situation where you have a running service with no VMs associated to it. To avoid this you can use automatic deletion feature.
To enable it, you need to add the following attribute to the service template:
"automatic_deletion": true
Determining when a VM is READY
Depending on the deployment strategy, OneFlow will wait until all the VMs in a specific Role are all in RUNNING state before deploying VMs that belong to a child Role. How OneFlow determines the running state of the VMs can be specified with the checkbox Consider VMs as running only when they report READY status via OneGate available in the Service creation dialog in Sunstone, or the attribute in ready_status_gate in the top level of the Service Template JSON.
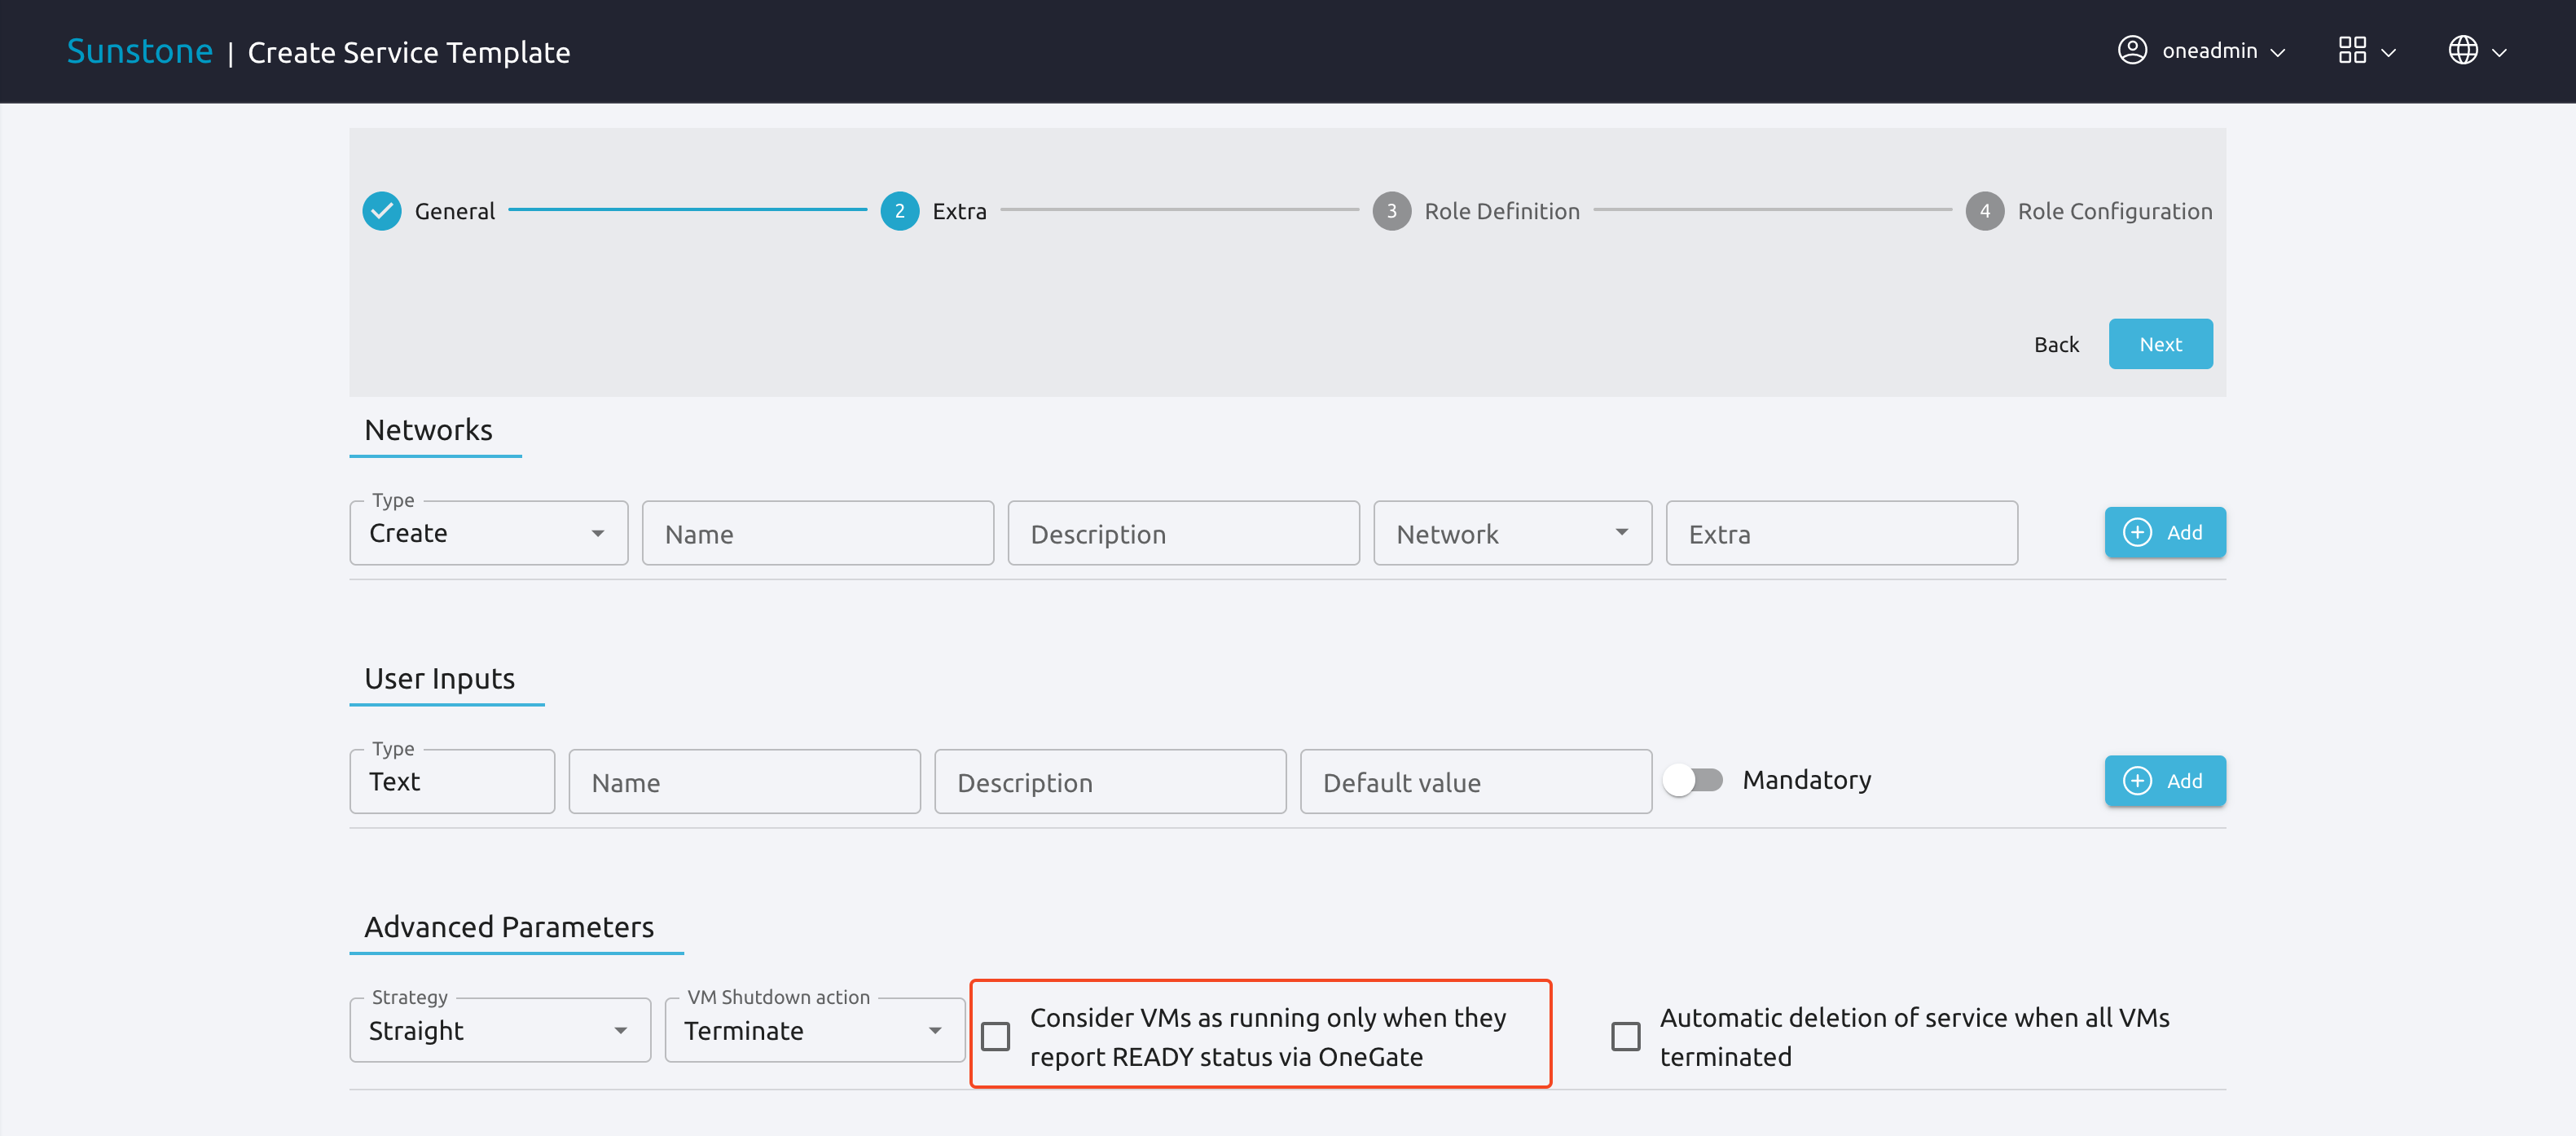
If ready_status_gate is set to true, a VM will only be considered to be in running state the following points are true:
VM is in
RUNNINGstate for OpenNebula. Which specifically means thatLCM_STATE==3andSTATE>=3The VM has
READY=YESin the user template.
If ready_status_gate is set to false, a VM will be considered to be in running state when it’s in running state for OpenNebula (LCM_STATE==3 and STATE>=3). Take into account that the VM will be considered RUNNING the very same moment the hypervisor boots the VM (before it loads the OS).
Configure Dynamic Networks
Each Service Role has a Virtual Machine Template assigned. The VM Template will define the capacity, disks, and network interfaces. Apart from defining the Virtual Networks in the VM Template, the Service Template can define a set of dynamic networks.

Then each Role of the service can be attached to one or more dynamic networks individually. The network can be attached to the Role as an alias. In this case, you need to specify the interface to add the alias by selecting the virtual network it will be attached to. For example the Role, slave in the next picture will have one physical interface attached to the PRIVATE network. This interface will also have a IP alias configured from network PUBLIC.
Additionally you can set if the VMs in the Role exposes an RDP endpoint. Equivalently, you need to specify the IP of the VM for the RDP connection by selecting the virtual network the interface is attached to.
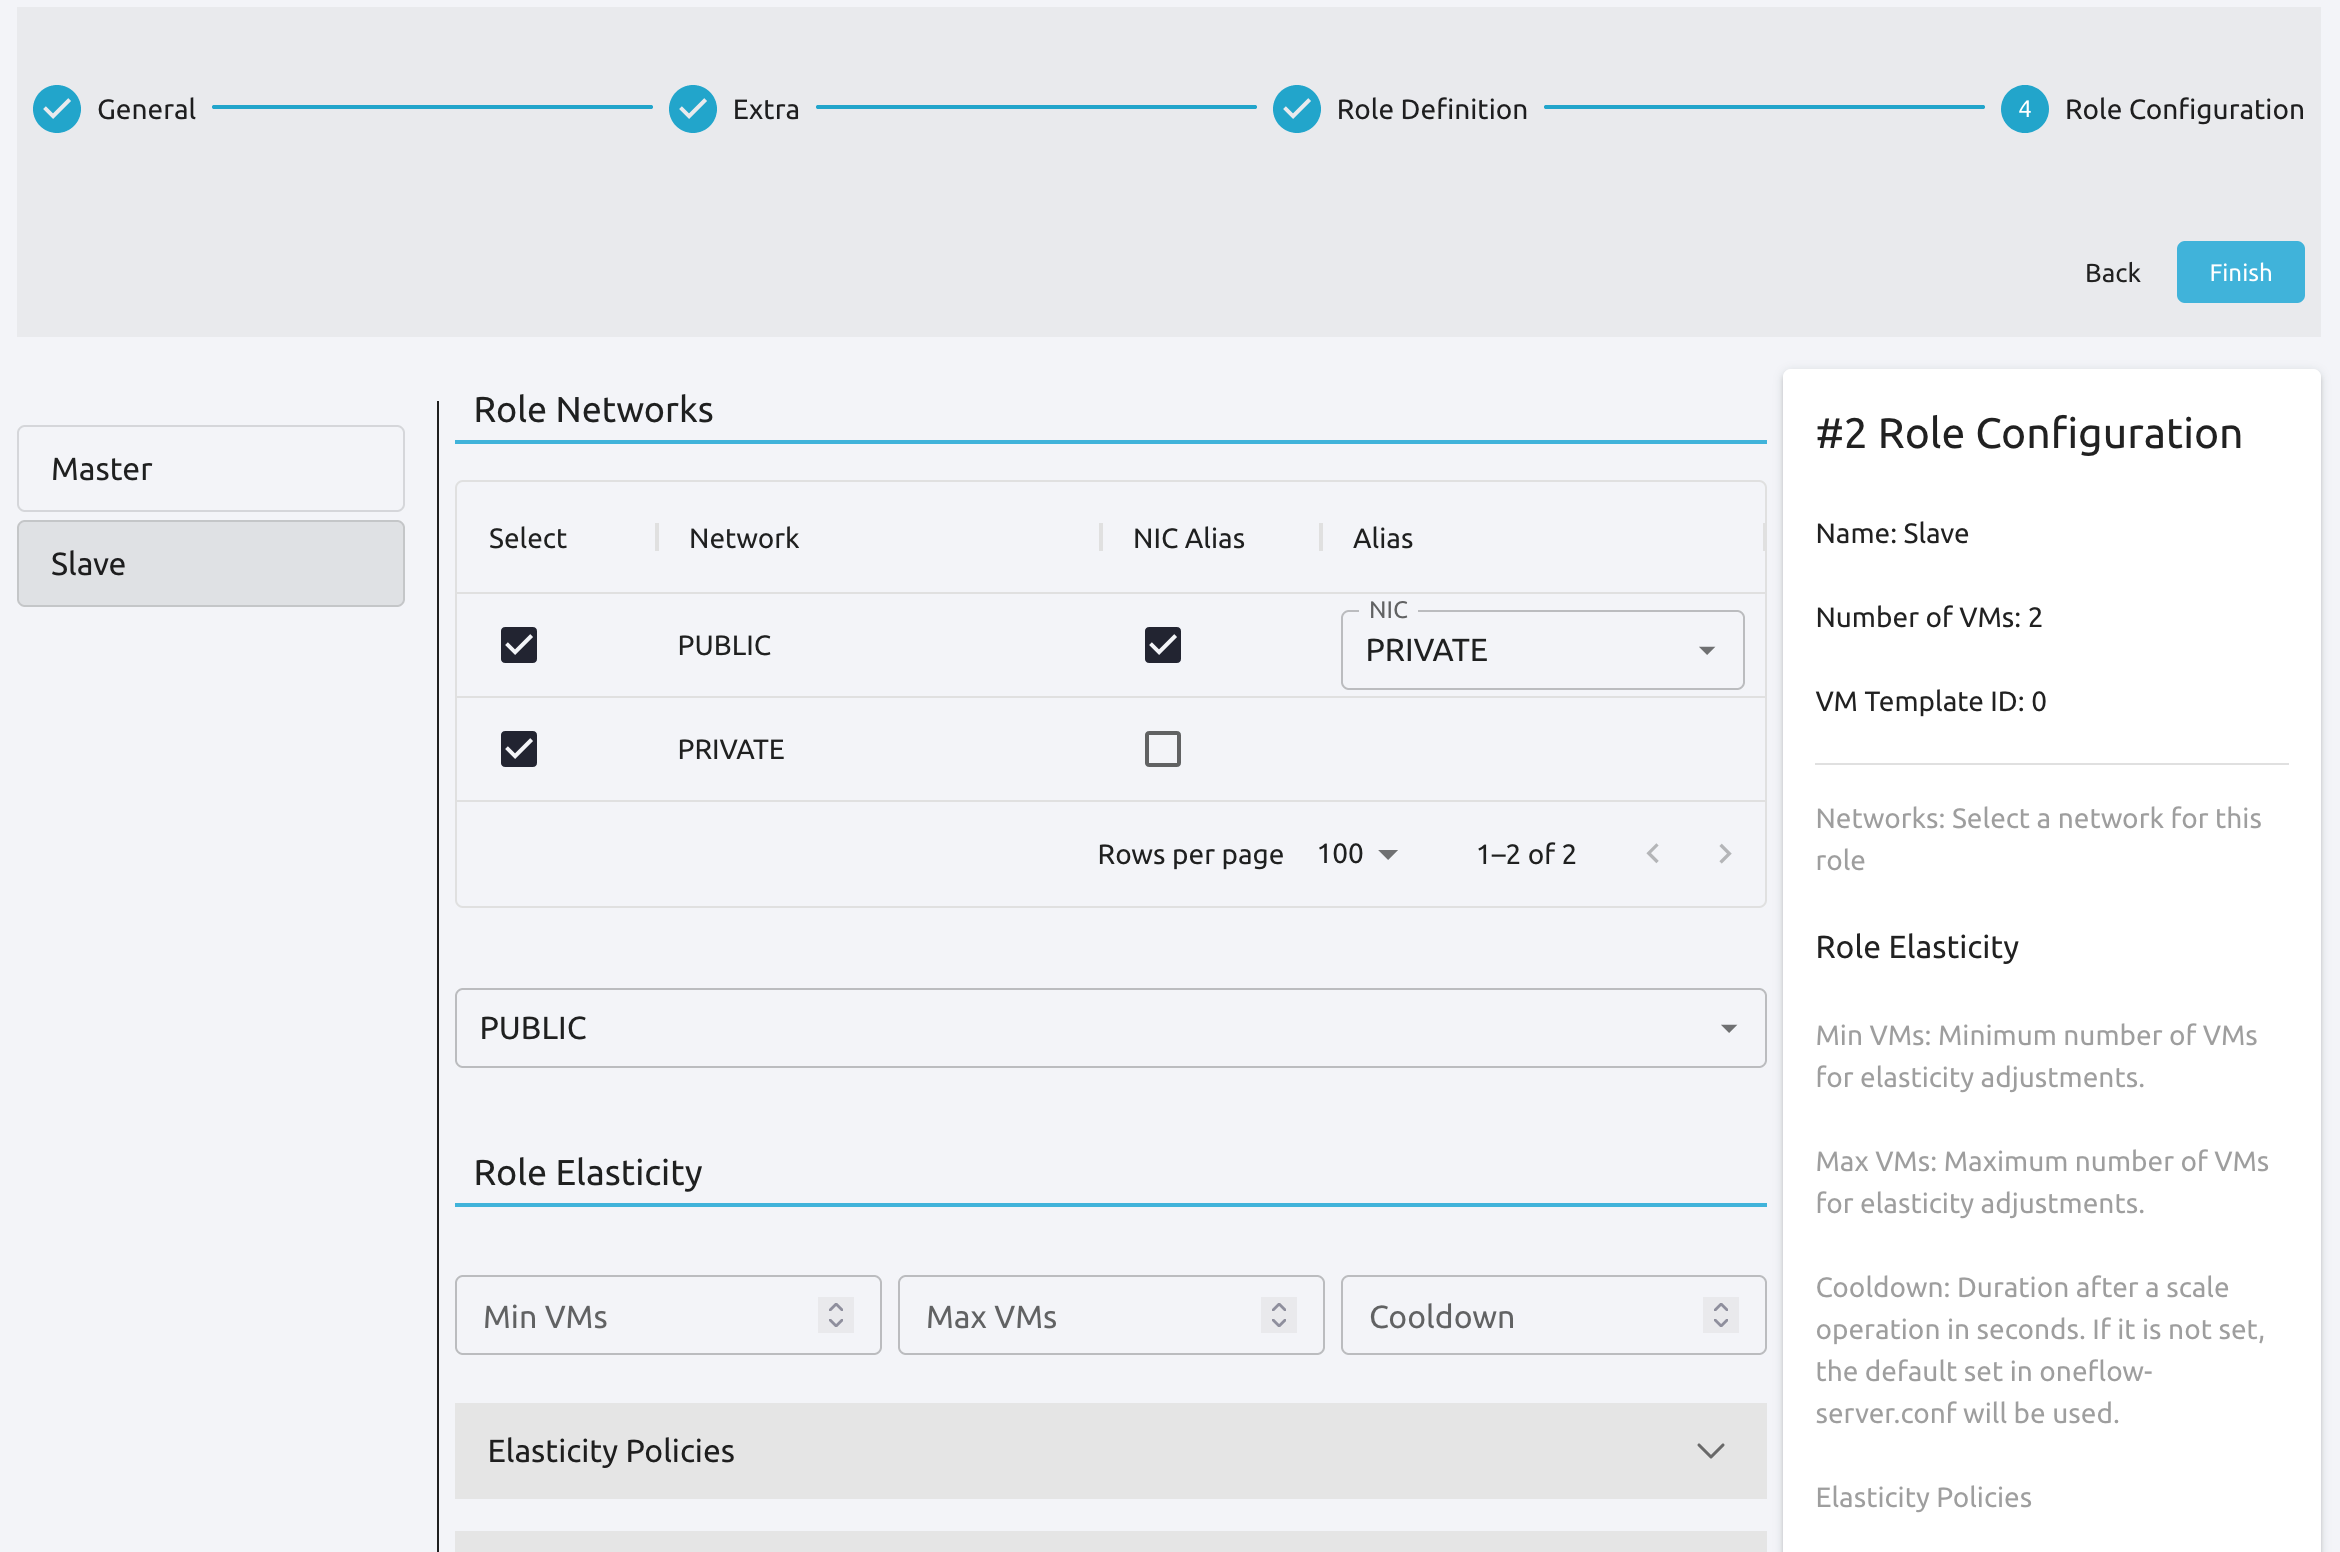
A Service Template can define three different dynamic network modes, that determine how the networks will be used:
Existing Virtual Network: VMs in the Role will just take a lease from that network. You’ll probably use this method for networks with a predefined address set (e.g. public IPs).
Network reservation: in this case it will take the existing network and create a reservation for the service. You have to specify the name of the reservation and the size in the input dialog. Use this method when you need to allocate a pool of IPs for your service.
Instantiate a network template: in this case as an extra parameters you may have to specify the address range to create, depending on the selected network template. This is useful for service private VLAN for internal service communication.
This allows you to create more generic Service Templates. For example, the same Service Template can be used by users of different groups that may have access to different Virtual Networks.
Note
When the service is deleted, all the networks that have been created are automatically deleted.
Note
You can provide suitable defaults for the dynamic networks
All these operations can be also done through the CLI. When you instantiate the template using oneflow-template instantiate <ID> <file>
# Use existing network
{"networks_values": [{"Private":{"id":"0"}}]}

# Reserve from a network
{"networks_values":[{"Private":{"reserve_from":"0", "extra": ""NAME=RESERVATION\nSIZE=5""}}]}

# Instantiate a network template
{"networks_values": [{"Private":{"template_id":"0", "extra":"AR=[ IP=192.168.122.10, SIZE=10, TYPE=IP4 ]"}}]}
Adding or Overwriting Attributes in Virtual Machine Templates
To enhance or modify the functionality implemented by a Virtual Machine (VM) template of a role, you can use User Inputs and Custom Attributes. These attributes allow you to add more information and context to the template in a key-value format. Below are the main differences between these two attributes:
User Inputs:
user_inputsenable the creation of attributes that OpenNebula will prompt the user for during instantiation. These attributes are added to the context section of the VM, making their values accessible as environment variables within the VM. This feature is useful for creating variables and attributes inside the VM based on user input:{ "name": "User inputs example", "description": "Service using user_inputs", "deployment": "straight", "roles": [ { "name": "master", "vm_template": 0, "cardinality": 1, "vm_template_contents": "CONTEXT = [\nATT_A = \"$ATT_A\"\nATT_B = \"$ATT_B\"\n]" }, { "name": "worker", "vm_template": 1, "cardinality": 2, "vm_template_contents": "CONTEXT = [\nATT_B = \"$ATT_B\"\nATT_C = \"$ATT_C\"\n]" } ], "user_inputs": { "ATT_A": "O|fixed|| |2", "ATT_B": "M|list||0.5,1,2,4|1", "ATT_C": "M|range||512..8192|2048" } }
In OneFlow,
user_inputsfollow the same syntax used for VMs’user_inputs. For more details on configuring allowed values, including default ones, please refer to this section of the documentation.Warning
Users need to manually define the content of the
vm_template_contentto pass the attributes to the VM. Use the conventionATT_NAME = $ATT_NAMEin thevm_template_content. During instantiation, OpenNebula will replace all$ATT_NAMEvariables with their corresponding values.Custom attributes:
custom_attrs_valuesallow you to modify attributes and fields of the VM template. These attributes are added to the root of the VM template document, overwriting the existing information. For example, you can overwrite the CPU and Memory values of a template for a specific role:{ "name": "Custom attributes example", "description": "Service using custom_attributes", "deployment": "straight", "roles": [ { "name": "master", "vm_template": 0, "cardinality": 1 }, { "name": "worker", "vm_template": 1, "cardinality": 2, "vm_template_contents": "CPU = \"$CPU\"\nMEMORY = \"$MEMORY\"" } ], "custom_attrs_values": { "CPU": 2, "MEMORY": 2048 } }
Warning
Similar to user inputs, the content of
vm_template_contentsmust be manually created to use custom attributes. OpenNebula will automatically replace the content of each variable at instantiation time.Custom Attributes Levels
Custom attributes can be defined at two different levels:
Service level: custom attributes are applied to all roles in the service. You can define custom attributes at the service level as follows:
{
  ...
  "roles": [
    {
      "name": "worker"
      "vm_template": 1,
      "vm_template_contents": "ATT_A = \"$ATT_A\"\nATT_B = \"$ATT_B\"\n"
    },
    ...
  ]
  "custom_attrs_values": {
    "ATT_A": "A_VALUE",
    "ATT_B": "B_VALUE"
  },
}
Role level: custom attributes are applied to a single role within the service. Custom attributes can be combined at role and service level, where custom role attributes will take precedence. Below you can see an example of a service with two different roles and custom attributes at service and role level:
{
  ...
  "roles": [
    ...
    {
      "name": "worker",
      "vm_template": 1,
      "vm_template_contents": "ATT_A = \"$ATT_A\"\nATT_B = \"$ATT_B\"\n"
      "custom_attrs_values": {
        "ATT_A": "A_VALUE",
        "ATT_B": "B_VALUE"
      }
    }
  ]
  ...
}
Note
In case you use custom attributes at both levels, the custom attributes at the Role level will take precedence over the custom attributes at the Service level.
Note
Custom attributes will be applied to all roles inside
vm_template_contentssection. When custom attributes coexist with user inputs of VM template, custom attributes are preferred to contextualization.{ ... "roles": [ { "name": "worker", "vm_template": 1, "vm_template_contents": "ATT_A = \"$ATT_A\"\n" } ] "custom_attrs_values":{ "ATT_A": "A_VALUE" }, "user_inputs_values": { "ATT_A": "A_VALUE_OTHER"}, }
In this example, if the VM template contents attribute includes CONTEXT = [ ATT_A = “$ATT_A” ] before Service instantiation, after instantiation, it will be updated to CONTEXT = [ ATT_A = “A_VALUE” ].
Adding attributes through CLI
There are two ways, using the CLI, to add User Inputs or Custom Attributes to a Service Template:
Creating a new Service template: attributes can be added to a Service Template by including them in the JSON file used to create the Service Template. For example, to add a new User Input to a Service Template, you can include the User Input in the JSON file used to create the Service Template as shown in the examples above. Then, when you create the Service Template using the
oneflow-template create <file>command, wherefileindicates the path of the JSON file used to create the Service Template.Updating an existing Service template: attributes can be added to an existing Service Template by updating the template of the Service Template. To achieve this, you can use the
oneflow-template update <ID>command. This command will open an editor where you can add the new attributes to the Service Template. Alternatively, you can use theoneflow-template update <ID> <file>command to update the Service Template with the attributes included in the specified file.
Adding attributes through Sunstone
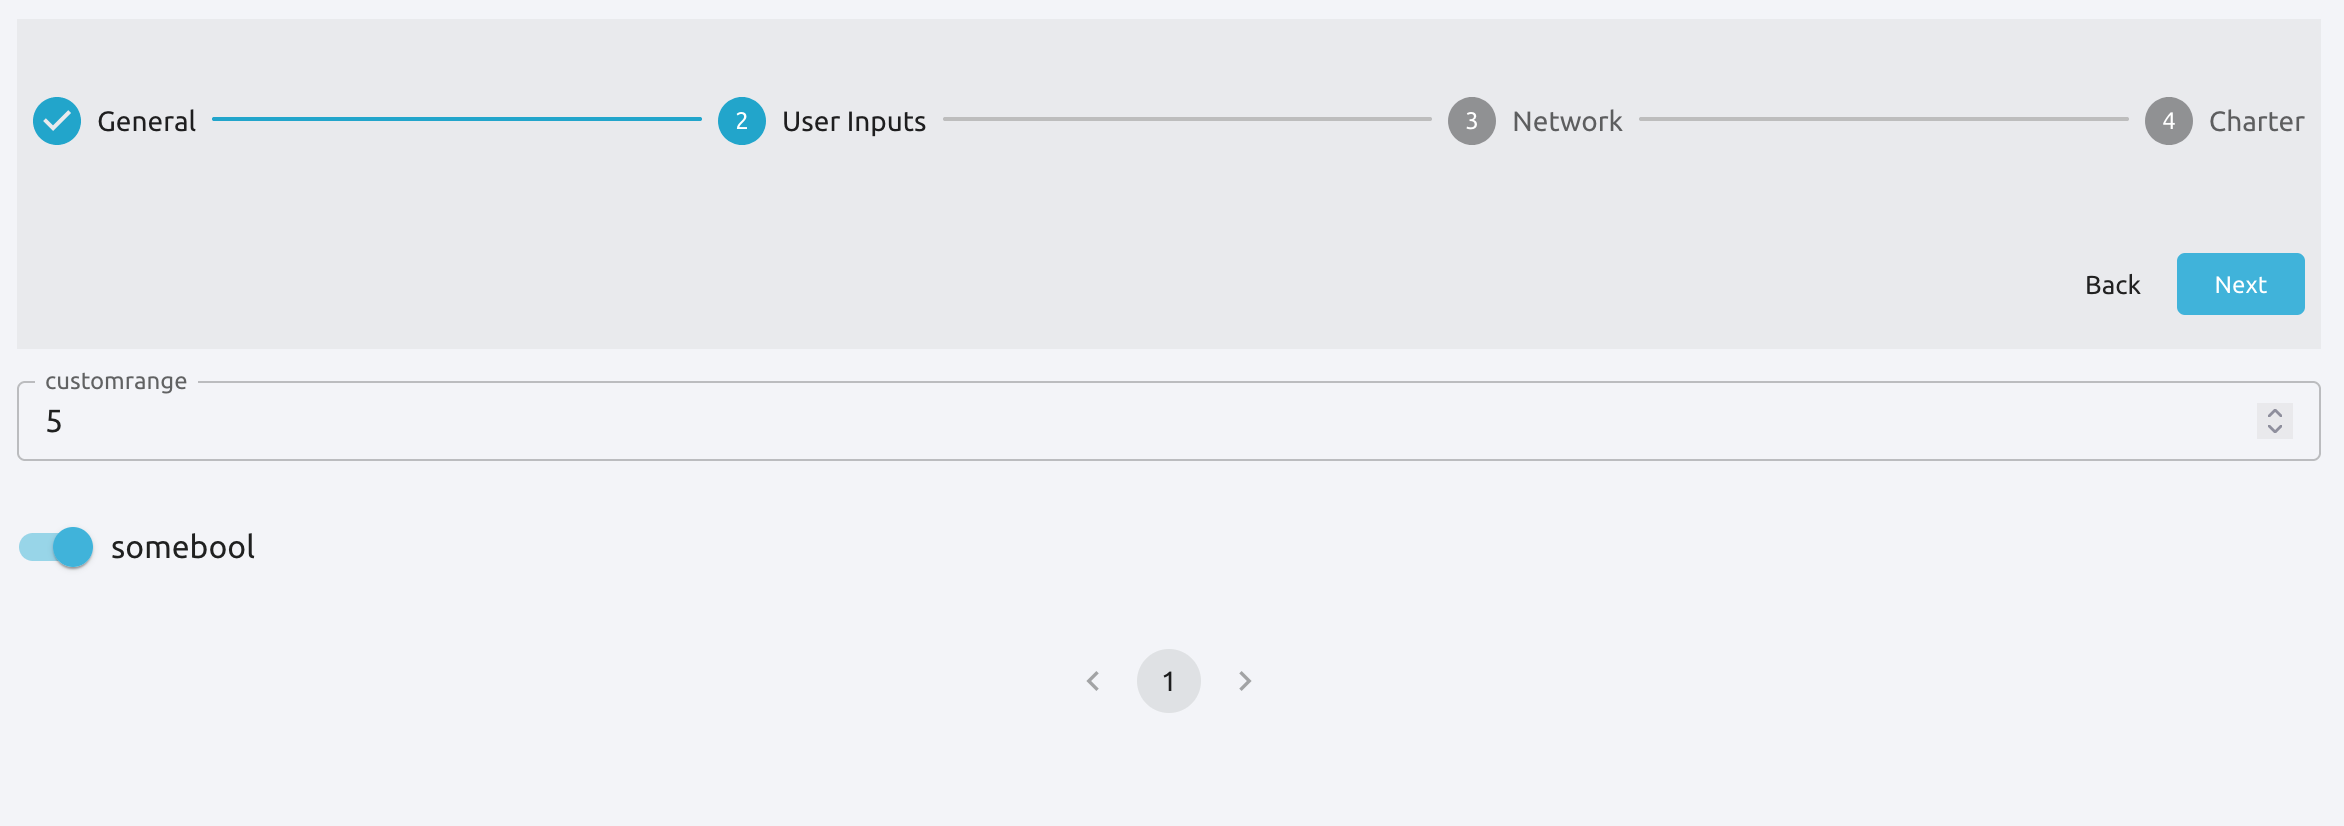
From Sunstone, you can add User Inputs as fields during the creation of the OneFlow service template or updating an already existing one in the following form:
Note
Currently, Custom Attributes are not supported in Sunstone. In order to add custom attributes, you need to use the CLI.
Clone a Service Template
A service template can be cloned to produce a copy, ready to be instantiated under another name. This copy can be recursive, so all the VM Templates forming the service will be cloned as well, and referenced from the cloned service.
The oneflow-template clone (with the optional --recursive flag) can be used to achieve this, as well as from the Sunstone service template tab.
If the name of the VM template + Service Template exceed 128 chars, VM template name will be cropped.
Note
Scheduled Actions cannot be defined in VM Templates if they are intended to be used as part of Service Templates. Please remove them prior to instantiate a service to avoid indeterministic behaviour.
Managing Services
A Service Template can be instantiated as a Service. Each newly created Service will be deployed by OneFlow following its deployment strategy.
Each Service Role creates Virtual Machines in OpenNebula from VM Templates, that must be created beforehand.
Create and List Existing Services
New Services are created from Service Templates, using the oneflow-template instantiate command:
oneflow-template instantiate 0
ID: 1
To list the available Services, use oneflow list/top:
oneflow list
ID USER            GROUP           NAME          STARTTIME          STATE
 1 oneadmin        oneadmin        my_service    10/28 17:42:46     PENDING
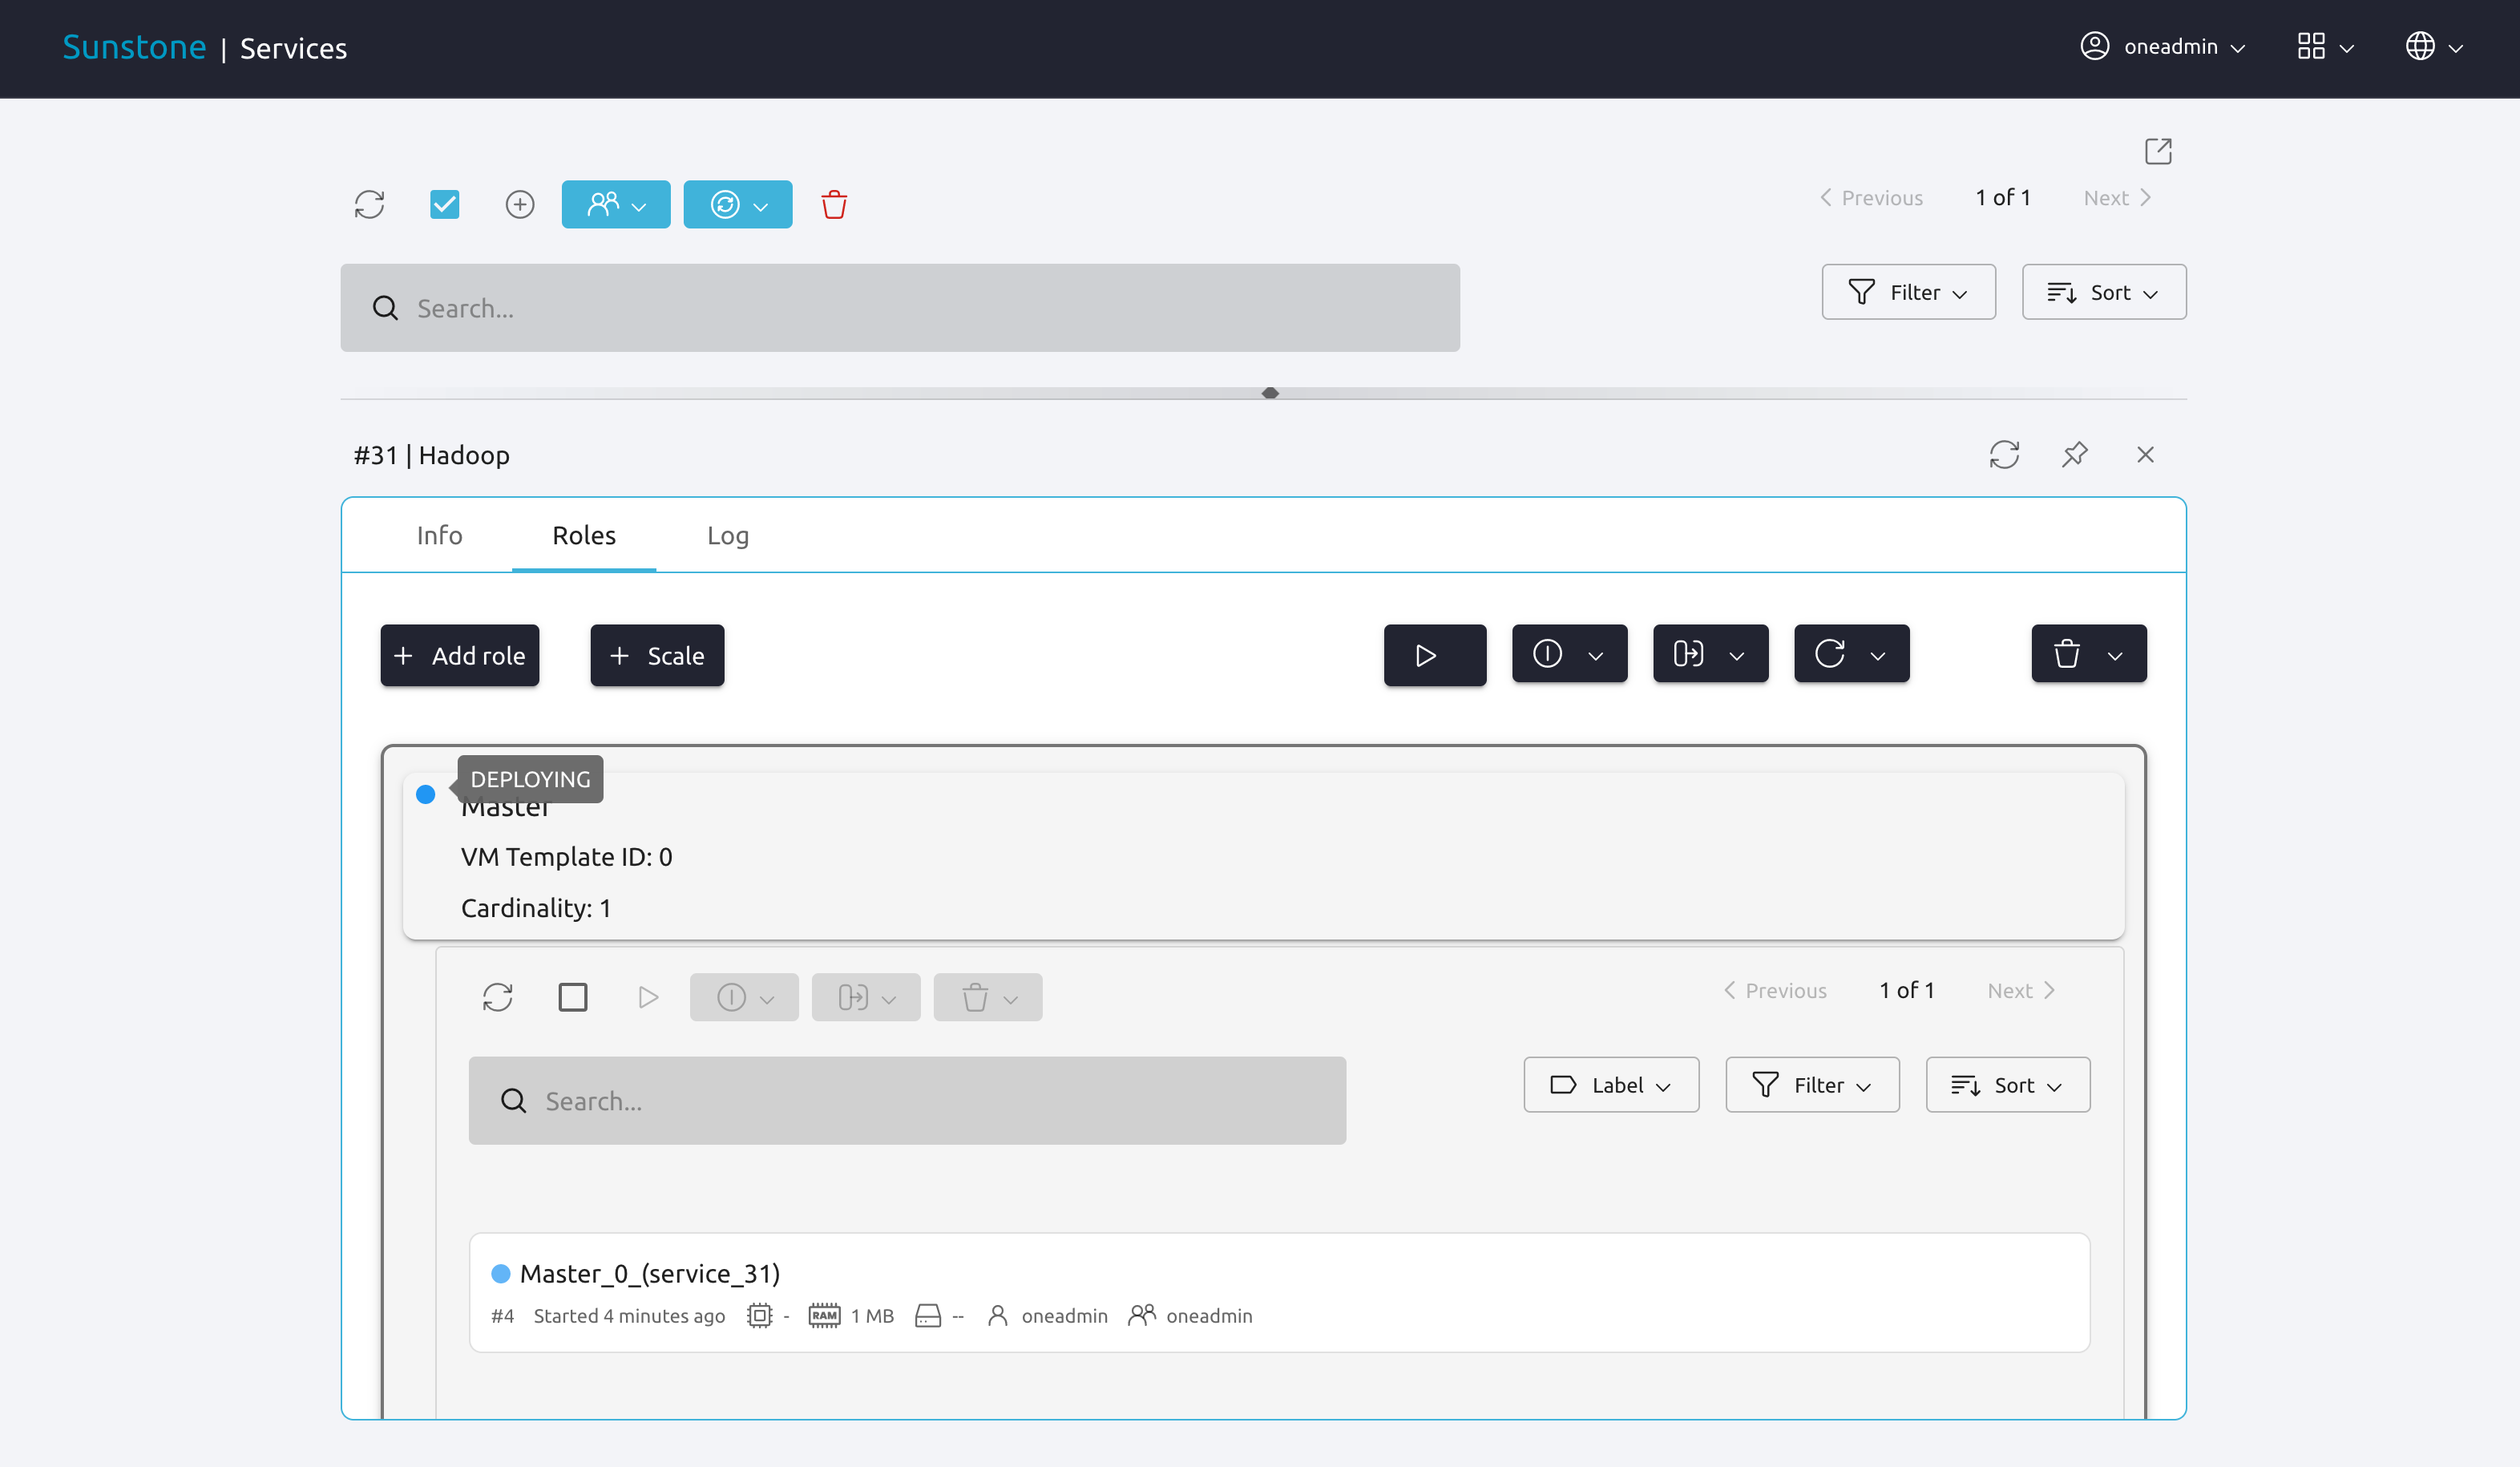
The Service will eventually change to DEPLOYING_NETS. You can see information for each Role using oneflow show.
Life-cycle
The deployment attribute defines the deployment strategy that the Life Cycle Manager (part of the oneflow-server) will use. These two values can be used:
none: all Roles are deployed at the same time.
straight: each Role is deployed when all its parent Roles are
RUNNING.
Regardless of the strategy used, the Service will be RUNNING when all of the Roles are also RUNNING.
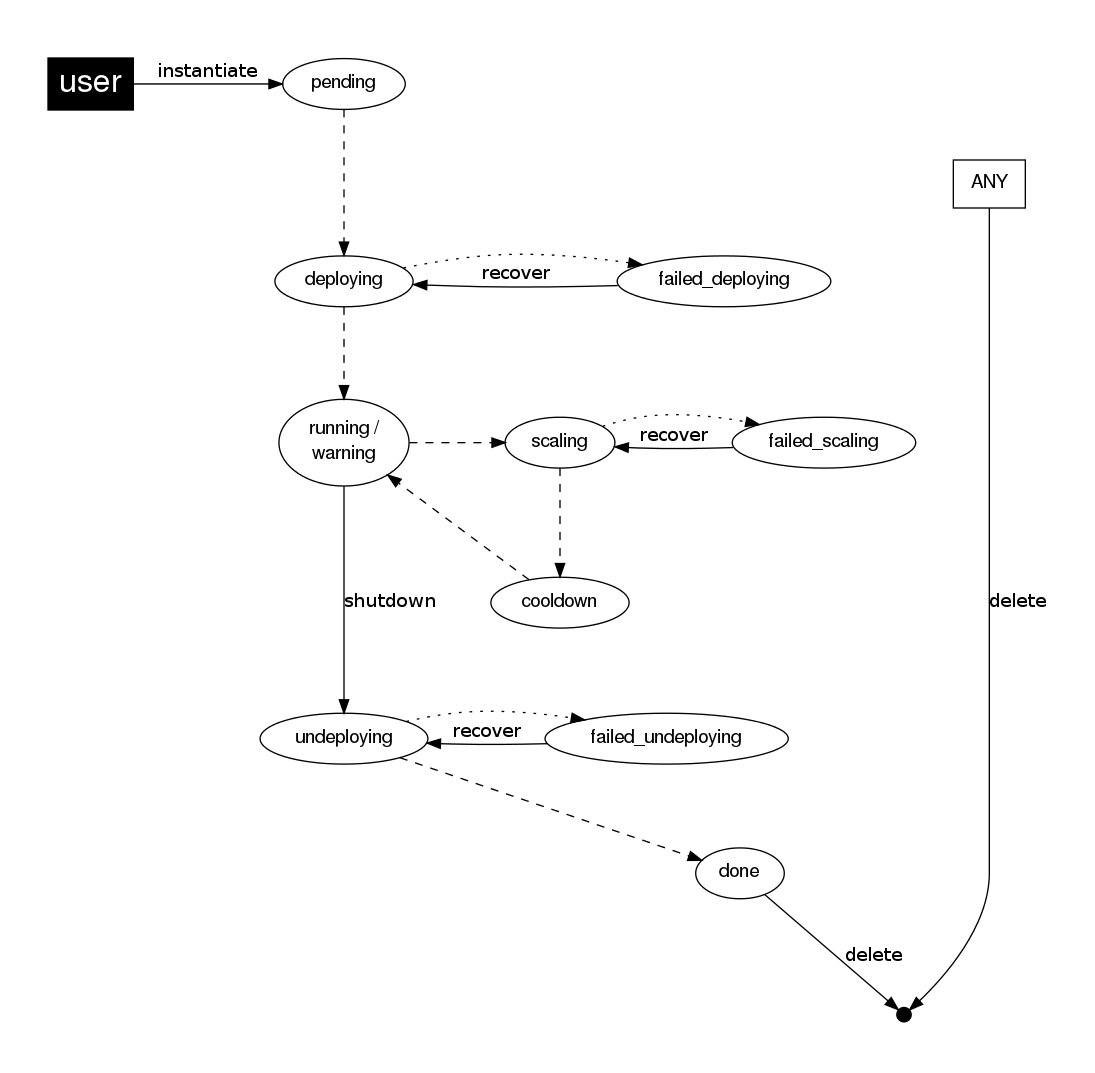
This table describes the Service states:
Service State |
Meaning |
|---|---|
|
The Service starts in this state, and will stay in it until the LCM decides to deploy it. |
|
All roles are in hold state. |
|
Some Roles are being deployed. |
|
Service networks are being deployed, they are in |
|
All Roles are deployed successfully. |
|
A VM was found in a failure state. |
|
A Role is scaling up or down. |
|
A Role is in the cooldown period after a scaling operation. |
|
Some Roles are being undeployed. |
|
Service networks are being undeployed, they are in |
|
An error occurred while deploying the Service. |
|
An error occurred while deploying the Service networks. |
|
An error occurred while undeploying the Service. |
|
An error occurred while undeploying the Service networks. |
|
An error occurred while scaling the Service. |
Each Role has an individual state, described in the following table:
Role State |
Meaning |
|---|---|
|
The Role is waiting to be deployed. |
|
The VMs are |
|
The VMs are being created, and will be monitored until all of them are |
|
All the VMs are |
|
A VM was found in a failure state. |
|
The Role is waiting for VMs to be deployed or to be shutdown. |
|
The Role is in the cooldown period after a scaling operation. |
|
The VMs are being shutdown. The Role will stay in this state until all VMs are |
|
An error occurred while deploying the VMs. |
|
An error occurred while undeploying the VMs. |
|
An error occurred while scaling the Role. |
Life-Cycle Operations
Services are deployed automatically by the Life Cycle Manager. To undeploy a running Service, users can use the command oneflow delete.
The command oneflow delete will perform a graceful a terminate on all the running VMs (see onevm terminate). If the straight deployment strategy is used, the Roles will be shutdown in the reverse order of the deployment.
If any of the VM terminate operations can’t be performed, the Service state will show FAILED state, to indicate that manual intervention is required to complete the cleanup. In any case, the Service can be completely removed using the command oneflow recover --delete.
When a Service fails during a deployment, undeployment or scaling operation, the command oneflow recover can be used to retry the previous action once the problem has been solved.
In order to delete all the services in DONE state, to free some space in your database, you can use the command oneflow purge-done.
Instantiation of roles with VMs on hold
VMs of a Service can be instances on hold with the on_hold parameter set to true in the Service Template.
{
  "name": "my_service",
  "deployment": "straight",
  "on_hold": true|false,
  "roles": [
    {
      ...
    }
  ]
}
This option can also be set at the Role level, where only one specific Role is instantiated in HOLD, instead of the whole service. For example:
{
  "name": "my_service",
  "deployment": "straight",
  "roles": [
    {
      "name": "frontend",
      "vm_template": 0,
      "on_hold": true|false
    },
    ...
  ]
}
Once you want to release the Roles, you can use the oneflow release command to release the Service:
oneflow release <SERVICE_ID>
Adding or Removing Roles from a Running Service
Important
Roles can be only added/removed when the service is in RUNNING state.
In order to add a role to a running service you can use the command oneflow add-role. You need to provide a valid JSON with the role description, for example:
cat role.tmpl
{
    "name": "MASTER",
    "cardinality": 1,
    "vm_template": 0,
    "min_vms": 1,
    "max_vms": 2,
    "elasticity_policies": [],
    "scheduled_policies": []
}
oneflow add-role 0 role.tmpl
After adding the role, the service will go to DEPLOYING state and when the VMs are created, it will go to RUNNING.
Note
Networks and custom attributes are supported, so if the new role has some of them, they will be evaluated.
Note
Before adding the role, the JSON is checked, to see that it follows the schema.
In order to remove a role from a running service you can use the command oneflow remove-role, for example:
oneflow remove-role 0 MASTER
After removing the role, the service will go to UNDEPLOYING state and when the VMs are removed, it will go to RUNNING.
Managing Permissions
Both Services and Template resources are completely integrated with the OpenNebula user and group management. This means that each resource has an owner and group, and permissions. The VMs created by a Service are owned by the Service owner, so he can list and manage them.
To change the owner and group of the Service, we can use oneflow chown/chgrp.
Note
The Service’s VM ownership is also changed.
All Services and Templates have associated permissions for the owner, the users in its group, and others. These permissions can be modified with the command chmod.
Please refer to the OpenNebula documentation for more information about users & groups, and resource permissions.
Scheduling Actions on the Virtual Machines of a Role
You can use the action command to perform a VM action on all the Virtual Machines belonging to a Role.
These are the actions that can be performed:
terminateterminate-hardundeployundeploy-hardholdreleasestopsuspendresumerebootreboot-hardpoweroffpoweroff-hardsnapshot-createsnapshot-revertsnapshot-deletedisk-snapshot-createdisk-snapshot-revertdisk-snapshot-delete
Instead of performing the action immediately on all the VMs, you can perform it on small groups of VMs with these options:
-p, --period x: seconds between each group of actions.-n, --number x: number of VMs to apply the action to each period.
Let’s say you need to reboot all the VMs of a Role, but you also need to avoid downtime. This command will reboot 2 VMs each 5 minutes:
oneflow action my-service my-role reboot --period 300 --number 2
The /etc/one/oneflow-server.conf file contains default values for period and number that are used if you omit one of them.
Note
You can also perform an operation in the whole service using eht command service action. All the above operations and options are supported.
Recovering from Failures
Some common failures can be resolved without manual intervention, calling the oneflow recover command. This command has different effects depending on the Service state:
State |
New State |
Recover action |
|---|---|---|
|
|
VMs in |
|
|
The undeployment is resumed. |
|
|
VMs in |
|
|
The Service is simply set to running before the cooldown period is over. |
Update Service
You can update a service in RUNNING state, to do that you need to use the command oneflow update <service_id>. You can update all the values, except the following ones:
Service
custom_attrs: it only has sense when deploying, not in running.
custom_attrs_values: it only has sense when deploying, not in running.
deployment: changing this, changes the undeploy operation.
log: this is just internal information, no sense to change it.
name: this has to be changed using rename operation.
networks: it only has sense when deploying, not in running.
networks_values: it only has sense when deploying, not in running.
ready_status_gate: it only has sense when deploying, not in running.
state: this is internal information managed by OneFlow server.
Role
cardinality: this is internal information managed by OneFlow server.
last_vmname: this is internal information managed by OneFlow server.
nodes: this is internal information managed by OneFlow server.
parents: this has only sense in deploy operation.
state: this is internal information managed by OneFlow server.
vm_template: this will affect scale operation.
Warning
If you try to change one of these values above, you will get an error. The server will also check the schema in case there is another error.
Note
If you change the value of min_vms the OneFlow server will adjust the cardinality automatically. Also, if you add or edit elasticity rules they will be automatically evaluated.
Note
You can use the flag --append to append new information to the service.
Advanced Usage
Elasticity
Please refer to elasticity documentation guide.
VM Template override
Each role is backed by a VM Template. Once the VM is instantiated, the resulting VM will inherit the attributes defined in the VM Template. You can pass extra attributes at the moment of the VM instantiation by using the vm_template_contents option within each role.
For example, the following service template will make sure that the VMs created backing the role FAAS will have capacity hotplug functionality.
root@provisionengine-test-env:~# oneflow-template show 241
SERVICE TEMPLATE 241 INFORMATION
ID                  : 241
NAME                : Function
USER                : oneadmin
GROUP               : oneadmin
REGISTRATION TIME   : 10/04 21:16:34

PERMISSIONS
OWNER               : um-
GROUP               : ---
OTHER               : ---

TEMPLATE CONTENTS
{
  "name": "Function",
  "deployment": "straight",
  "description": "",
  "roles": [
    {
      "name": "FAAS",
      "cardinality": 1,
      "vm_template": 0,
      "shutdown_action": "terminate-hard",
      "elasticity_policies": [

      ],
      "scheduled_policies": [

      ],
      "vm_template_contents": "HOT_RESIZE=[CPU_HOT_ADD_ENABLED=\"YES\",\nMEMORY_HOT_ADD_ENABLED=\"YES\"]\nMEMORY_RESIZE_MODE=\"BALLOONING\"\nVCPU_MAX= \"2\"\nMEMORY_MAX=\"128\""
    }
  ],
  "ready_status_gate": false,
  "automatic_deletion": false,
  "registration_time": 1696454194
}
Network mapping & Floating IPs
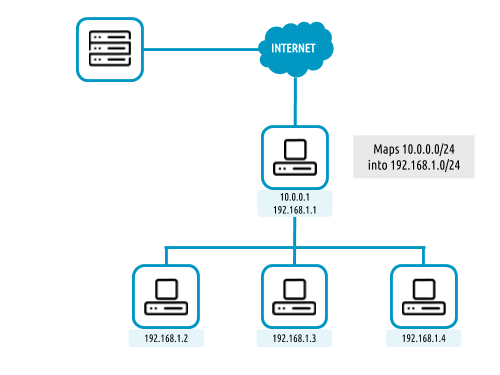
Network mapping can be achieved by using OneFlow and OneGate together. A few steps are required for mapping IP addresses from an internal network into an external one, as shown in the image below:
Upload the Network Mapping script
First of all, it is necessary to upload the Network Mapping script to a Kernels & Files Datastore. Simply, Create a file of type Context in the File Datastore using /usr/share/one/start-scripts/map_vnets_start_script. Note that you may need to add /usr/share/one/start-script path to SAFE_DIRS attribute of the Files Datastore.
Preparing the Router Virtual Machine Template
A custom Virtual Machine template acting as router is also needed. Steps similar to those below should be followed:
Storage. Choose a disk image. For instance, a light weight Alpine that can be get on OpenNebula Systems MarketPlace.
Network. You may want to set
virtioasDefault hardware model to emulate for all NICs.Context:
Configuration:
Add OneGate tokenmust be checked (this is also applicable to all templates used in the Service Template).¡Copy the contents of
/usr/share/one/start-scripts/cron_start_scriptinStart script.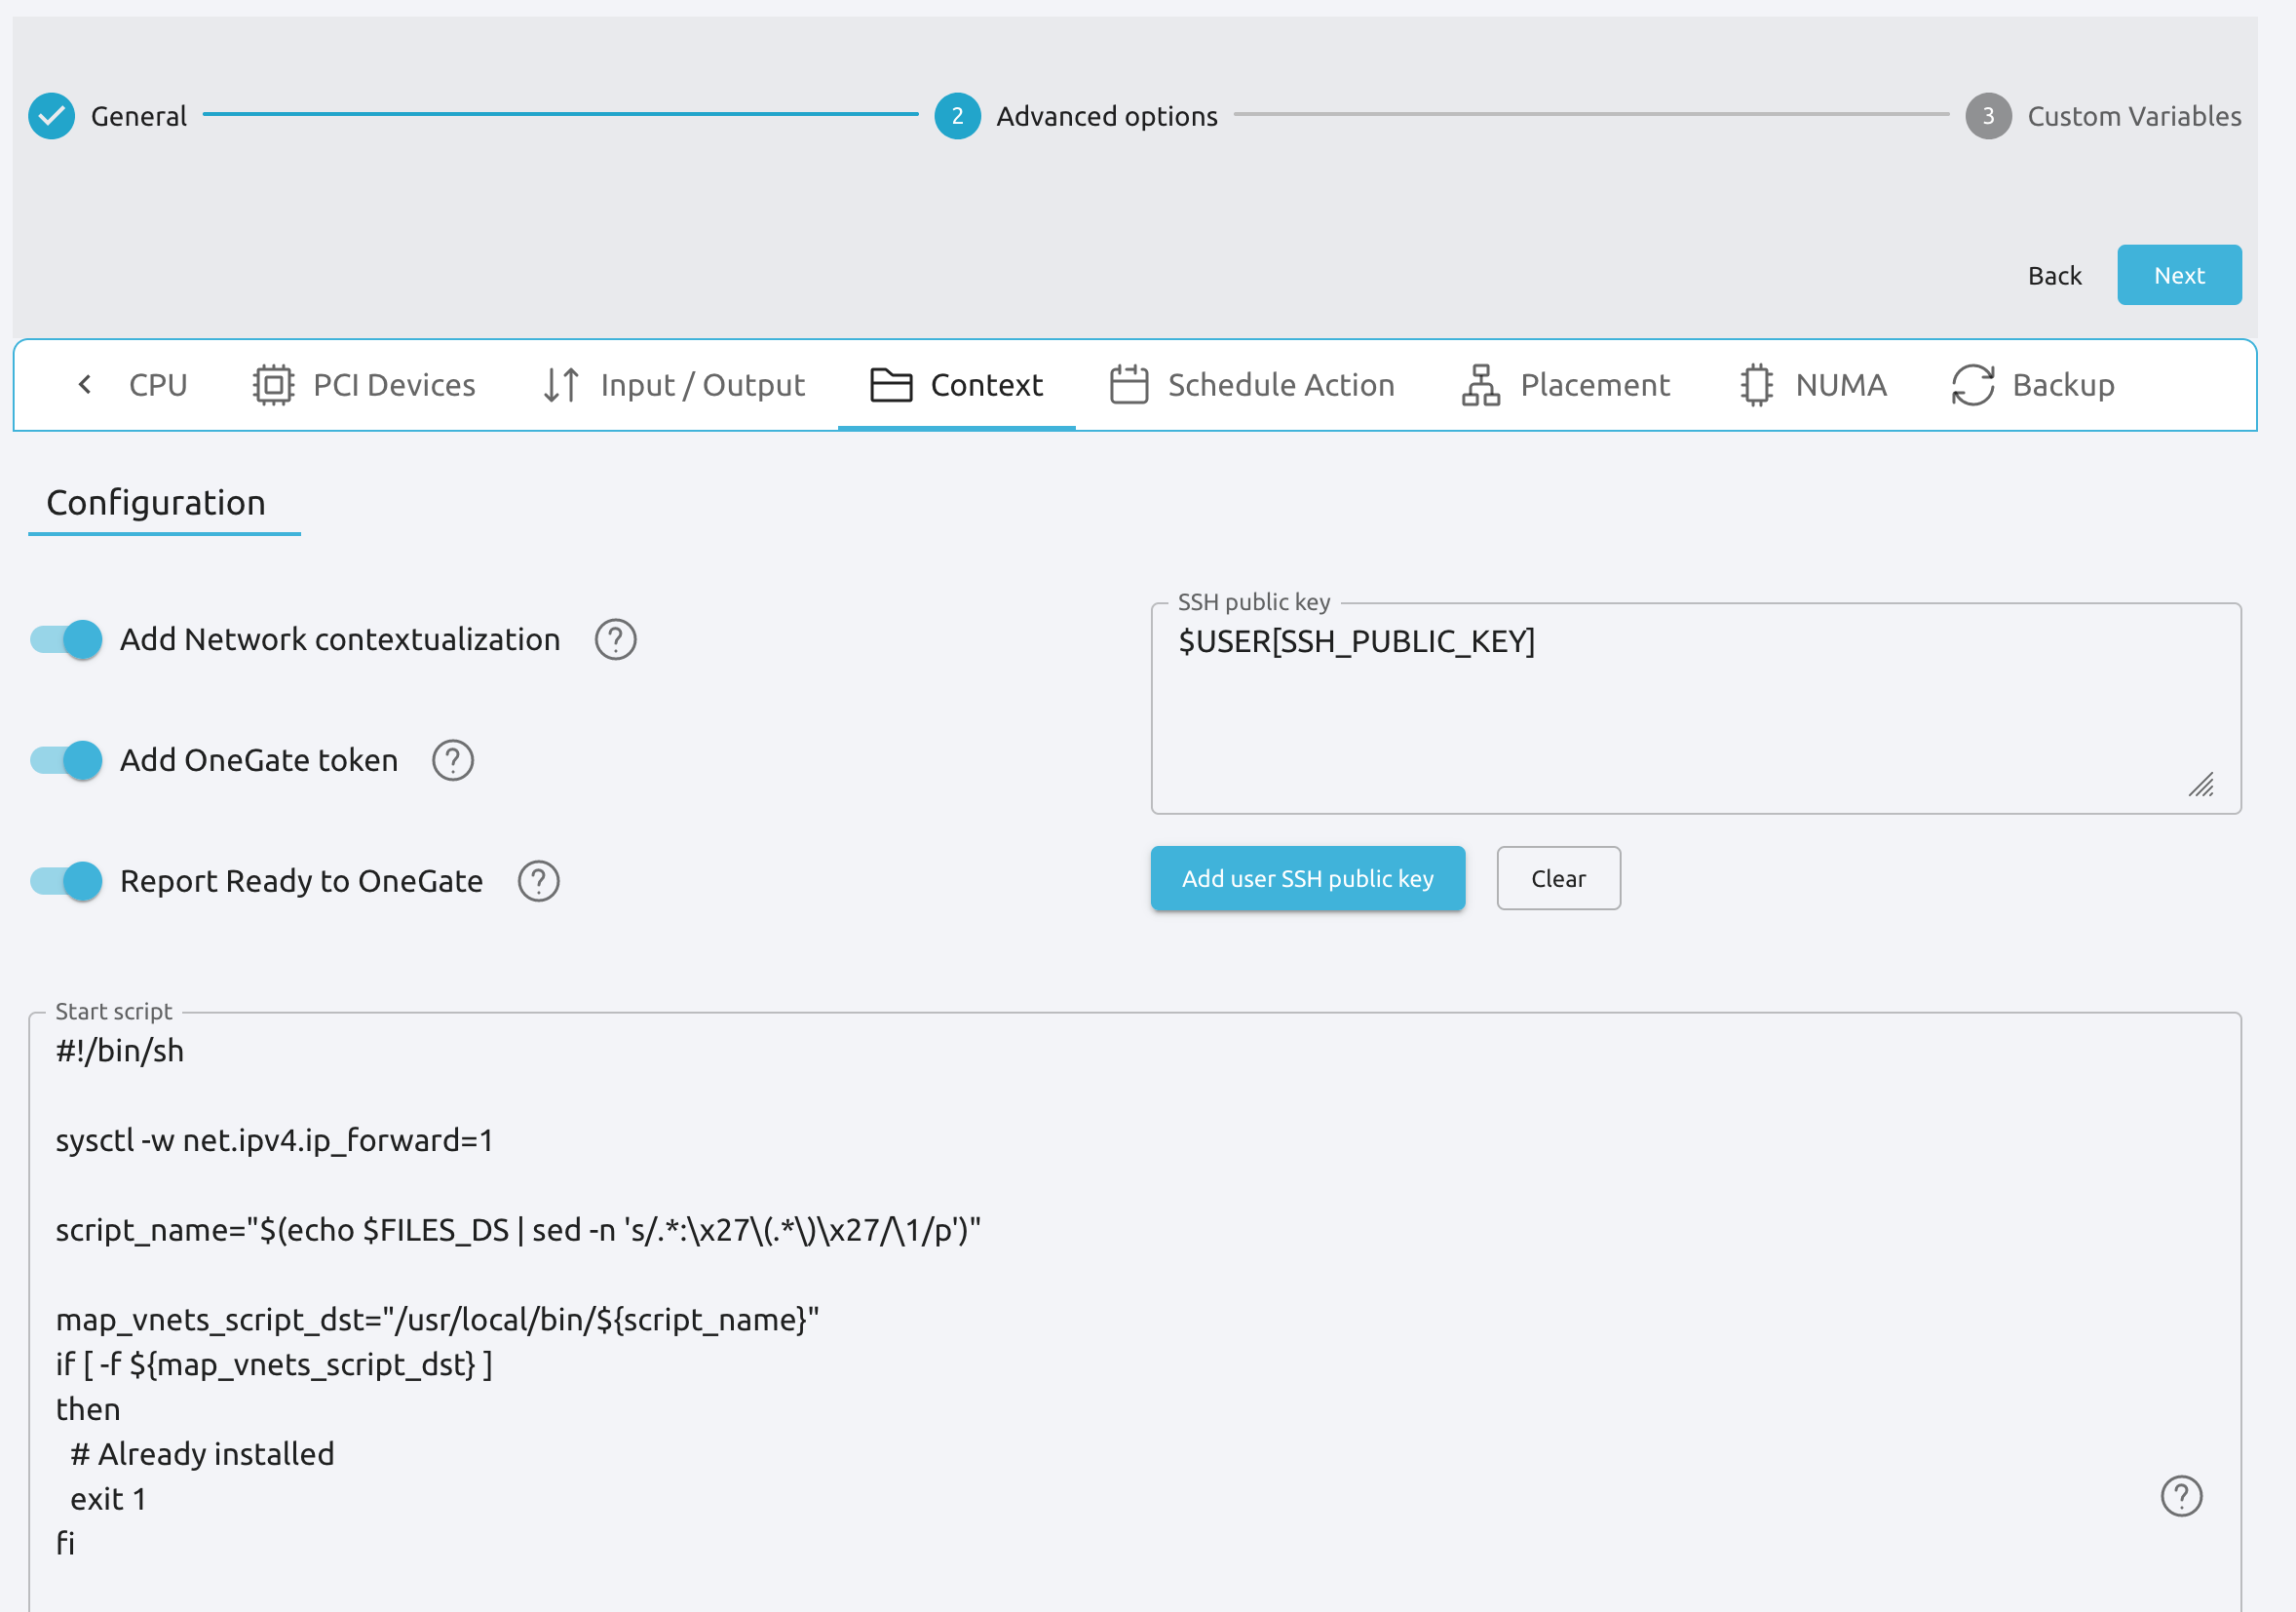
Files. Select the network mapping script previously uploaded to the File Datastore.
Prepare the Service Template
As an example we will create a two-tier server with an external network (Public) and an internal (Private) one for private traffic:
Network configuration. Declare the Public and Private networks to be used on instantiation. See Dynamic Networks section above.
Role
router. Select the previously created Router Virtual Template, and checkPrivateandPublicinNetwork Interfaces.Role
worker. Select a Virtual Machine Template, check onlyPrivateinNetwork Interfaces, and checkrouterinParent rolesto set up a deploy dependency.
Instantiate the Service Template
At this point the Service Template can be instantiated. If a NIC_ALIAS on Pulic network is attached to any of the virtual machines on the worker role, the specific machine can be reached by using the IP address assigned to the NIC_ALIAS.
$ ping -c1 10.0.0.2
PING 10.0.0.2 (10.0.0.2) 56(84) bytes of data.
64 bytes from 10.0.0.2: icmp_seq=1 ttl=64 time=0.936 ms

--- 10.0.0.2 ping statistics ---
1 packets transmitted, 1 received, 0% packet loss, time 0ms
rtt min/avg/max/mdev = 0.936/0.936/0.936/0.000 ms
If the NIC_ALIAS on Pulic network is detached from the virtual machine, the connectivity -through the previously- assigned IP address is lost. You can re-attach the IP as a NIC_ALIAS to other VM to float the IP.
$ ping -c1 10.0.0.2
PING 10.0.0.2 (10.0.0.2) 56(84) bytes of data.

--- 10.0.0.2 ping statistics ---
1 packets transmitted, 0 received, 100% packet loss, time 0ms
Warning
It takes up to one minute, half a minute on average, to configure the rules on iptables.
Service Charters
This functionality automatically adds scheduling actions in VM when the service is instantiated, for more information of this, please check the VM Charter
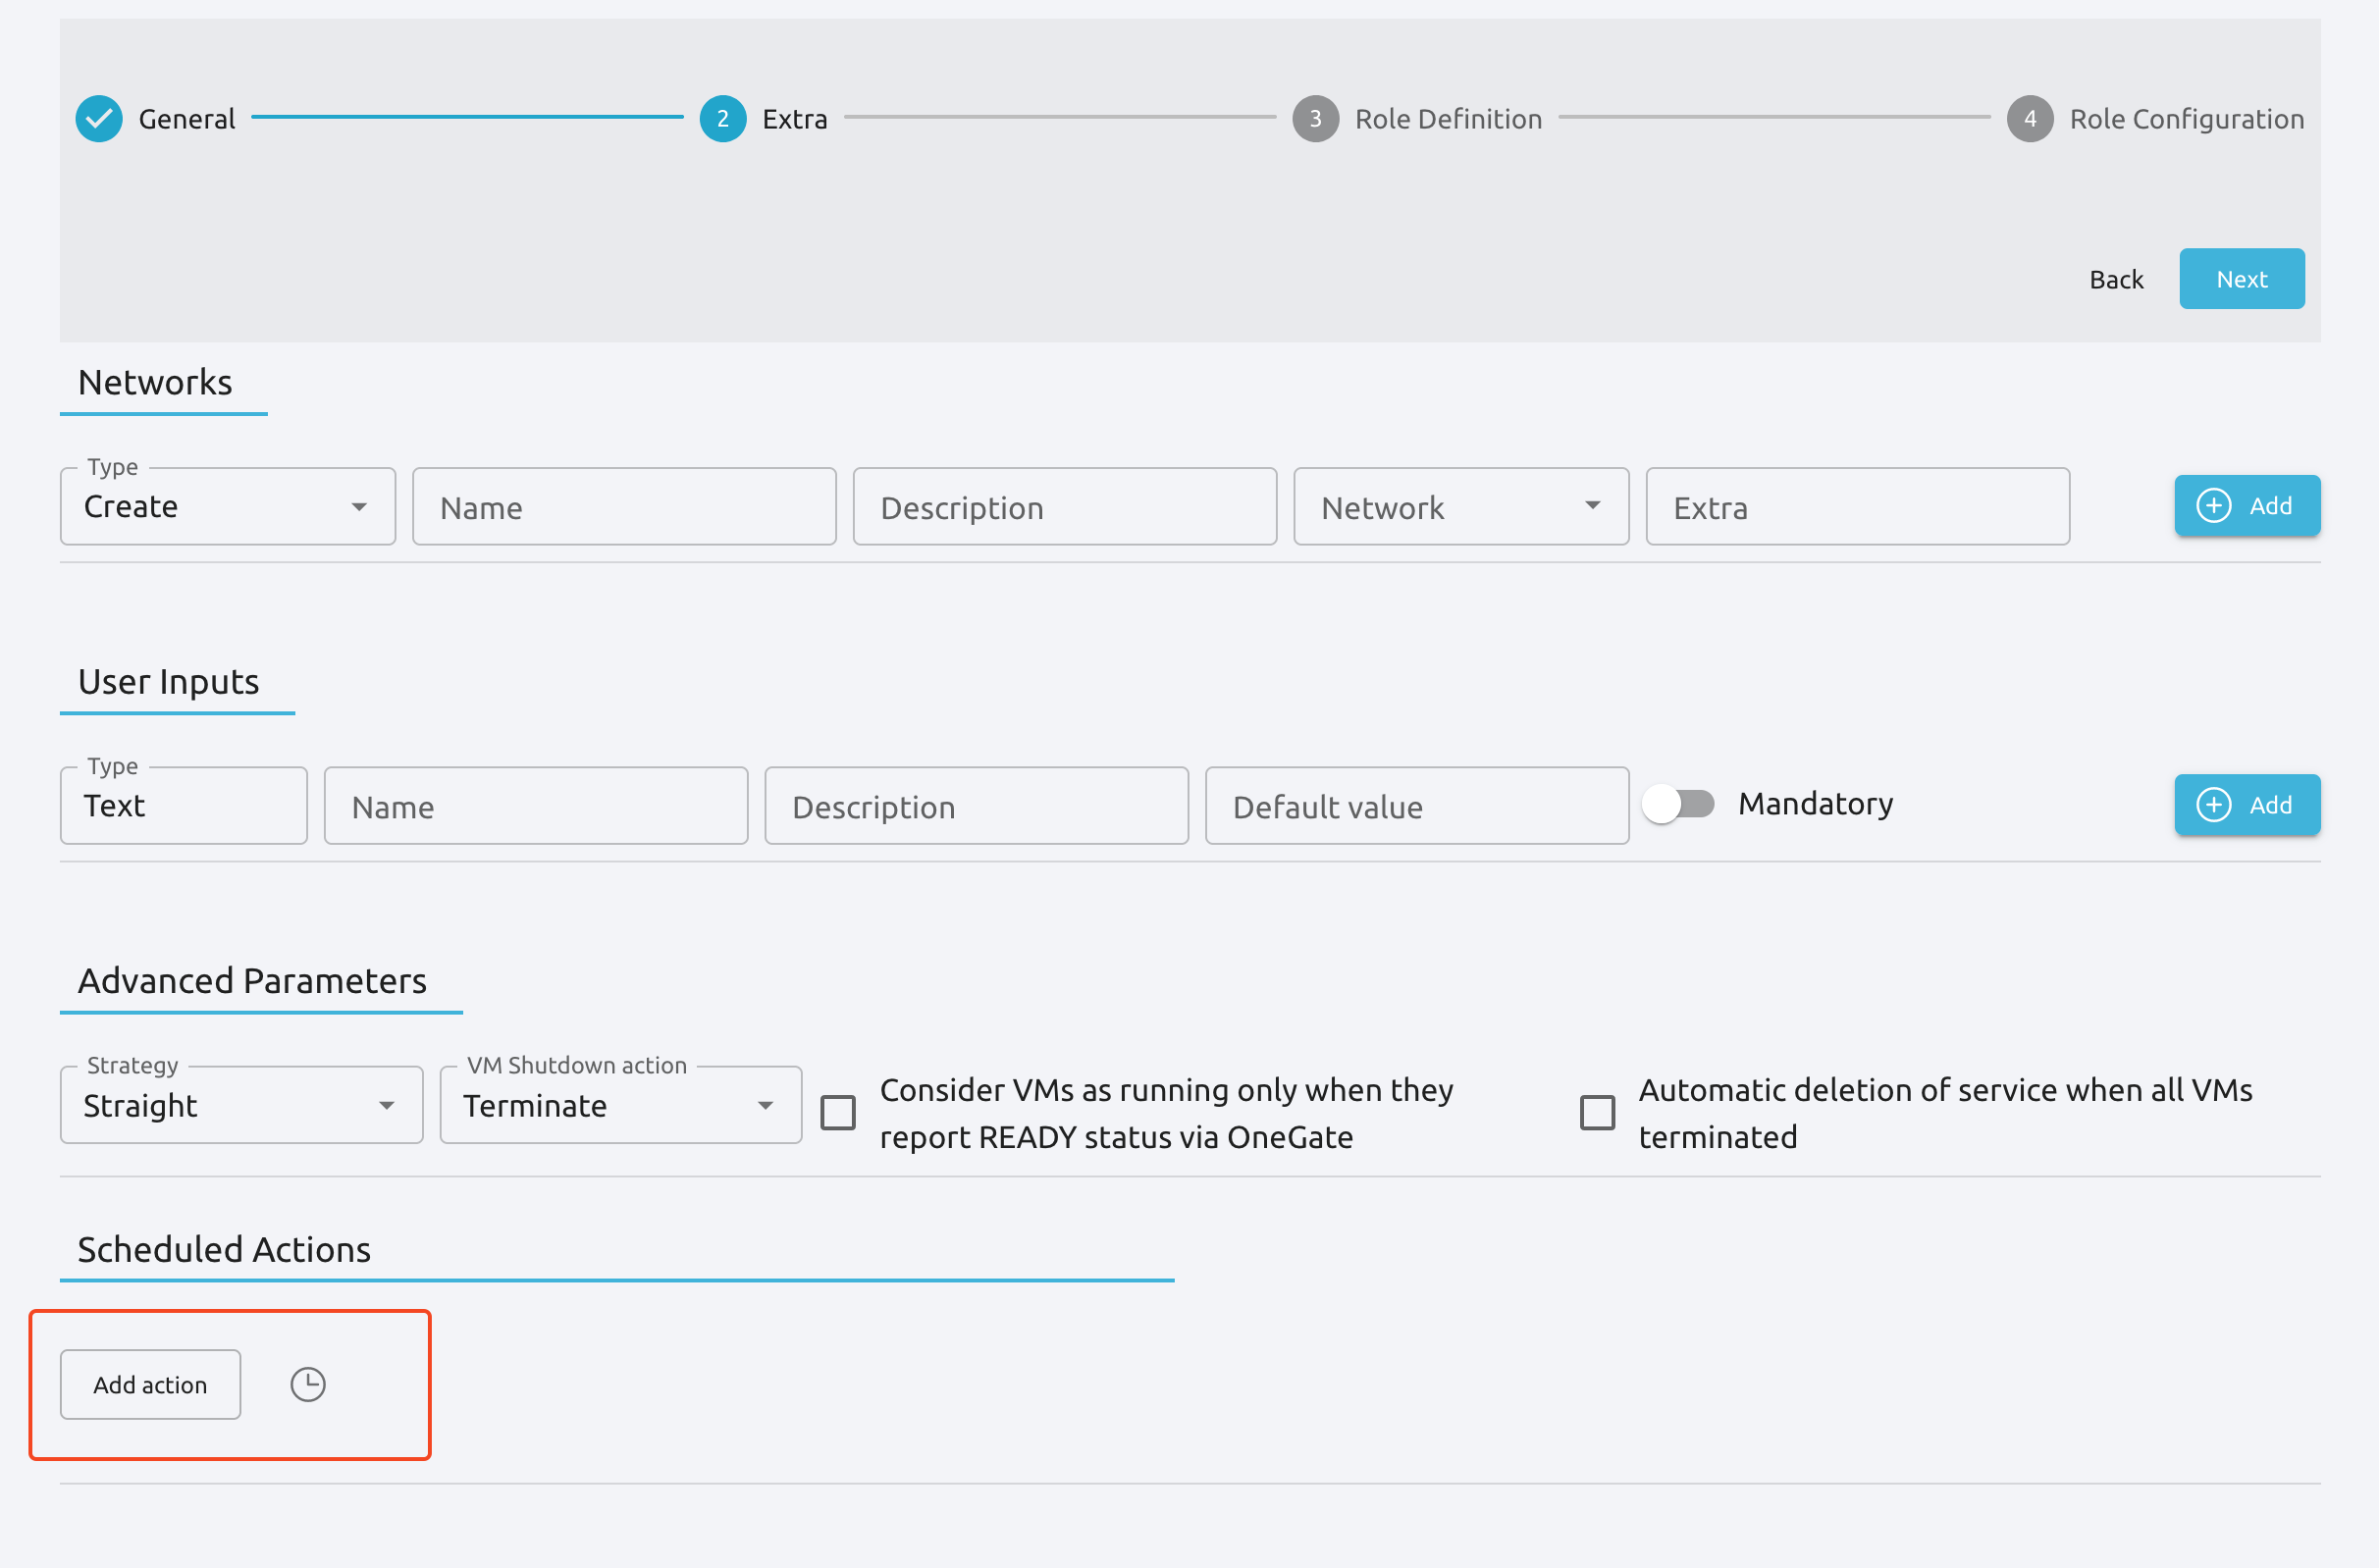
Service Global Parameters
You can define attributes that refer to a parent’s attribute, for example, the parent can push an attribute trough OneGate and its children can use it on their template.
In order to do this, you need to use the following syntax: ${<PARENT_ROLE_NAME>.<XPATH>}:
Parent Role Name: is the parent role that will have the attribute, it’s important to note that the name must be exactly the same as the parent role one.
XPATH: XPATH expression to find the value, it must be separated by
., for example: if the XPATH isTEMPLATE/CONTEXT/TEST, the expression should be${<PARENT_ROLE_NAME>.template.context.test}.
These expressions can be placed inside vm_template_contents attribute, which is the final information that will have the VM, for example:
vm_template_contents": "DB_NAME=${DATABASE.template.context.db_name}
Important
This will only work when using STRAIGHT strategy and when there is a parent relationship. So the attributes must be in the children not in the parent.
Service Template Reference
For more information on the resource representation, please check the API guide