vCenter Driver Setup
The vCenter driver is responsible for the integration of OpenNebula with VMware-based infrastructures. All the interaction between OpenNebula and vSphere is channeled through the vCenter API, except for the VNC console connection where Sunstone server (more specifically, the noVNC server) contacts with the ESX hypervisors directly.
This section lays out the actions needed to incorporate VMware resources into an OpenNebula cloud.
Driver Defaults
vCenter Virtualization Drivers
The following sections in the /etc/one/oned.conf file describe the information and virtualization drivers for vCenter, which are enabled by default:
#-------------------------------------------------------------------------------
#  vCenter Virtualization Driver Manager Configuration
#    -r number of retries when monitoring a host
#    -t number of threads, i.e. number of hosts monitored at the same time
#    -p more than one action per host in parallel, needs support from hypervisor
#    -s <shell> to execute commands, bash by default
#    -w Timeout in seconds to execute external commands (default unlimited)
#-------------------------------------------------------------------------------
VM_MAD = [
    NAME              = "vcenter",
    SUNSTONE_NAME     = "VMWare vCenter",
    EXECUTABLE        = "one_vmm_sh",
    ARGUMENTS         = "-p -t 15 -r 0 -s sh vcenter",
    TYPE              = "xml",
    KEEP_SNAPSHOTS    = "yes",
    DS_LIVE_MIGRATION = "yes",
    COLD_NIC_ATTACH   = "yes",
    LIVE_RESIZE       = "yes",
    IMPORTED_VMS_ACTIONS = "terminate, terminate-hard, hold, release, suspend,
        resume, delete, reboot, reboot-hard, resched, unresched, poweroff,
        poweroff-hard, disk-attach, disk-detach, nic-attach, nic-detach,
        snapshot-create, snapshot-delete, migrate, live-migrate"
]
#-------------------------------------------------------------------------------
IMPORTED_VMS_ACTIONS define which operatons are allowed to be executed on imported VMs (Wild VMs).
As a virtualization driver, the vCenter driver accepts a series of parameters that control its execution. The parameters allowed are:
parameter |
description |
|---|---|
-r <num> |
number of retries when executing an action |
-t <num |
number of threads, i.e. number of actions done at the same time |
See the Virtual Machine drivers reference for more information about these parameters, and how to customize and extend the OpenNebula virtualization drivers. Also, check the specific vCenter driver reference that details how OpenNebula maps and keeps track of vCenter resources.
Additionally, certain behavior of the vCenter driver can be configured in /var/lib/one/remotes/etc/vmm/vcenter/vcenterrc. Check the file to learn what parameters can be changed. An explanation of each option can be found here.
vCenter Datastore Drivers
The following section configures the vCenter datastore drivers, used to copy images to and from vCenter image datastores.
DS_MAD_CONF = [
    NAME = "vcenter",
    REQUIRED_ATTRS = "VCENTER_INSTANCE_ID,VCENTER_DS_REF,VCENTER_DC_REF",
    PERSISTENT_ONLY = "NO",
    MARKETPLACE_ACTIONS = "export"
]

DATASTORE_MAD = [
    EXECUTABLE = "one_datastore",
    ARGUMENTS  = "-t 15 -d dummy,fs,lvm,ceph,dev,iscsi_libvirt,vcenter -s shared,ssh,ceph,fs_lvm,qcow2,vcenter"
]
The following section configures the vCenter datastore transfer drivers, used to copy images to and from vCenter system datastores.
TM_MAD = [
    EXECUTABLE = "one_tm",
    ARGUMENTS = "-t 15 -d dummy,lvm,shared,fs_lvm,qcow2,ssh,ceph,dev,vcenter,iscsi_libvirt"
]

TM_MAD_CONF = [
    NAME = "vcenter", LN_TARGET = "NONE", CLONE_TARGET = "SYSTEM", SHARED = "YES"
]
See the Storage Drivers reference for more information about these parameters, and how to customize and extend the drivers. The vCenter Storage Setup guide gives more details on the vCenter storage model in OpenNebula.
vCenter Networking Drivers
The following section configures the networking drivers, used to import and create networks from vCenter.
VN_MAD_CONF = [
    NAME = "vcenter",
    BRIDGE_TYPE = "vcenter_port_groups"
]
See the Networking Drivers reference for more information about these parameters, and how to customize and extend the drivers. The vCenter Networking Setup guide gives more details on the vCenter networking model in OpenNebula.
vCenter Monitoring Drivers
vCenter clusters and Virtual Machines monitoring is performed through onemonitord. Details on its configuration can be found on the dedicated guide.
See the Monitoring Drivers reference for development information about these drivers and how to customize and extend them.
Limitations
only the disk-saveas operation is supported for VMs in the
POWEROFFstate.imported Wild VMs cannot be stopped, undeployed nor
recover --recreated.
vCenter Import Tool
vCenter clusters, VM templates, networks, datastores, and VMDK files located in vCenter datastores can be easily imported into OpenNebula:
Using the onevcenter tool from the command-line interface
onevcenter <command> -o <object type> -h <opennebula host_id> [<options>] [<args]
Using the Import button in Sunstone.
Warning
The image import operation may take a long time. If you use the Sunstone client and receive a “Cannot contact server: is it running and reachable?” the 30-second Sunstone timeout may have been reached. In this case, either configure Sunstone to run behind Apache/NGINX or use the CLI tool instead.
The following vCenter resources can be easily imported into OpenNebula:
vCenter clusters (imported as OpenNebula Hosts)
Datastores
Networks
VM Templates
Wild VMs (VMs launched outside of OpenNebula)
Images
Importing vCenter Clusters
OpenNebula can import vCenter clusters as OpenNebula Host using Sunstone (Infrastructure-->Hosts) or through CLI (onevcenter).
This is the only step where vCenter user credentials are required.
Import a vCenter cluster with onevcenter
When you select a vCenter cluster to be imported, OpenNebula will create an OpenNebula Host that will represent the vCenter cluster. You can instruct OpenNebula as to which OpenNebula cluster you want to use to group the OpenNebula Host; if you don’t select a previously existing cluster, the default action is to create an OpenNebula cluster for you.
A sample session is as follows:
onevcenter hosts --vcenter <vcenter-host> --vuser <vcenter-username> --vpass <vcenter-password>

Connecting to vCenter: vcenter.host...done!

Exploring vCenter resources...done!

Do you want to process datacenter Datacenter (y/[n])? y

  * vCenter cluster found:
          - Name       : Cluster2
          - Location   : /
        Import cluster (y/[n])? y

        In which OpenNebula cluster do you want the vCenter cluster to be included?


          - ID: 100 - NAME: Cluster
          - ID: 101 - NAME: Cluster3

        Specify the ID of the cluster or press Enter if you want OpenNebula to create a new cluster for you:

        OpenNebula host Cluster2 with ID 2 successfully created.
Note
If vCenter is using a port other than the default port, you can use the –port command.
Import a vCenter cluster with Sunstone
You can also import a cluster from Sunstone. Click on Hosts under the Infrastructure menu entry and then click on the Plus sign. A new window will be opened.
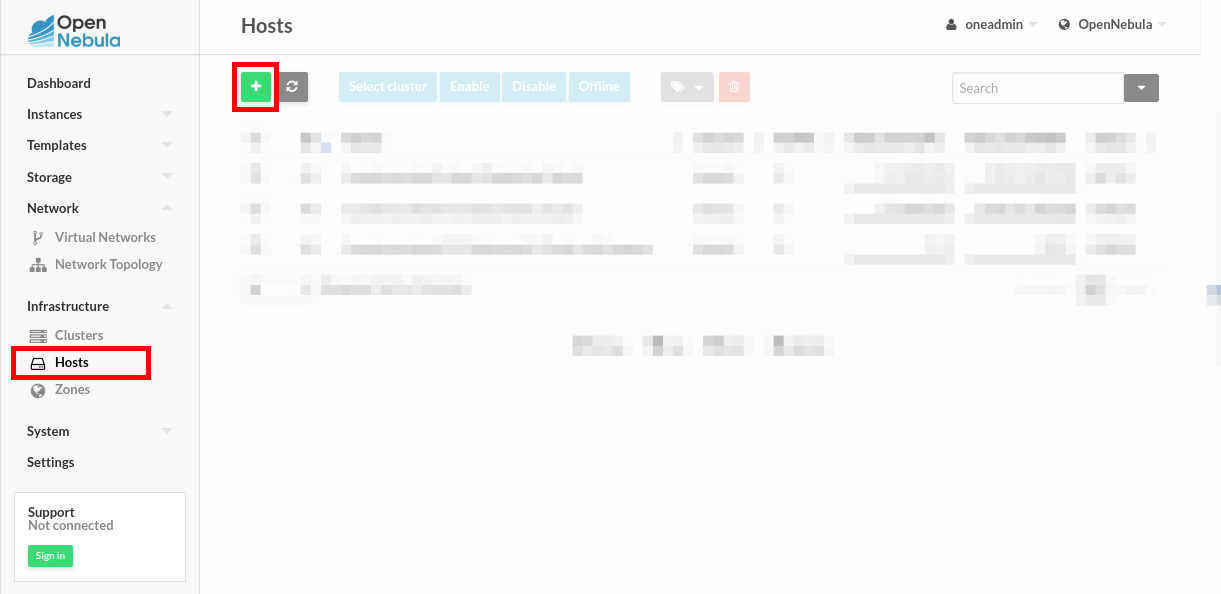
Select VMWare vCenter from the Type drop-down menu. Introduce the vCenter hostname (the <SERVER>:<PORT> notation can be used for non-default ports) or IP address and the credentials used to manage the vCenter instance, and click on Get Clusters
Once you enter the vCenter credentials you’ll get a list of the vCenter clusters that haven’t been imported yet. You’ll have the name of the vCenter cluster and the location of that cluster inside the Hosts and Clusters view in vSphere.
Note
A vCenter cluster is considered not to have been imported if the cluster’s moref and vCenter instance uuid is not found in OpenNebula’s image pool.
If OpenNebula finds new clusters they will be grouped according to the datacenter they belong to.
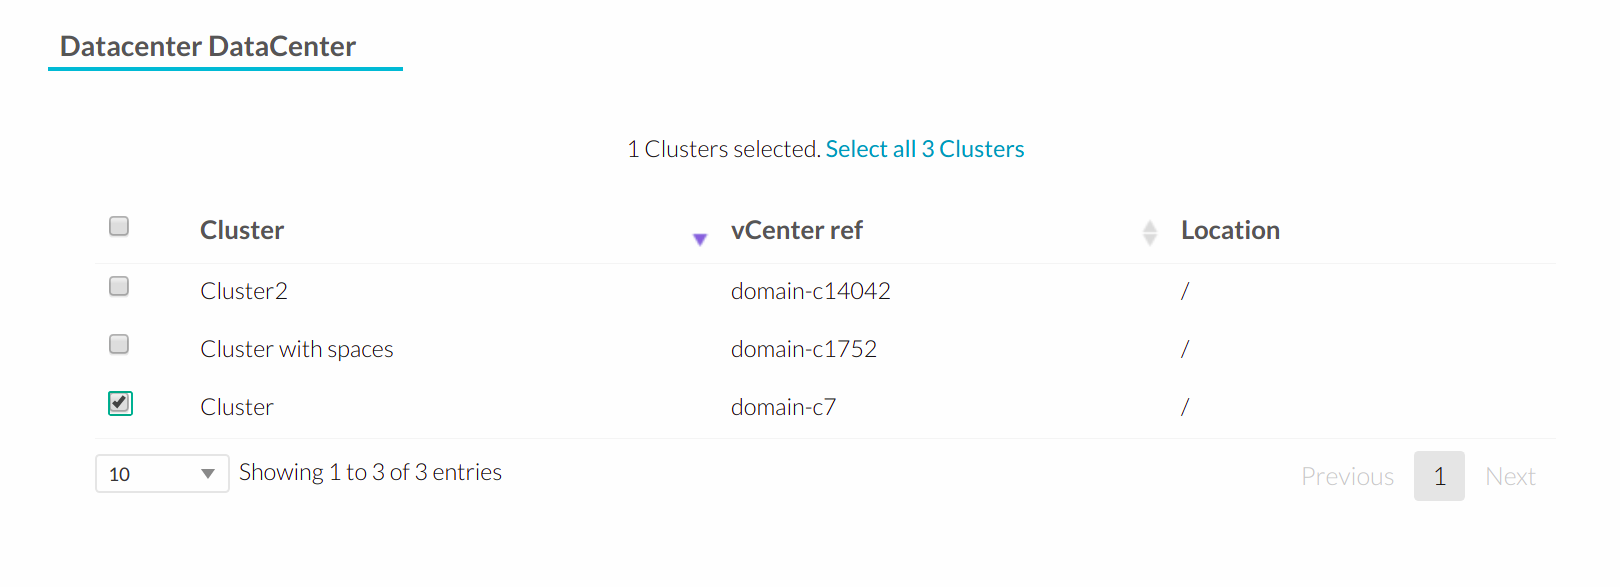
Before you check one or more vCenter clusters to be imported, you can select an OpenNebula cluster from the drop-down Cluster menu; if you select the default datastore (ID:0), OpenNebula will create a new OpenNebula cluster for you.

Select the vCenter clusters you want to import and then click on the Import button. Once the import tool finishes, you’ll get the ID of the OpenNebula Hosts created as representations of the vCenter clusters.
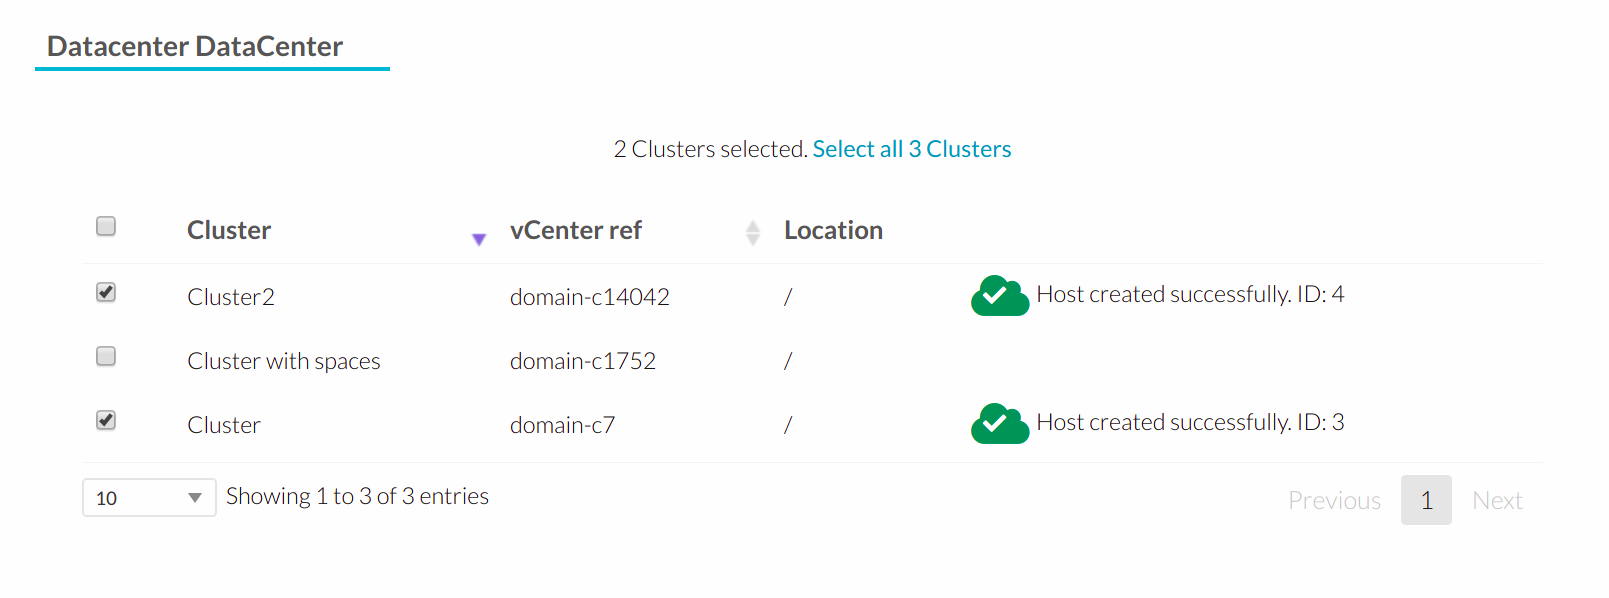
You can check that the Hosts representing the vCenter clusters have a name containing the cluster name, and if there is a name collision with a previously imported vCenter cluster, a string is added to avoid the collision. Also, you can see that if you select the default datastore, OpenNebula will assign a new OpenNebula cluster with the same name of the imported vCenter cluster.

Note that if you delete an OpenNebula Host representing a vCenter cluster and then try to import it again, you may get an error like the following:

In that case, you should specify the correct cluster from the Cluster drop-down menu or remove the OpenNebula cluster so OpenNebula can create the cluster again automatically when the vCenter cluster is imported.
You can define VM_PREFIX attribute within the Host template so the names of all VMs instantiated on that host will begin with VM_PREFIX in vCenter. This value defaults to “one-<VID>” (where VID is the ID of the VM) if VM_PREFIX is not present. It can be set to an empty value to avoid having a prefix on the VM names.
Additionally, this attribute can be overriden on the USER_TEMPLATE of the VM by setting an attribute on the same name (VM_PREFIX). The USER_TEMPLATE of the VM can also contain a VM_SUFFIX attribute to be automatically added to the VM name. Both VM_PREFIX and VM_SUFFIX can contain the $i which will be automatically substituted by the VM ID.
Importing vCenter resources
Once you have imported your vCenter cluster you can import the rest of the vCenter resources by delegating the authentication to the imported OpenNebula Host.
There are two steps to be followed to import vCenter resources:
Retrieve a list of the resources available to identify the concrete ones to import:
[CLI] Using onevcenter list -o <resource type> -h <host_id> [additional_info].
[Sunstone] Navigate to the proper section on Sunstone and click on import button and select the proper Host.
This will show you the list of objects that you can import, giving you some information.
Import selected resources based on the previous information collected during the first step:
[CLI] Using onevcenter, import <desired objects> -o <resource type> -h <host_id> [additional_info].
There are several ways to perform this operation, in this list an ID column arranging the unimported resources will appear in addition to the REF column. You can use both columns to select certain resources:
Command (Example)
Note
onevcenter import ref
This will import the resource with ref
onevcenter import 0
This will import the first resource shown on the list, the resource with IM_ID 0
onevcenter import “ref0, ref1”
This will import items with refs ref0 and ref1
onevcenter import 0..5
This will import items with IM_ID 0, 1, 2, 3, 4, 5
[Sunstone] Simply select the desired resources (checking any option) from the previous list and click Import.
Importing all resources with default configuration
In some scenarios you will want to import every resource using default values and avoiding the interactive interface.
[CLI] using onevcenter import_defaults command:
onevcenter import_defaults -o datastores -h 0
This will import all datastores related to the imported OpenNebula Host with ID: 0.
[Sunstone] Click on the first checkbox at the corner of the table.
Importing vCenter Datastores
Virtual hard disks, which are attached to vCenter Virtual Machines and templates, have to be represented in OpenNebula as images. Images must be placed in OpenNebula’s image datastores which can be easily created thanks to the import tools. vCenter datastores can be imported using the onevcenter tool or the Sunstone user interface.
A vCenter datastore is unique inside a datacenter, so it is possible that two datastores can be found with the same name in different datacenters and/or vCenter instances. In this situation, OpenNebula generates a name that avoids collisions. This name can be changed once the datastore has been imported to a more human-friendly name.
Import a datastore with onevcenter
Here’s an example showing how a datastore is imported using the command-line interface:
First of all, we already have one vCenter cluster imported with ID 0.
onevcenter list -o datastores -h 0

# vCenter: vCenter.server

IMID REF             NAME                                               CLUSTERS
0    datastore-15    datastore2                                         [102]
1    datastore-11    datastore1                                         []
2    datastore-15341 datastore1 (1)                                     [100]
3    datastore-16    nfs                                                [102, 100]
The import tool (list) will discover datastores in each datacenter and will show the name of the datastore, the capacity and OpenNebula cluster IDs that this datastore will be added to.
Once you know which datastore you want to import:
onevcenter import datastore-16 -o datastores -h 0
ID: 100
ID: 101
When you select a datastore, two representations of the same datastore are created in OpenNebula: an IMAGE datastore and a SYSTEM datastore. That’s why you can see that two datastores have been created (unless the datastore is a StorageDRS, in which case only a SYSTEM datastore is created.)
Import a datastore with Sunstone
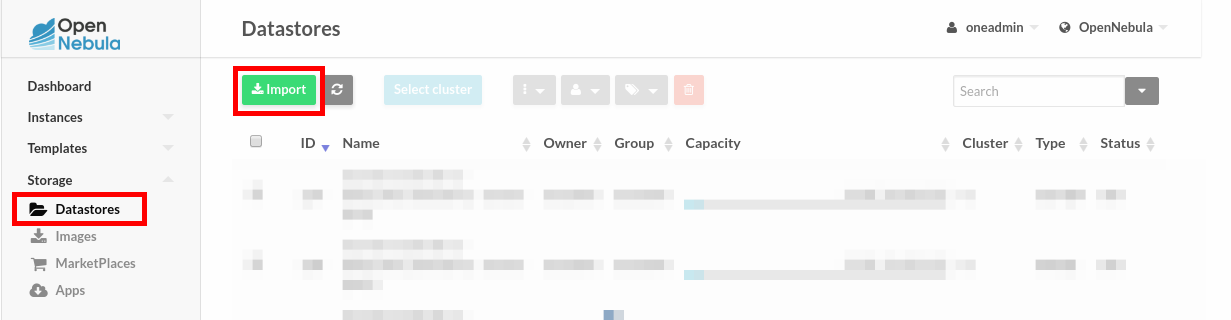
In Sunstone, click on Datastores under the Storage menu entry, and then click on the Import button. A new window will be opened.
In the new window, choose a cluster that will authenticate you into this vCenter instance and click on Get Datastores. This will retrieve all the datastores available for import - those that haven’t been imiported yet. If the OpenNebula clusters IDs column is empty that means that the import tool could not find an OpenNebula cluster where the datastore can be grouped and you may have to assign it manually later.
From the list, select the datastore you want to import and then click on the Import button. You’ll get a notification with the IDs of the datastores that have been created.
In the datastore list you can check the datastore name. Also, between parentheses you can find SYS for a SYSTEM datastore, IMG for an IMAGE datastore or StorDRS for a StorageDRS cluster representation. The datastore name can be changed once the datastore has been imported.
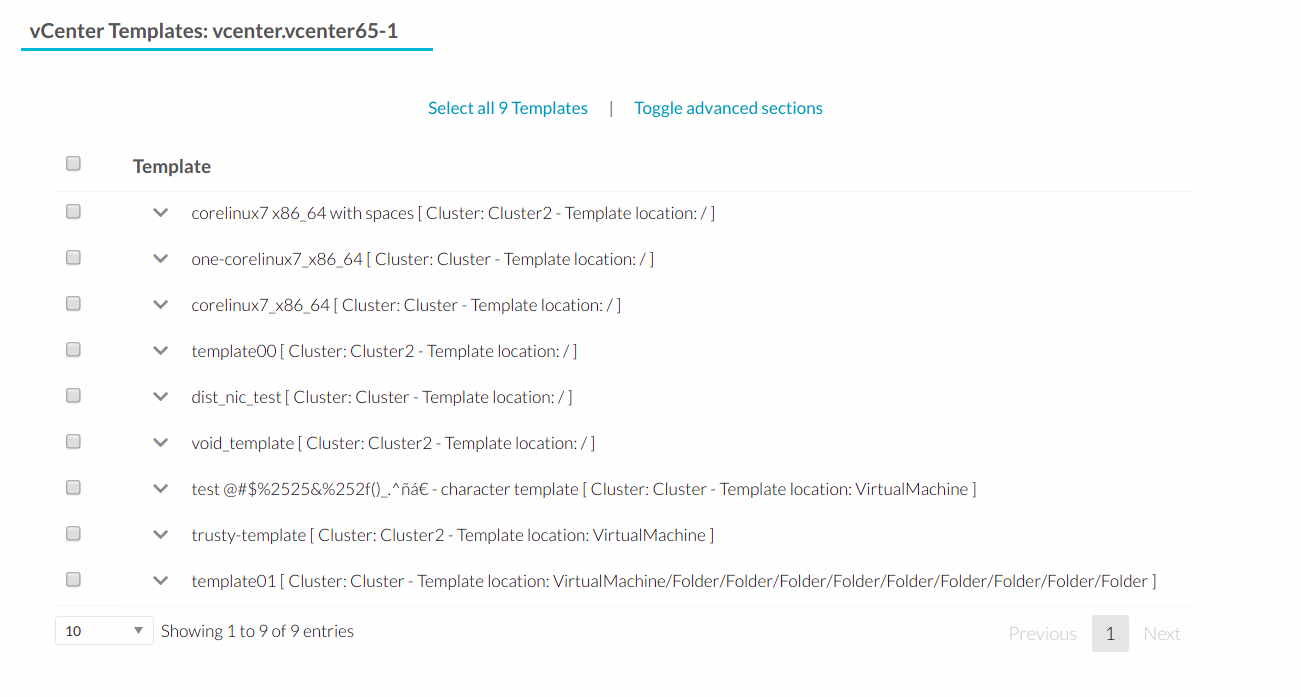
Importing vCenter VM Templates
The onevcenter tool and the Sunstone interface can be used to import existing VM templates from vCenter.
Important
This step should be performed after we have succesfully imported the datastores where the template’s hard disk files are located, and those datastores have been monitored at least once.
OpenNebula will create OpenNebula images that represent vCenter VM disks, and virtual networks that represent the port groups used by the virtual NICs. For example, we have a template that has three disks and an NIC connected to the VM Network port group.
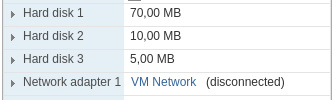
After the import operation finishes there will be three images representing each of the virtual disks found within the template. The name of the images can be changed after the images have been imported.

Also, a virtual network will be created. Note that the virtual network is added automatically to an OpenNebula cluster where the vCenter cluster has been added as a Host.
A vCenter template name is only unique inside a folder, so you may have two templates with the same name in different folders inside a datacenter. If OpenNebula detects a collision it will craft a name to avoid this. This name can be changed after the import finishes.
Import a VM Template with onevcenter
The following would be the process using the onevcenter tool:
onevcenter list -o templates -h 0

# vCenter: vcenter.Server

IMID REF        NAME
   0 vm-8720    corelinux7 x86_64 with spaces
   1 vm-9199    one-corelinux7_x86_64
   2 vm-8663    dist_nic_test
In this example our vcenter.server has 3 templates and they are listed from IM_ID = 0 to 2.
Whenever you are ready to import:
onevcenter import vm-1754 -o templates -h 0

- Template: corelinux7_x86_64
You’ll be asked about whether or not you want to use linked clones. If a copy of the template is needed, this action may take some time as a full clone of the template and its disks has to be performed.
You can also select the folder where you want VMs based on this template to be shown in vSphere’s VMs and Templates inventory.
OpenNebula will inspect the vCenter template and will create images and networks for the virtual disks and virtual networks associated with the template. Those actions will require some time to finish as well.
By default, OpenNebula will use the first Resource Pool that is available in the datacenter unless a specific Resource Pool has been set for the Host representing the vCenter cluster. If you haven’t already, have a look at the “Resource Pools in OpenNebula” section in this chapter. If you want to select a new resource pool, a list of available Resource Pools will display so you can select one of them:
The list of available resource pools is:

- TestResourcePool/NestedResourcePool
- TestResourcePool

Please input the new default resource pool name:
If you want to create a list of Resource Pools that will allow the user to select one of them, you have the chance to accept the list generated by the import tool or enter the references of the Resource Pools using a comma to separate the values.
If you select a list, you will be asked to select the reference of the default Resource Pool in that list.
Import a VM Template with Sunstone
In Sunstone, click on VMs under the Template menu entry and then click on the Import button. In the new window, choose the OpenNebula Host representing the vCenter where the VM Template resides.
OpenNebula will search for templates that haven’t been imported yet.
Before importing a template, you can click on the down arrow next to the template’s name and specify the Resource Pools as is explained in the Resource Pools in OpenNebula section in this chapter. If the vCenter cluster doesn’t have DRS enabled you won’t be able to use Resource Pools and hence the down arrow won’t display any content at all.
Select the template you want to import and then click on the Import button. This process may take some time as OpenNebula will import the disks and network interfaces that exist in the template, and will create images and networks to represent them.
A vCenter template is considered not to have been imported if the template’s moref and vCenter instance uuid are not found in OpenNebula’s template pool. If OpenNebula does not find new templates, check that you have previously imported the vCenter clusters that contain those templates.
When an image is created to represent a virtual disk found in the vCenter template, the VCENTER_IMPORTED attribute is set to YES automatically. This attribute prevents OpenNebula from deleting the file from the vCenter datastore when the image is deleted from OpenNebula.
Note
If you want to use linked clones with a template, please import it using the onevcenter tool.
After a vCenter VM Template is imported as an OpenNebula VM Template, it can be modified to change the capacity in terms of CPU and MEMORY, the name, permissions, etc. It can also be enriched to add:
If you modify a VM template and you edit a disk or NIC that was found by OpenNebula when the template was imported, please consider the following:
Disks and NICs that were discovered in a vCenter template have a special attribute called OPENNEBULA_MANAGED set to NO.
The OPENNEBULA_MANAGED=NO should only be present in disk and NIC elements that exist in your vCenter template as OpenNebula doesn’t apply the same actions as those applied to disks and NICs that are not part of your vCenter template.
If you edit a disk or NIC element in your VM template which has OPENNEBULA_MANAGED set to NO, and you change the image or virtual network associated with a new resource that is not part of the vCenter template, please don’t forget to remove the OPENNEBULA_MANAGED attribute in the disk or NIC section of the VM template by either using the Advanced view in Sunstone or from the CLI with the onetemplate update command.
Before using your OpenNebula cloud, you may want to read about the vCenter specifics.
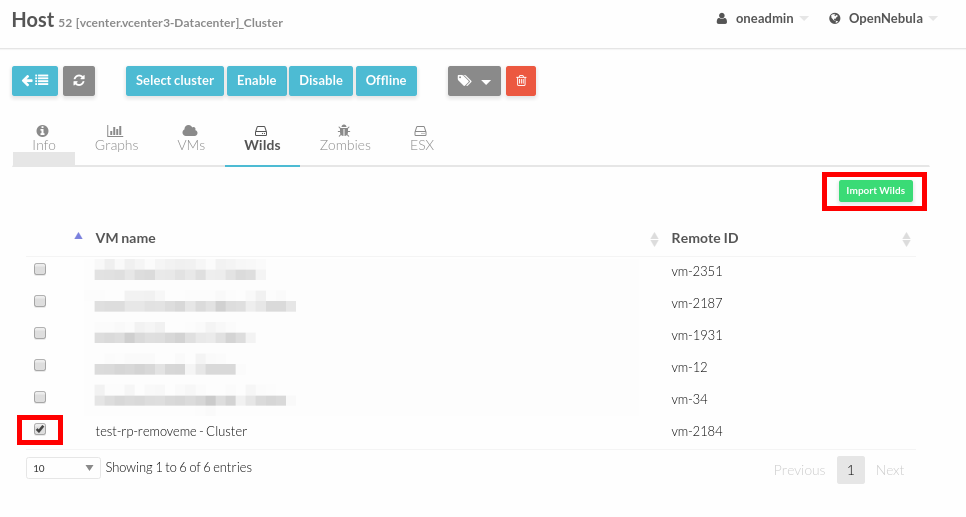
Importing running Virtual Machines
Once a vCenter cluster is monitored, OpenNebula will display any existing VM as Wild. These VMs can be imported and managed through OpenNebula once the Host has been successfully acquired.
Requirements
Before you import a Wild VM you must have imported the datastores where the VM’s hard disk files are located, as was explained before. OpenNebula requires the datastores to exist before the image that represents an existing virtual hard disk is created.
Running VM cannot have snapshots. Please remove them before importing.
In the command line we can list wild VMs with the one Host show command:
onehost show 0
  HOST 0 INFORMATION
  ID                    : 0
  NAME                  : MyvCenterHost
  CLUSTER               : -
  [....]

  WILD VIRTUAL MACHINES

            NAME                                                      IMPORT_ID  CPU     MEMORY
            test-rp-removeme - Cluster                                  vm-2184    1        256

  [....]
In Sunstone we have the Wild tab in the Host’s information:

VMs in running state can be imported as well as VMs defined in vCenter that are not in Power On state (this will import the VMs in OpenNebula in the poweroff state).
A Wild VM import process creates images to represent the VM disks as well as new Virtual Networks if they are not already represented. If a Virtual Network exists already in OpenNebula, a network lease (IP/MAC) is requested for each IP reported for the VM by the VMware tools. If no AR contains the IP address space of the IP reported by the VM, a new AR is created and a lease requested. If the same NIC in the vCenter VM reports more than one IP, this is represented using NIC_ALIAS.
It is important to clarify that in the event that a VM Template has multiple NICs and NIC ALIAS, they will be imported during this process.
To import existing VMs you can use the ‘onehost importvm’ command.
onehost importvm 0 "test-rp-removeme - Cluster"
onevm list
ID USER     GROUP    NAME            STAT UCPU    UMEM HOST               TIME
 3 oneadmin oneadmin test-rp-removem runn 0.00     20M [vcenter.v     0d 01h02
Also, the Sunstone user interface can be used from the Host’s Wilds tab. Select a VM from the list and click on the Import button.
Once a Wild VM is imported, OpenNebula will reconfigure the vCenter VM so VNC connections can be established once the VM is monitored.
Also, network management operations are present, like the ability to attach/detach network interfaces, as well as capacity (CPU and MEMORY) resizing operations and VNC connections if the ports are opened beforehand.
After a VM has been imported, it can be removed from OpenNebula and imported again. OpenNebula sets information in the vCenter VM metadata that needs to be removed, which can be done with the onevcenter cleartags command:
opennebula.vm.running
opennebula.vm.id
opennebula.disk.*
remotedisplay
The following procedure is useful if the VM has been changed in vCenter and OpenNebula needs to “rescan” its disks and NICs:
Use onevcenter cleartags on the VM that will be removed:
onevcenter cleartags <vmid>
vmid is the id of the VM whose attributes will be cleared.
Un-register VM
onevm recover --delete-db <vmid>
Re-import VM: on the Host’s next monitoring cycle you will find this VM under Wilds tab and it can be safely imported.
If you want to set specific IPv4/6 when importing the VM, you can use the parameters --ipv4 and --ipv6, giving a list of IP addresses separated by commas.
onehost importvm <host> <vm> --ipv4 ip1,ip2
Important
You need to provide the IPs depending on your interfaces order, as they are going to be assigned in that order.
Importing vCenter Networks
OpenNebula can create Virtual Network representations of existing vCenter networks (standard port groups and distributed port groups). OpenNebula can handle, on top of these representations, three types of Address Ranges: Ethernet, IPv4 and IPv6. This networking information can be passed to the VMs through the contextualization process.
When you import a vCenter port group or distributed port group, OpenNebula will create an OpenNebula Virtual Network that represents that vCenter network.
Note
Multicluster networks are supported by OpenNebula; distributed port groups spanning across than one vCenter cluster can be properly imported. OpenNebula will show the related vCenter clusters and at least one should be imported before proceeding with the network import process. Even if it is possible to import a multicluster network having only one vCenter cluster imported, it is best to import all vCenter clusters related to the network into OpenNebula first (arranging them into OpenNebula clusters).
A vCenter network name is unique inside a datacenter, so it is possible that two networks can be found with the same name in different datacenters and/or vCenter instances. If OpenNebula detects a collision it will craft a name to avoid this. This name can be changed afterwards.
Import networks with onevcenter
The import tool will discover port groups in each datacenter and will show the name of the port group, the port group type (Port Group or Distributed Port Group), the cluster that uses that port group and the OpenNebula cluster ID that this virtual network will be added to.
In case the network had more than one vCenter cluster associated, the list command will show a list of the OpenNebula clusters.
Here’s an example showing how a standard port group or distributed port group is imported using the command-line interface.
onevcenter list -o networks -h 0

# vCenter: vcenter.Server

    IMID REF              NAME                      CLUSTERS
    0    network-12       VM Network                [100, 102]
    1    network-12245    testing00                 [100, 102]
    2    network-12247    testing03                 [102]
    3    network-12248    testing02                 [102]
    4    network-12246    testing01                 [100, 102]
With this information, we now want to import ‘testing0*’ networks (it’s common to import more than one network).
onevcenter import 1..4 -o networks -h 0
or
onevcenter import "network-12245, network-12247, network-12246, network-12248" -o networks -h 0
After this you’ll be asked several questions and different actions will be taken depending on your answers.
If you want to import the network and the vnet has vlan id, it will be shown to you in the first place. The next step is to assign an address range. You can know more about address ranges in the Managing Address Ranges section.
Import networks with Sunstone
In Sunstone the process is similar: click on Virtual Networks under the Network menu entry and then click on the Import button. Choose a vCenter cluster and then click on Get Networks.
Before importing a network, you can click on the down arrow next to the network’s name and specify the type of address pool you want to configure:
eth for an Ethernet address range pool.
ipv4 for an IPv4 address range pool.
ipv6 for an IPv6 address range pool with SLAAC.
ipv6_static for an IPv6 address range pool without SLAAC (it requires an IPv6 address and a prefix length).
When you import a network, the default address range is a 255 MAC addresses pool.
Finally, click on the Import button. The ID of the virtual network that has been created will be displayed.
If OpenNebula does not find new networks, check that you have previously imported the vCenter clusters that are using those port groups.
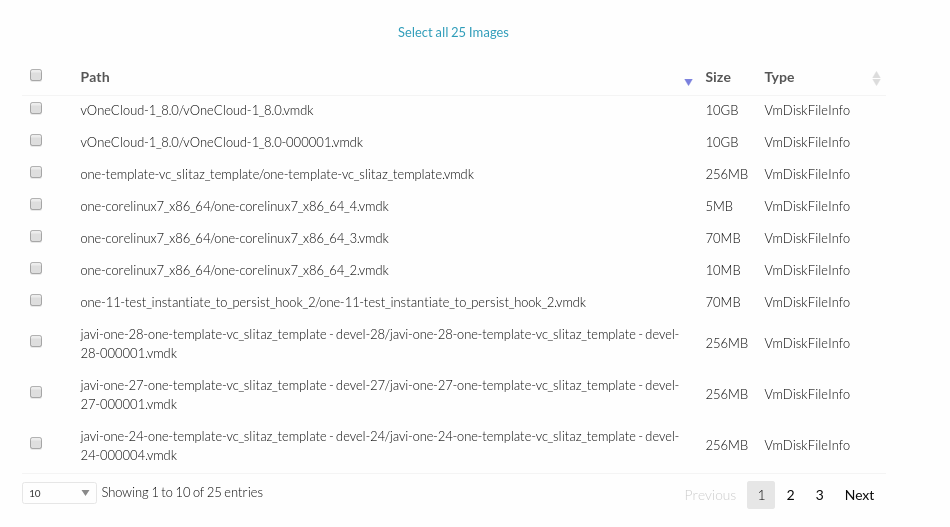
Importing vCenter Images
OpenNebula can create image representations of vCenter VMDK and ISO files that are present in vCenter datastores.
When you import an image, OpenNebula generates a name that avoids collisions; that name contains the image name and, if there was another image with that name, a suffix. That name can be changed to a more human-friendly name once the image has been imported.
The import tools will look for files that haven’t been previously imported, checking if there’s a file with the same PATH and DATASTORE_ID attributes.
Import images with onevcenter
The onevcenter tool and the Sunstone interface can be used to import this kind of file.
The onevcenter tool needs an OpenNebula’s IMAGE datastore name to be specified as an argument. OpenNebula will browse the datastores and look for VMDK and ISO files. This means that it’s mandatory to have the proper vCenter image datastore imported into OpenNebula. We can pass on this information through onevcenter tool with -d option, so be sure to check this before the import image operation:
This is an easy way to check the available vCenter datastores:
onedatastore list | grep -E 'img.*vcenter'

 100 datastore2(IM       924G 100%  102               1 img  vcenter vcenter on
 102 datastore1(IM       924G 88%   -                 0 img  vcenter vcenter on
 106 nfs(IMG)            4.5T 39%   100,102          24 img  vcenter vcenter on
Now, we can get the images stored in a vCenter datastore which the following command:
onevcenter list -o images -h 0 -d 102

    IMID REF                                 PATH
       0 one-21                              one_223304/21/one-21.vmdk
       1 Core-current.iso.iso                one_223304/22/Core-current.iso.iso
Finally, here’s an example showing how a VMDK file can be imported using the command-line interface. In this case we’re going to import the image with reference “one-21” using datastore1 (102) and host 0:
onevcenter import "one-21" -o images -h 0 -d 102
ID: 53
Once the image has been imported, it will report the OpenNebula image ID.
Import images with Sunstone
Images can also be imported from Sunstone. Click on Images under the Storage menu entry and click on the Import button. In the new window, choose an OpenNebula Host representing the vCenter cluster that contains the datastore where the image belongs and then click on Get Images.
OpenNebula will search for VMDK and ISO files that haven’t been imported yet.
Select the images you want to import and click on the Import button. The ID of the imported images will be reported.
When an image is created using the import tool, the VCENTER_IMPORTED attribute is set to YES automatically. This attribute prevents OpenNebula from deleting the file from the vCenter datastore when the image is deleted from OpenNebula, so it can be used to prevent a virtual hard disk being removed accidentally from a vCenter template. This default behavior can be changed in /var/lib/one/etc/remotes/vmm/vcenter/vcenterrc by setting DELETE_IMAGES to Yes.
Migrate vCenter Virtual Machines with OpenNebula
vCenter driver allows migration of VMs between different vCenter clusters (i.e., OpenNebula hosts) and/or different datastores. Depending on the type of migration (cold, when the VM is powered off or is saved; or live, when the VM is migrated while running), and the target (cluster and/or datastore), several requirements need to be met in order to migrate the machine.
Migrating a VM Between vCenter Clusters (OpenNebula Hosts)
Requirements (both live and cold migrations)
Every Network attached to the selected VMs needs to exist in both vCenter clusters and OpenNebula clusters
Every Datastore that is used by the VM needs to exist in both vCenter clusters and OpenNebula clusters
- Target OpenNebula Host can specify an ESX_MIGRATION_LIST attribute:
If not specified, target ESX Host is not explicitly declared and migration may fail
If set to an empty string (“”), OpenNebula will randomly chose a target ESX from all the ESXs that belong to the vCenter target cluster
If set to a space-separated list of ESX hostnames (that need to beling to the vCenter target cluster), OpenNebula will randomly chose a target ESX from the list
A good place to check if the VM meets the OpenNebula requirements is the ‘AUTOMATIC_REQUIREMENTS’ attribute of the Virtual Machine (this can be reviewed in the Template info tab). Check if it includes the target OpenNebula clusters (remember, a cluster in OpenNebula is a collection of Hosts, virtual networks and datastores; a cluster in vCenter is represented as a Host in OpenNebula).
Requirements (only live migrations)
vMotion interface enabled in both vCenter clusters (otherwise the driver will warn about compatibility issues)
OpenNebula live migration only works for running VMs so be sure to check the state beforehand
Usage (CLI)
Cold Migration
onevm migrate "<VM name>" <destination host id>
Live Migration
onevm migrate --live "<VM name>" <destination host id>
Migrating a VM Between Datastores
On a VM migration, the target datastore can be changed. Disks belonging to the VM will be migrated to the target datastore. This is useful for rebalancing resources usage among datastores.
Requirements (both cold and live migrations)
Every datastore that is used by the VM needs to exist in both vCenter clusters and OpenNebula clusters
Usage (CLI)
Cold Migration
onevm migrate "<VM name>" <destination host id> <destination datastore id>
Live Migration
onevm migrate --live "<VM name>" <destination host id> <destination datastore id>
Driver tuning
Drivers can be easily customized. Please refer to vCenter Driver Section in the Integration Guide.
Some aspects of the driver’s behavior can be configured in /var/lib/one/remotes/etc/vmm/vcenter/vcenterrc:
delete_images: Allows OpenNebula to delete imported vCenter images. Default: no.
vm_poweron_wait_default: Timeout for deploy action. Default: 300.
debug_information: Provides more verbose logs. Default: false.
retries: Some driver actions support a retry if a failure occurs. This parameter will set the amount of retries. Default: 3.
retry_interval: Amount of time to wait between retry attempts (seconds). Default: 1.
memory_dumps: Create snapshots with memory dumps. Default: true.
keep_non_persistent_disks: Detach non-persistent disks from VMs on VM terminate but avoid deleting them afterwards. Default: false.
keep_mac_on_imported: Avoid change MAC from imported Wild. Default: false.
wild_vm_persistent_images: Wild VM disks imported as persistent (true) or non-persistent (false) images. Default: true.
vm_template_persistent_images: VM Template disks imported as persistent (true) or non-persistent (false) images. Default: false.
sparse_images: Sets the VMDK image subformat to sparse (true) or flat (false) for ESXi compatibility. Default: false.