vCenter Contextualization and Customization
You have two options to prepare a guest OS on boot:
OpenNebula’s contextualization process.
vCenter customization.
OpenNebula Contextualization
OpenNebula uses a method called contextualization to send information to the VM at boot time. Its most basic usage is to share networking configuration and login credentials with the VM so it can be configured.
Step 1. Start a VM with the OS you want to Customize
Supported contextualization packages are available for the OS’s described in the platform notes.
If you already happen to have a VM or Template in vCenter with the installed OS you can start it and prepare it to be used with OpenNebula. Alternatively you can start an installation process with the OS media.
Step 2. Download Contextualization Packages to the VM
RHEL 7.x (CentOS/Oracle Linux 7.x)
# wget https://github.com/OpenNebula/one-apps/releases/download/v6.8.1/one-context-6.8.1-1.el7.noarch.rpm
RHEL 8.x (CentOS/AlmaLinux/RockyLinux/Oracle Linux 8.x)
# wget https://github.com/OpenNebula/one-apps/releases/download/v6.8.1/one-context-6.8.1-1.el8.noarch.rpm
RHEL 9.x (AlmaLinux/RockyLinux/Oracle Linux 9.x) and Fedora 36,37
# wget https://github.com/OpenNebula/one-apps/releases/download/v6.8.1/one-context-6.8.1-1.el9.noarch.rpm
Debian/Ubuntu/Devuan
# wget https://github.com/OpenNebula/one-apps/releases/download/v6.8.1/one-context_6.8.1-1.deb
OpenSUSE 15 and Tumbleweed
# wget https://github.com/OpenNebula/one-apps/releases/download/v6.8.1/one-context-6.8.1-1.suse.noarch.rpm
ALT Linux p9, p10, Sisyphus
# wget https://github.com/OpenNebula/one-apps/releases/download/v6.8.1/one-context-6.8.1-alt1.noarch.rpm
Alpine Linux
# wget https://github.com/OpenNebula/one-apps/releases/download/v6.8.1/one-context-6.8.1-r1.apk
FreeBSD 12, 13
# wget https://github.com/OpenNebula/one-apps/releases/download/v6.8.1/one-context-6.8.1_1.txz
Windows
Download the MSI package into C:\:
Or execute this command in powershell:
(New-Object Net.WebClient).DownloadFile("https://github.com/OpenNebula/one-apps/releases/download/v6.8.1/one-context-6.8.1.msi", "C:\one-context-6.8.1.msi")
Install OpenSSH server
Add-WindowsCapability -Online -Name OpenSSH.Server~~~~0.0.1.0
Step 3. Install Contextualization Packages and Dependencies
RHEL 7.x (CentOS/Oracle Linux 7.x)
yum install -y epel-release
yum install -y one-context-[0-9]*el7*rpm
RHEL 8.x (CentOS/AlmaLinux/Oracle Linux 8.x)
yum install -y epel-release
yum install -y one-context-[0-9]*el8*rpm
systemctl enable network.service
RHEL 9.x (AlmaLinux/Oracle Linux 9.x) and Fedora
yum install -y epel-release
yum install -y one-context-[0-9]*el9*rpm
systemctl enable network.service
OpenSUSE
zypper --no-gpg-check install -y one-context-[0-9]*suse*rpm
ALT Linux
apt-get install -fy one-context-[0-9]*alt*rpm
Debian/Ubuntu/Devuan
apt-get purge -y cloud-init
dpkg -i one-context_*deb || apt-get install -fy
Alpine Linux
apk add --allow-untrusted one-context-[0-9]*apk
FreeBSD
pkg install -y curl bash sudo base64 ruby open-vm-tools-nox11
pkg install -y one-context-[0-9]*.txz
Windows
Double-click on the downloaded MSI package icon in the same way you open other documents to install it.
Step 4. Install VMware Tools
CentOS, Debian/Ubuntu
open-vm-tools are installed as a dependency of contextualization package.
Windows
In vCenter open the VM menu, go to “Guest OS” section, click in “Install VMware Tools…” and follow the instructions.
Step 5. Run Sysprep in Windows Machines
Execute sysprep to prepare the OS for duplication. You can find more information at:
https://technet.microsoft.com/en-us/library/cc721940(v=ws.10).aspx
Step 6. Power Off the Machine and Save it
These are the steps needed to finish the preparation and import it to OpenNebula:
Power off the machine so it is in a consistent state the next time it boots.
Make sure that you take out any installation media used in the previous steps.
Convert the VM into a Template following this procedure
Import in OpenNebula, the datastores where the template’s virtual hard disks are located.
Import the template in OpenNebula.
The last two steps can be done using Sunstone or the CLI as explained in the Import vCenter Resources section
Set Up the Virtual Machine Template
The Virtual Machine Template has a section called context where you can automate different configuration aspects. The most common attributes are network configuration, user credentials and startup scripts. These parameters can be both added using the CLI to the template or using Sunstone Template wizard. Here is an example of the context section using the CLI:
CONTEXT = [
    TOKEN = "YES",
    NETWORK = "YES",
    SSH_PUBLIC_KEY = "$USER[SSH_PUBLIC_KEY]",
    START_SCRIPT = "yum install -y ntpdate"
]
In the example we are telling OpenNebula to:
Set OneGate token and onegate information in the context
Add network configuration to the Virtual Machine
Enable login into the Virtual Machine using ssh with the value of the user’s parameter
SSH_PUBLIC_KEYOn Virtual Machine boot execute the command
yum install -y ntpdate
OneGate Token
OpenNebula has a centralized service to share data between Virtual Machines and the main daemon, useful to set monitoring information that can be gathered inside the VM and configuration data. It also lets you send scaling actions when the Virtual Machine belongs to a Service.
To do so the client installed with the contextualization packages (onegate) needs some information:
Token: it’s the key specific to each VM used to authenticate with the service
OneGate endpoint: the address where the OneGate daemon is reachable
To fill this information you have to specify TOKEN = "YES" in the
contextualization section.
Network Configuration
OpenNebula does not rely on a DHCP server to configure networking in the Virtual Machines. To do this configuration it injects the network information in the contextualization section. This is done with option NETWORK = "YES". When OpenNebula finds this option it adds the IP information for each of the network interfaces configured plus extra information that resides in the Virtual Network template, like DNS, gateway and network mask.
The parameters used from the Virtual Network template are explained in the Managing Virtual Networks section.
User Credentials
One of the other very important things you have to configure is user credentials to connect to the newly created Virtual Machine. For linux base images we recommend to use SSH public key authentication and using it with OpenNebula is very convenient.
The first thing the users should do its to add their SSH public key (or keys) to its OpenNebula user configuration. This can be done in the Settings section of the web interface or using the command line interface:
oneuser update myusername
# an editor is opened, add this line
SSH_PUBLIC_KEY="ssh-rsa MYPUBLICKEY..."
Then in the Virtual Machine Template we add the option:
CONTEXT = [
    SSH_PUBLIC_KEY = "$USER[SSH_PUBLIC_KEY]"
]
Using this system the new Virtual Machines will be configured with the SSH public key of the user that instantiated it.
For Windows machines SSH is not available but you can use the options USERNAME and PASSWORD to create and set the password of an initial administrator.
CONTEXT = [
    USERNAME = "Administrator",
    PASSWORD = "VeryComplexPassw0rd"
]
Note
This password is encrypted in the virtual machine and in the virtual machine template.
Execute Scripts on Boot
To be able to execute commands on boot, for example, to install some software, you can use the option START_SCRIPT. When this option is used a new file that contains the value of the option will be created and executed.
For Windows machines this is a PowerShell script. For linux machines this can be any scripting language as long as it is installed in the base image and the proper shebang line is set (shell scripts don’t need shebang).
In this example some commands will be executed using bash shell that will install the package ntpdate and set the time.
CONTEXT = [
    START_SCRIPT = "#!/bin/bash
yum update
yum install -y ntpdate
ntpdate 0.pool.ntp.org"
]
To add more complex scripts you can also use the option START_SCRIPT_BASE64. This option gets a base64 encoded string that will be decoded before writing the temporary script file.
Advanced Contextualization
There are more options that can be set in the contextualization section. You can read about them in the Virtual Machine Definition File reference section
vCenter Customization
vCenter offers a way to prepare the guest OS on boot. For example configuring its network, licenses, Active Directory server, etc. OpenNebula vCenter drivers offers a way to tie one OpenNebula template with one of these customizations so it is applied on VM startup. You can get more information about this system in VMware documentation.
There are a couple of things to take into account:
This system is not compatible with OpenNebula contextualization as this customization overwrites the networking changes made by context scripts.
VM network configuration must be done externally to OpenNebula. Either with a DHCP server or manually setting IPs for each interface.
This method can be used in all the Guest OSs supported by vCenter.
Applying Customization to a VM Template Using Sunstone
For vCenter VM Templates there are two options in the context tab. To use vCenter Customization select “vCenter” in the as “Contextualization type”. This will show a dropdown with all the customizations from all the hosts. There you can select from these possibilities:
None: No customization will be applied
Custom: You will be able to type manually the name of one customization
The name of customizations found in vCenters
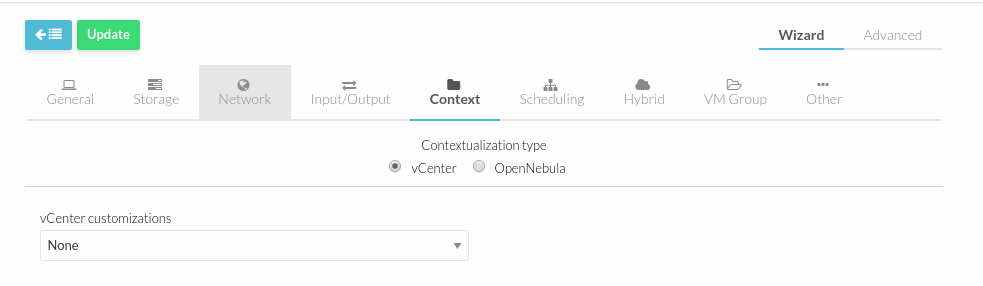
Make sure that the customization applied is available in the vCenter where the VM template reside. After the VM Template is updated it will get a VCENTER_CUSTOMIZATION_SPEC attribute inside the USER_TEMPLATE section.
Getting the Available Customizations per Cluster
OpenNebula monitoring probes get the list of available customization specifications per cluster. You can get the list with the command onehost show. Look for CUSTOMIZATION data in MONITORING INFORMATION.
$ onehost show 20
[...]
MONITORING INFORMATION
...
CUSTOMIZATION=[
  NAME="linux-customization",
  TYPE="Linux" ]
CUSTOMIZATION=[
  NAME="custom",
  TYPE="Windows" ]
Applying Customization to a template Using CLI
To add a customization specification to one template a parameter called VCENTER_CUSTOMIZATION_SPEC must be added inside the USER_TEMPLATE section. Take for example this template:
CPU = "1"
DESCRIPTION = "vCenter Template imported by OpenNebula from Cluster Cluster"
DISK = [
  IMAGE_ID = "124",
  IMAGE_UNAME = "oneadmin",
  OPENNEBULA_MANAGED = "NO" ]
GRAPHICS = [
  LISTEN = "0.0.0.0",
  TYPE = "VNC" ]
HYPERVISOR = "vcenter"
LOGO = "images/logos/linux.png"
MEMORY = "256"
NIC = [
  NETWORK_ID = "61",
  OPENNEBULA_MANAGED = "NO" ]
OS = [
  BOOT = "" ]
SCHED_REQUIREMENTS = "ID=\"20\""
VCENTER_CCR_REF = "domain-c14"
VCENTER_INSTANCE_ID = "4946bb10-e8dc-4574-ac25-3841bcf189b9"
VCENTER_RESOURCE_POOL = "Dev6ResourcePool/nested/tino"
VCENTER_TEMPLATE_REF = "vm-2353"
VCENTER_VM_FOLDER = ""
VCPU = "1"
To use the customization named LinuxCustomization shown in the previous section we can add the option VCENTER_CUSTOMIZATION_SPEC="LinuxCustomization" as this:
CPU = "1"
DESCRIPTION = "vCenter Template imported by OpenNebula from Cluster Cluster"
DISK = [
  IMAGE_ID = "124",
  IMAGE_UNAME = "oneadmin",
  OPENNEBULA_MANAGED = "NO" ]
GRAPHICS = [
  LISTEN = "0.0.0.0",
  TYPE = "VNC" ]
HYPERVISOR = "vcenter"
LOGO = "images/logos/linux.png"
MEMORY = "256"
NIC = [
  NETWORK_ID = "61",
  OPENNEBULA_MANAGED = "NO" ]
OS = [
  BOOT = "" ]
SCHED_REQUIREMENTS = "ID=\"20\""
USER_TEMPLATE = [
  VCENTER_CUSTOMIZATION_SPEC = "LinuxCustomization" ]
VCENTER_CCR_REF = "domain-c14"
VCENTER_INSTANCE_ID = "4946bb10-e8dc-4574-ac25-3841bcf189b9"
VCENTER_RESOURCE_POOL = "Dev6ResourcePool/nested/tino"
VCENTER_TEMPLATE_REF = "vm-2353"
VCENTER_VM_FOLDER = ""
VCPU = "1"