Virtual Machine Templates
In OpenNebula, VMs are defined with VM Templates. This section explains how to describe a Virtual Machine, and how users typically interact with the system.
OpenNebula administrators and users can register Virtual Machine definitions (VM Templates) in the system, to be instantiated later as Virtual Machine instances. These VM Templates can be instantiated several times, and also shared with other users.
Defining a VM
A Virtual Machine Template, at the very basics, consists of:
A capacity in terms memory and CPU
A set of NICs attached to one or more virtual networks
A set of disk images
Optional attributes like VNC graphics, the booting order, context information, etc.
VM Templates are stored in the system to easily browse and instantiate VMs from them.
Capacity & Name
Defines the basic attributes of the VM including its NAME, amount of RAM (MEMORY), or number of Virtual CPUs.
Disks
Each disk is defined with a DISK attribute. A VM can use three types of disk:
Use a persistent Image: changes to the disk image will persist after the VM is terminated.
Use a non-persistent Image: a copy of the source Image is used, changes made to the VM disk will be lost.
Volatile: disks are created on the fly on the target host. After the VM is terminated the disk is disposed.
Network Interfaces & Alias
Network interfaces can be defined in two different ways:
Manual selection: interfaces are attached to a pre-selected Virtual Network. Note that this may require to build multiple templates considering the available networks in each cluster.
Automatic selection: Virtual networks will be scheduled like other resources needed by the VM (like hosts or datastores). This way, you can hint the type of network the VM will need and it will be automatically selected among those available in the cluster. See more details here.
Network interface alias allows you to have more than one IP on each network interface. This does not create a new virtual interface on the VM. The alias address is added to the network interface. An alias can be attached and detached. Note also that when a NIC with an alias is detached, all the associated alias are also detached.
The alias takes a lease from the network which it belongs to. So, for the OpenNebula it is the same as a NIC and exposes the same management interface, it is just different in terms of the associated virtual network interface within the VM.
Note
The Virtual Network used for the alias can be different from that of the NIC which is alias of.
A Complete Example
The following example shows a VM Template file with a couple of disks and a network interface, also a VNC section and an alias were added.
NAME   = test-vm
MEMORY = 128
CPU    = 1

DISK = [ IMAGE  = "Arch Linux" ]
DISK = [ TYPE     = swap,
         SIZE     = 1024 ]

NIC = [ NETWORK = "Public", NETWORK_UNAME="oneadmin" ]

NIC = [ NETWORK = "Private", NAME = "private_net" ]
NIC_ALIAS = [ NETWORK = "Public", PARENT = "private_net" ]

GRAPHICS = [
  TYPE    = "vnc",
  LISTEN  = "0.0.0.0"]
Important
Simple templates can be also created using the command line instead of creating a template file. For example, a similar template as the previous example can be created with the following command:
onetemplate create --name test-vm --memory 128 --cpu 1 --disk "Arch Linux" --nic Public
For a complete reference of all the available options for onetemplate create, go to the CLI reference, or run onetemplate create -h.
Note
OpenNebula Templates are designed to be hypervisor-agnostic, but there are additional attributes that are supported for each hypervisor. Check the corresponding hypervisor guide for specific details.
Virtual Machine Contextualization
OpenNebula uses a method called contextualization to send information to the VM at boot time. Its most basic usage is to share networking configuration and login credentials with the VM so it can be configured. More advanced cases can be starting a custom script on VM boot or preparing configuration to use OpenNebula Gate.
You can define contextualization data in the VM Template. See Context Section in the VM Template reference.
Preparing VM Templates for End-Users
Besides the basic VM definition attributes, you can setup some extra options in your VM Template to ease sharing it with other users.
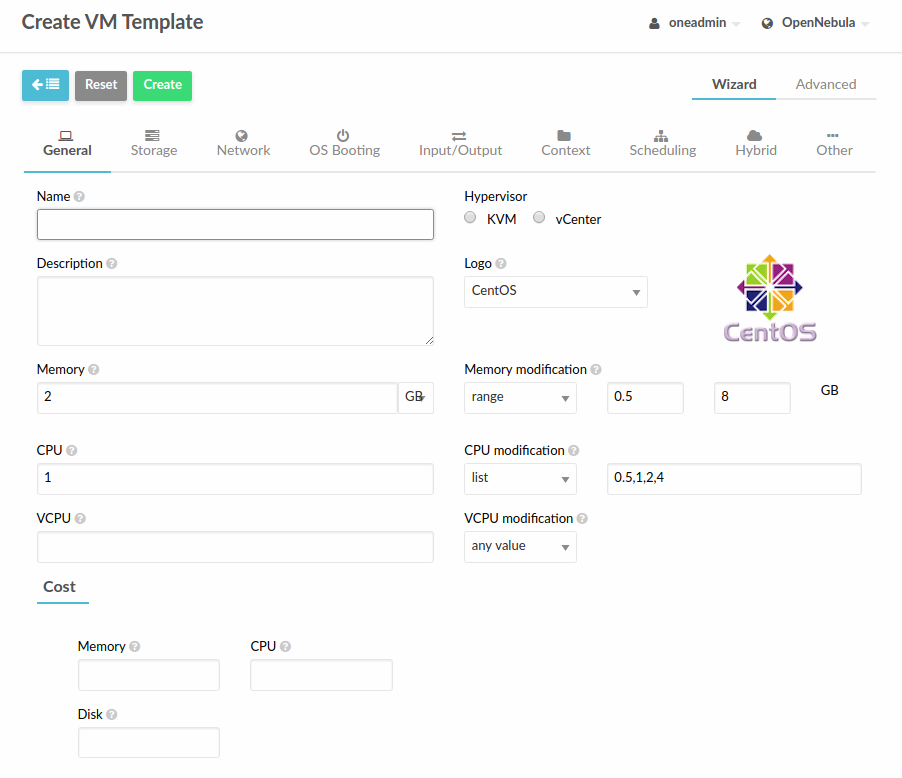
Customizable Capacity
The capacity attributes (CPU, MEMORY, VCPU) can be modified each time a VM Template is instantiated. The Template owner can decide if and how each attribute can be customized. The modification options available are:
fixed (
fixed): The value cannot be modified.any value (
text): The value can be changed to any number by the user instantiating the Template.range (
range): Users will be offered a range slider between the given minimum and maximum values.list (
list): Users will be offered a drop-down menu to select one of the given options.
If you are using a template file instead of Sunstone, the modification is defined with user input (USER_INPUT) attributes (see below). The absence of user input is an implicit any value. For example:
CPU    = "1"
MEMORY = "2048"
VCPU   = "2"
USER_INPUTS = [
  VCPU   = "O|fixed|| |2"
  CPU    = "M|list||0.5,1,2,4|1",
  MEMORY = "M|range||512..8192|2048" ]
Note
Use float types for CPU, and integer types for MEMORY and VCPU. More information in the Template reference documentation.
Note
This capacity customization can be forced to be disabled for any Template in the cloud view. Read more in the Cloud View Customization documentation.
User Inputs
The User Inputs functionality provides the VM Template creator the possibility to dynamically ask for dynamic values. This is a convenient way to parametrize a base installation. These inputs will be presented to the user when the VM Template is instantiated. The VM guest needs to have the OpenNebula contextualization packages installed to make use of the values provided by the user. The following example shows how to pass some user inputs to a VM:
USER_INPUTS = [
  BLOG_TITLE="M|text|Blog Title",
  MYSQL_PASSWORD="M|password|MySQL Password",
]

CONTEXT=[
  BLOG_TITLE="$BLOG_TITLE",
  MYSQL_PASSWORD="$MYSQL_PASSWORD" ]
Note
If a VM Template with user inputs is used by a Service Template Role, the user will be also asked for these inputs when the Service is created.
Note
You can use the flag --user-inputs ui1,ui2,ui3 to use them in a non-interactive way.
Schedule Actions
If you want to perform a pre-defined operation on a VM, you can use the Scheduled Actions. The selected operation will be performed on the VM at a specific time, e.g. “Shut down the VM 5 hours after it started”. You can also add an Scheduled action at VM instantiation.
Set a Cost
Each VM Template can have a cost per hour. This cost is set by CPU unit and MEMORY MB, and disk MB. VMs with a cost will appear in the showback reports.
Enable End User Features
There are a few features of the Cloud View that will work if you configure the Template to make use of them:
Users will see the Template logo (
LOGO) and description (DESCRIPTION), something that is not so visible in the normal admin view.The Cloud View gives access to the VM’s VNC, but only if it is configured in the Template.
End users can upload their public ssh key. This requires the VM guest to be contextualized, and the Template must have the ssh contextualization enabled.
Make the Images Non-Persistent
If a Template is meant to be consumed by end-users, its Images should not be persistent. A persistent Image can only be used by one VM simultaneously, and the next user will find the changes made by the previous user.
If the users need persistent storage, they can use the “instantiate to persistent” functionality.
Prepare the Network Interfaces
End-users can select the VM network interfaces when launching new VMs. You can create templates without any NIC, or set the default ones. If the template contains any NIC, users will still be able to remove them and select new ones.
When users add network interfaces, you need to define a default NIC model in case the VM guest needs a specific one (e.g. virtio for KVM). This can be done with the NIC_DEFAULT attribute, or through the Template wizard. Alternatively, you could change the default value for all VMs in the driver configuration file (see the KVM one for example).
Note
This networking customization can be forced to be disabled for any Template in the cloud view. Read more in the Cloud View Customization documentation.
Instantiating Templates
You can create a VM out of an existing VM Template using the onetemplate instantiate command . It accepts a Template ID or name, and creates a VM instance from the given template. You can create more than one instance simultaneously with the --multiple num_of_instances option.
onetemplate instantiate 6
VM ID: 0
onevm list
    ID USER     GROUP    NAME         STAT CPU     MEM        HOSTNAME        TIME
     0 oneuser1 users    one-0        pend   0      0K                 00 00:00:16
Overwrite VM Template Values
Users can overwrite some of the VM Template values, limited to those not listed in the restricted attributes. This allows users some safe, degree of customization for predefined templates.
Let’s say the administrator wants to provide base templates that the users can customize, but with some restrictions. Having the following restricted attributes in oned.conf:
VM_RESTRICTED_ATTR = "CPU"
VM_RESTRICTED_ATTR = "VPU"
VM_RESTRICTED_ATTR = "NIC"
And the following template:
CPU     = "1"
VCPU    = "1"
MEMORY  = "512"
DISK=[
  IMAGE = "BaseOS" ]
NIC=[
  NETWORK_ID = "0" ]
Users can instantiate it customizing anything except the CPU, VCPU and NIC. To create a VM with different memory and disks:
onetemplate instantiate 0 --memory 1G --disk "Ubuntu 16.04"
Also, a user cannot delete any element of a list that has any restricted attributes. Having the following restricted attributes in oned.conf:
VM_RESTRICTED_ATTR = "DISK/TOTAL_BYTES_SEC"
And the following template:
CPU     = "1"
VCPU    = "1"
MEMORY  = "512"
DISK=[
  IMAGE = "BaseOS"
  TOTAL_BYTES_SEC = 1 ]
DISK=[
  IMAGE = "BaseOS2" ]
NIC=[
  NETWORK_ID = "0" ]
A user can delete the second disk but an user cannot delete the first disk because it has a restricted attribute.
Warning
The provided attributes replace the existing ones. To add a new disk, the current one needs to be added also.
onetemplate instantiate 0 --disk BaseOS,"Ubuntu 16.04"
cat /tmp/file
MEMORY = 512
COMMENT = "This is a bigger instance"
onetemplate instantiate 6 /tmp/file
VM ID: 1
Deployment
The OpenNebula Scheduler will deploy automatically the VMs in one of the available Hosts, if they meet the requirements. The deployment can be forced by an administrator using the onevm deploy command.
Use onevm terminate to shutdown and delete a running VM.
Continue to the Managing Virtual Machine Instances Guide to learn more about the VM States, and the available operations that can be performed.
Instantiating as another user and/or group
The onetemplate instantiate command accepts option --as_uid and --as_gid with the User ID or Group ID to define the owner or group for the new VM.
onetemplate instantiate 6 --as_uid 2 --as_gid 1
VM ID: 0
onevm list
    ID USER      GROUP    NAME         STAT CPU     MEM        HOSTNAME        TIME
     0 test_user users    one-0        pend   0      0K                 00 00:00:16
Managing Templates
Users can manage the VM Templates using the command onetemplate, or the graphical interface Sunstone. For each user, the actual list of templates available are determined by the ownership and permissions of the templates.
Adding and Deleting Templates
Using onetemplate create, users can create new Templates for private or shared use. The onetemplate delete command allows the owner -or the OpenNebula administrator- to delete it from the repository.
For instance, if the previous example template is written in the vm-example.txt file:
onetemplate create vm-example.txt
ID: 6
Via Sunstone, you can easily add templates using the provided wizards (or copy/pasting a template file) and delete them clicking on the delete button.
Cloning Templates
You can also clone an existing Template with the onetemplate clone command:
onetemplate clone 6 new_template
ID: 7
If you use the onetemplate clone --recursive option, OpenNebula will clone each one of the Images used in the Template Disks. These Images are made persistent, and the cloned template DISK/IMAGE_ID attributes are replaced to point to the new Images.
Updating a Template
It is possible to update a template by using the onetemplate update. This will launch the editor defined in the variable EDITOR and let you edit the template.
onetemplate update 3
Restricted attributes when create or update a Template
When a user creates or updates a template, there are some restricted attributes that she could not create or update. Having the following restricted attributes in oned.conf:
VM_RESTRICTED_ATTR = "CPU"
VM_RESTRICTED_ATTR = "VPU"
VM_RESTRICTED_ATTR = "NIC"
And the following template:
CPU     = "1"
VCPU    = "1"
MEMORY  = "512"
DISK=[
  IMAGE = "BaseOS" ]
NIC=[
  NETWORK_ID = "0" ]
Users can create or update a template customizing anything except the CPU, VCPU and NIC.
Also, a user cannot delete any element of a list that has a restricted attributes. Having the following restricted attributes in oned.conf:
VM_RESTRICTED_ATTR = "DISK/TOTAL_BYTES_SEC"
And the following template:
CPU     = "1"
VCPU    = "1"
MEMORY  = "512"
DISK=[
  IMAGE = "BaseOS"
  TOTAL_BYTES_SEC = 1 ]
DISK=[
  IMAGE = "BaseOS2" ]
NIC=[
  NETWORK_ID = "0" ]
A user can delete the second disk but she cannot delete the first disk because it contains a restrictedd attribute.
Sharing Templates with other Users
The users can share their Templates with other users in their group, or with all the users in OpenNebula. See the Managing Permissions documentation for more information.
Let’s see a quick example. To share the Template 0 with users in the group, the USE right bit for GROUP must be set with the chmod command:
onetemplate show 0
...
PERMISSIONS
OWNER          : um-
GROUP          : ---
OTHER          : ---
onetemplate chmod 0 640
onetemplate show 0
...
PERMISSIONS
OWNER          : um-
GROUP          : u--
OTHER          : ---
The following command allows users in the same group USE and MANAGE the Template, and the rest of the users USE it:
onetemplate chmod 0 664
onetemplate show 0
...
PERMISSIONS
OWNER          : um-
GROUP          : um-
OTHER          : u--
The onetemplate chmod --recursive option will perform the chmod action also on each one of the Images used in the Template disks.
Sunstone offers an “alias” for onetemplate chmod --recursive 640, the share action:
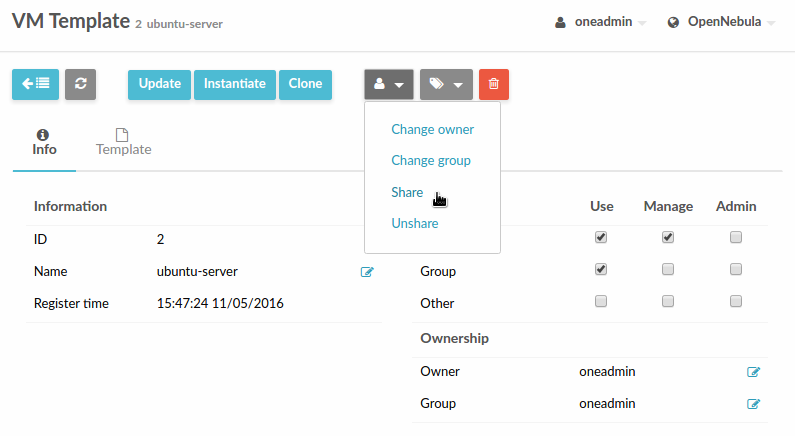
Managing VM Templates with Sunstone
Sunstone exposes the above functionality in the Templates > VMs tab: