OneGate Usage
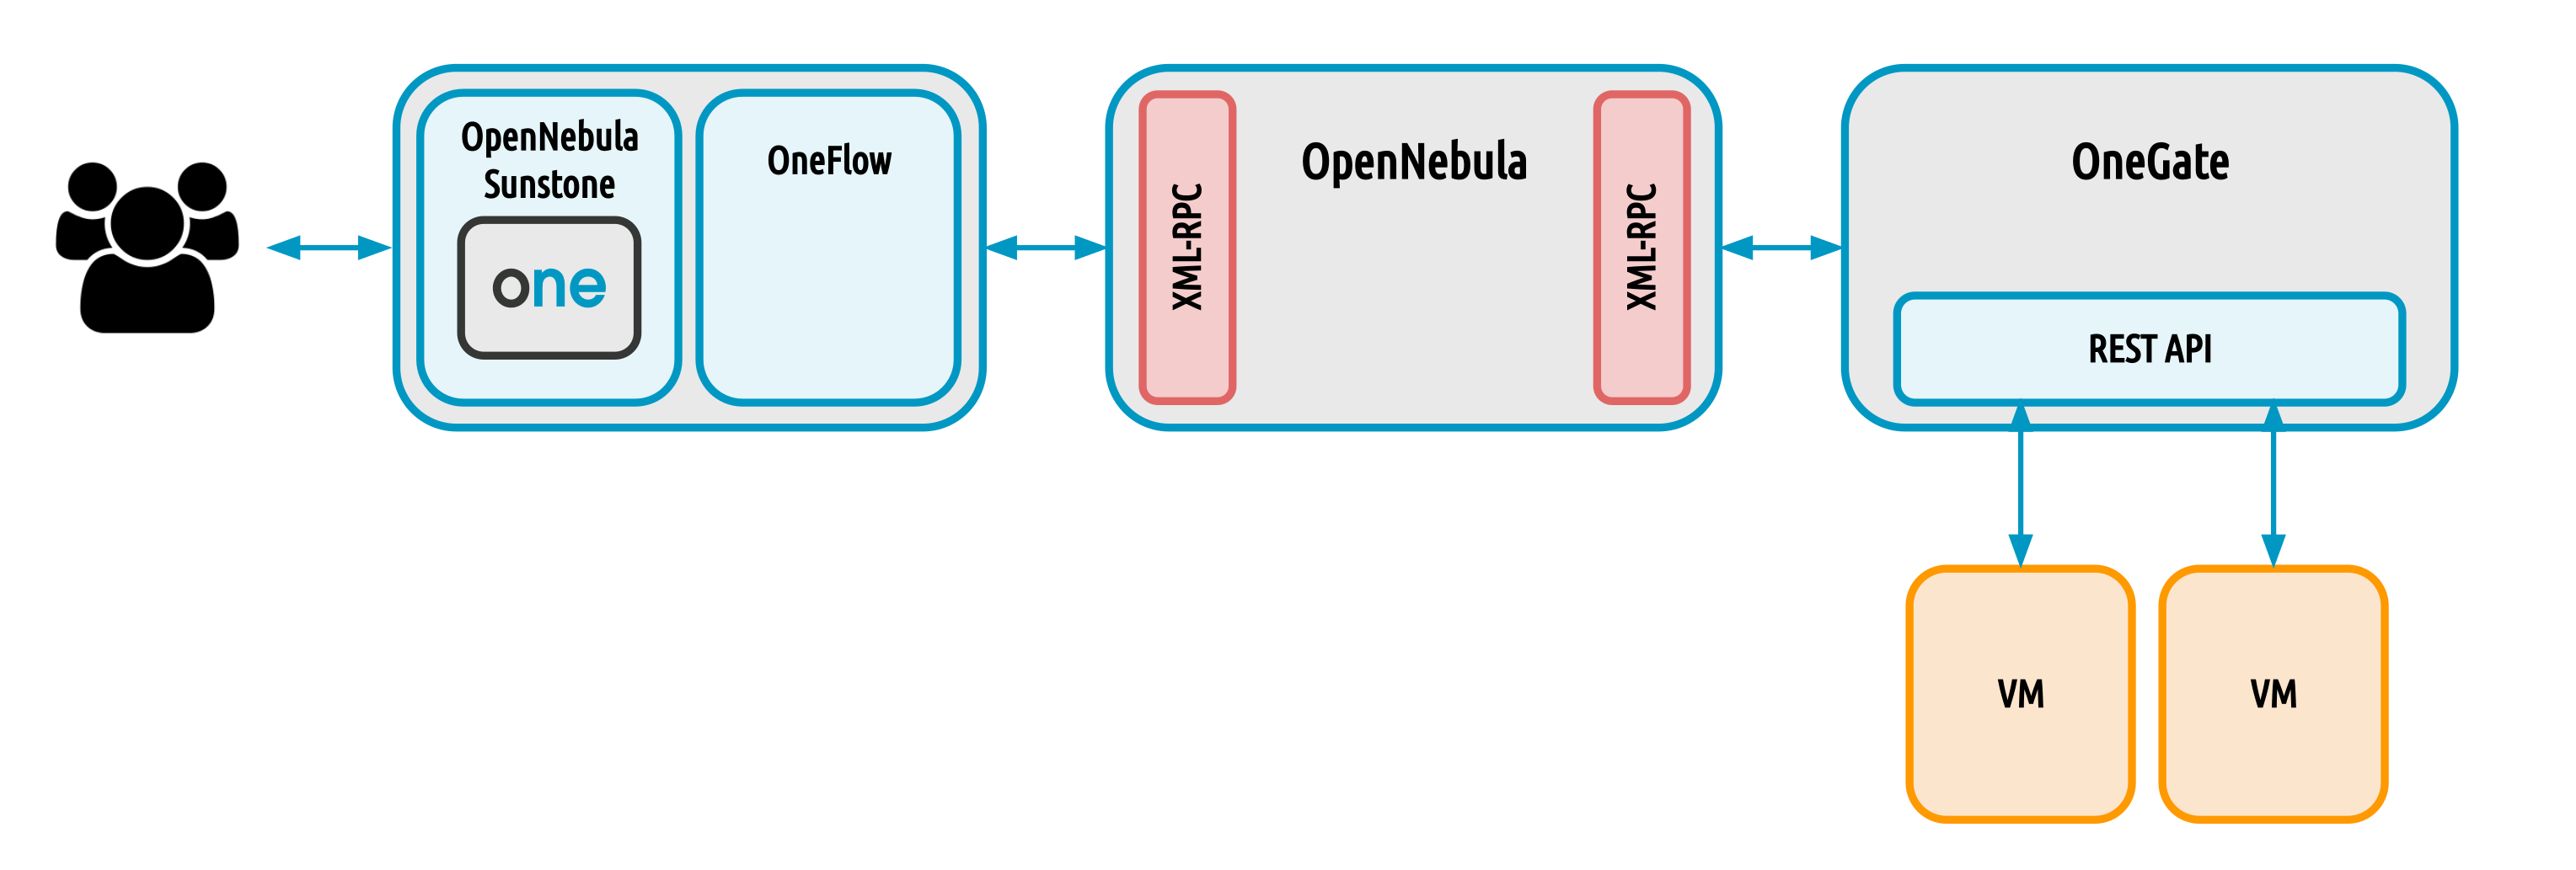
The OneGate component allows Virtual Machine guests to pull and push VM information from OpenNebula. Users and administrators can use it to gather metrics, detect problems in their applications, and trigger OneFlow elasticity rules from inside the VM.
For Virtual Machines that are part of a Multi-VM Application (OneFlow Service), they can also retrieve the Service information directly from OneGate and trigger actions to reconfigure the Service or pass information among different VMs.
OneGate Workflow Explained
OneGate is a server that listens to http connections from the Virtual Machines. OpenNebula assigns an individual token to each VM instance, and Applications running inside the VM use this token to interact with the OneGate API. This token is generated using VM information and signed with the owner User template attribute TOKEN_PASSWORD. This password can be changed updating the User template, but tokens from existing VMs will not work anymore.
OneGate Usage
First, the cloud administrator must configure and start the OneGate server.
Setup the VM Template
Your VM Template must set the CONTEXT/TOKEN attribute to YES.
CPU     = "0.5"
MEMORY  = "1024"

DISK = [
  IMAGE_ID = "0" ]
NIC = [
  NETWORK_ID = "0" ]

CONTEXT = [
  TOKEN = "YES" ]
or check the OneGate checkbox in Sunstone:
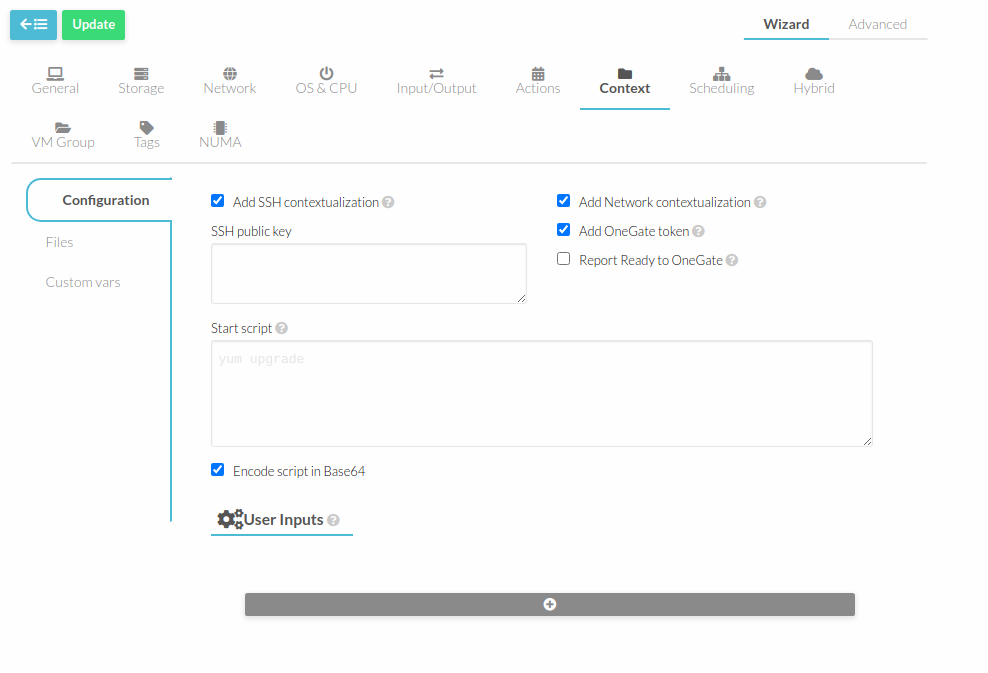
When this Template is instantiated, OpenNebula will automatically add the ONEGATE_ENDPOINT context variable, and a token.txt will be placed in the context cdrom. This token.txt file is only accessible from inside the VM.
...

CONTEXT=[
  DISK_ID="1",
  ONEGATE_ENDPOINT="http://192.168.0.1:5030",
  TARGET="hdb",
  TOKEN="YES" ]
In vCenter this information is available in the extraConfig section of the VM metadata, available in the guest OS through the VMware tools as explained in the contextualization guide.
Using the OneGate Client inside the Guest VM
A Ruby client that implements the OneGate API is included in the official OpenNebula context packages. This is a simple command line interface to interact with the OneGate server, it will handle the authentication and requests complexity.
OneGate Client Usage
Available commands and usage are shown with onegate -h.
With the appropriate policies implemented in the Service, these mechanisms allow Services to be self-managed, enabling self-configuration, self-healing, self-optimization and self-protection.
Self-Awareness
There are several actions available to retrieve information of the Virtual Machine and the Service it belongs to. A Virtual Machine can also retrieve information of other Virtual Machines that are part of the Service.
Note
For a detailed version use the --json option and all the information will be returned in JSON format. Use the option --extended to increase the information retrieved.
Retrieving Information of the VM
Use the command onegate vm show. If no argument is provided, the information of the current Virtual Machine will be retrieved. Alternatively, a VM ID can be provided to retrieve the information of a specific Virtual Machine.
onegate vm show
VM 8
NAME : master_0_(service_1)
STATE : RUNNING
IP : 192.168.122.23
Note
Specifying a VM ID different of a different VM will only works to retrieve information of VMs in the same OneFlow Service or the same Virtual Router.
Retrieving information of the Service
Use the command onegate service show.
onegate service show
SERVICE 1
NAME                : PANACEA service
STATE               : RUNNING

ROLE master
VM 8
NAME                : master_0_(service_1)

ROLE slave
VM 9
NAME                : slave_0_(service_1)
You can use the option onegate service show --extended to get all the information from virtual machines.
onegate service show --extended
SERVICE 1
NAME                : PANACEA service
STATE               : RUNNING

ROLE master
VM 8
NAME                : master_0_(service_1)
STATE               : RUNNING
IP                  : 192.168.122.23


ROLE slave
VM 9
NAME                : slave_0_(service_1)
STATE               : RUNNING
Retrieving Information of the Virtual Router
Use the command onegate vrouter show.
onegate vrouter show
VROUTER 0
NAME                : vr
VMS                 : 1
Retrieving Information of the Virtual Network
Use the command onegate vnet show <ID> to get the information of a Virtual Network.
onegate vnet show 0
  VNET
  ID                  : 0
Note
This option is only available for Virtual Routers and only Virtual Networks related to that Virtual Router (i.e Virtual Network attached or related somehow in the reservation hierarchy with another attached Virtual Network) can be retrieved.
Updating the VM Information
The Virtual Machine can update the information of itself or other Virtual Machine of the Service. This information can be retrieved from any of the Virtual Machines.
For example, the master Virtual Machine can change the ACTIVE attribute from one Virtual Machine to another one. Then, this information can be used to trigger any kind of action in the other Virtual Machine.
onegate vm update 9 --data ACTIVE=YES
onegate vm show 9 --json
{
  "VM": {
    "NAME": "slave_0_(service_1)",
    "ID": "9",
    "STATE": "3",
    "LCM_STATE": "3",
    "USER_TEMPLATE": {
      "ACTIVE": "YES",
      "FROM_APP": "4fc76a938fb81d3517000003",
      "FROM_APP_NAME": "ttylinux - kvm",
      "LOGO": "images/logos/linux.png",
      "ROLE_NAME": "slave",
      "SERVICE_ID": "1"
    },
    "TEMPLATE": {
      "NIC": [

      ]
    }
  }
}
Deleting attribute from VM Information
The Virtual Machine can delete attributes from its own template or from other Virtual Machines in its Service.
For example, to erase the ACTIVE attribute from Virtual Machine 9 you can execute the following in any Service VM:
onegate vm update 9 --erase ACTIVE
onegate vm show 9 --json
{
  "VM": {
    "NAME": "slave_0_(service_1)",
    "ID": "9",
    "STATE": "3",
    "LCM_STATE": "3",
    "USER_TEMPLATE": {
      "FROM_APP": "4fc76a938fb81d3517000003",
      "FROM_APP_NAME": "ttylinux - kvm",
      "LOGO": "images/logos/linux.png",
      "ROLE_NAME": "slave",
      "SERVICE_ID": "1"
    },
    "TEMPLATE": {
      "NIC": [

       ]
    }
  }
}
Self-Configuration
There are several actions to adapt the Service to a given situation. Actions on any of the Virtual Machines can be performed individually. Also, the size of the Service can be customized just specifying a cardinality for each of the roles.
Performing actions on a VM
The following actions can be performed in any of the Virtual Machines of the Service.
onegate vm resumeonegate vm stoponegate vm suspendonegate vm terminateonegate vm rebootonegate vm poweroffonegate vm reschedonegate vm unreschedonegate vm holdonegate vm release
Check this guide to know more about states and operations.
Change Service cardinality
The number of Virtual Machines of a Service can be also modified from any of the Virtual Machines that have access to the OneGate Server.
$ onegate service scale --role slave --cardinality 2
$ onegate service show
SERVICE 1
NAME                : PANACEA service
STATE               : SCALING

ROLE master
VM 8
NAME                : master_0_(service_1)
STATE               : RUNNING
IP                  : 192.168.122.23

ROLE slave
VM 9
NAME                : slave_0_(service_1)
STATE               : RUNNING
VM 10
NAME                : slave_1_(service_1)
STATE               : PENDING