Creating Disk Images
When it comes to creating OS disk images for your VM guests, you have several options:
OpenNebula Marketplace Appliances: Utilize ready-to-use OpenNebula Marketplace appliances.
OpenNebula Apps Project: Build or customize your own images using the build toolchain provided by the OpenNebula Apps project.
Manual Installation: Perform a manual installation directly in a running VM guest.
OpenNebula Marketplace Appliances
If you have access to the public OpenNebula Marketplace from your frontend, you’ll find pre-configured images ready to run in an OpenNebula Cloud.
To retrieve images from the OpenNebula Marketplace:
Navigate to the Storage/Apps tab in Sunstone.
Select one of the available images.
Click the Download button.

Using the CLI, you can list an import images using these commands:
onemarketapp list
ID NAME VERSION SIZE STAT TYPE REGTIME MARKET ZONE
[...]
41 boot2docker 1.10.2 32M rdy img 02/26/16 OpenNebula Public 0
42 alpine-vrouter (KVM) 1.0.3 256M rdy img 03/10/16 OpenNebula Public 0
43 alpine-vrouter (vcenter) 1.0 256M rdy img 03/10/16 OpenNebula Public 0
44 CoreOS alpha 1000.0.0 245M rdy img 04/03/16 OpenNebula Public 0
45 Devuan 1.0 Beta 8M rdy img 05/03/16 OpenNebula Public 0
onemarketapp export Devuan Devuan --datastore default
IMAGE
ID: 12
VMTEMPLATE
ID: -1
OpenNebula Apps Project
The OpenNebula Apps project provides an extensive toolkit for creating specialized appliances tailored to your OpenNebula cloud environment. If you wish to rebuild the provided appliances yourself, check the following information:
Requirements: Review the requirements for building context packages and appliances.
Build Tools Usage: Learn how to use the build tools effectively.
If you need to incorporate additional content or include a new base OS, refer to the developer information for detailed guidance.
Manual Installation
If you are using KVM hypervisor you can create base images using OpenNebula by manually installing the operating system.
Note
You can also start with a base installation provided by the official ditribution channels:
AlmaLinux: https://repo.almalinux.org/almalinux/
Ubuntu: https://cloud-images.ubuntu.com/
Amazon Linux: https://cdn.amazonlinux.com/os-images/latest/kvm/
Oracle Linux: https://yum.oracle.com/oracle-linux-templates.html
In this case, jump to Step 2 and register a persistent VM disk using the downloaded qcow2 image. And in Step 3, the VM template disks should just use the base image (no install CD in this case)
Step 1. Add the Installation Medium
You can add the installation CD to OpenNebula by uploading the image using Sunstone and setting its type to CDROM or using the command line. For example, to add the CentOS ISO file you can use this command:
oneimage create --name centos7-install --path https://buildlogs.centos.org/rolling/7/isos/x86_64/CentOS-7-x86_64-DVD-1910-01.iso --type CDROM --datastore default
Step 2. Create Installation Disk
The disk where the OS will be installed needs to be created as a DATABLOCK. Don’t make the image too big as it can be resized afterwards on VM instantiation. Also make sure to make it persistent so we won’t lose the disk changes when the Virtual Machine terminates.
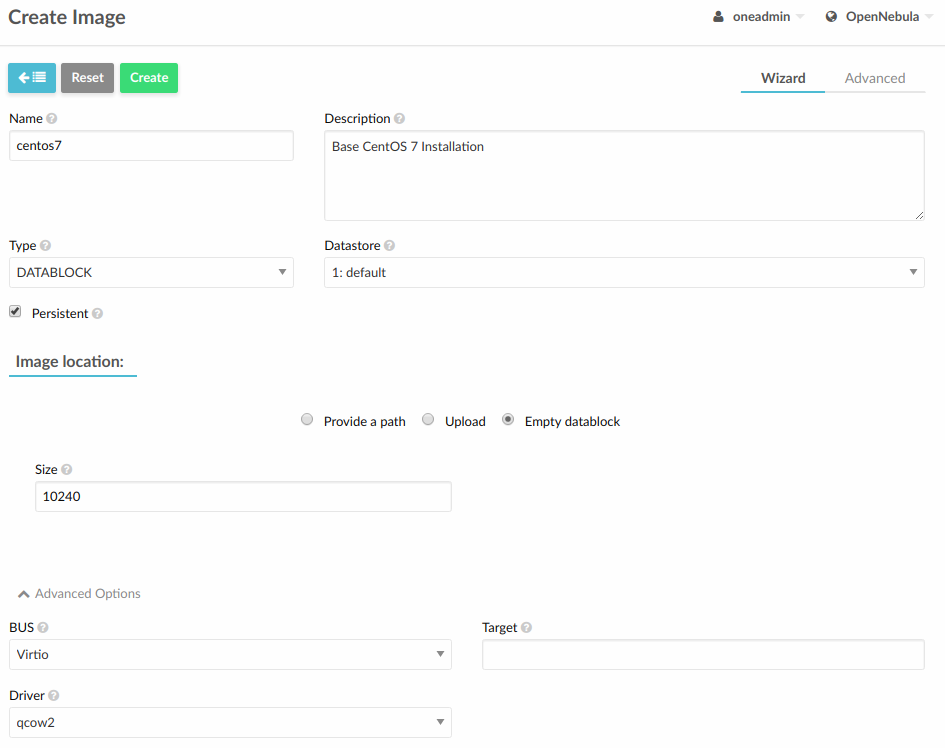
If you are using the CLI you can do the same with this command:
oneimage create --name centos7 --description "Base CentOS 7 Installation" --type DATABLOCK --persistent --prefix vd --driver qcow2 --size 10240 --datastore default
Step 3. Create a Template to do the Installation
You’ll need to create a VM Template with the following characteristics:
In Storage tab,
DISK 0disk will be the installation disk (future base image) created in step 2, andDISK 1Second disk will be the installation CD image created in step 1.In Network tab, attach
NIC 0to a Virtual Network as it will be needed to download context packages.In Boot tab of OS & CPU tab, enable (check) both disks for booting. The boot order will be: first the installation media and second the installation disk.
In Input/Output tab: enable VNC in Graphics and set
TabletUSBin Inputs. This will be useful in case the OS has a graphical installation.
This can be done from the CLI as well using this command:
onetemplate create --name centos7-cli --cpu 1 --memory 1G --disk centos7,centos7-install --nic network --boot disk0,disk1 --vnc --raw "INPUT=[TYPE=tablet,BUS=usb]"
Now, instantiate the recently created VM Template and do the guest OS installation using the VNC viewer. You’ll need to configure the network manually as there are no context packages in the installation media. Upon completion, tell the instanter to reboot the machine, login to the guest OS and follow the Open Cloud Contextualization instructions.
As a tip, one of the latest things you should do when using this method is disabling root password and deleting any extra users created by the installation tools.
Step 4. Shutdown the Machine and Configure the Image
Now, you can shutdown the Virtual Machine from the guest OS. When the Vitual Machine appears as POWEROFF in OpenNebula, terminate it.
Make sure to change the attribute PERSISTENT of the installation disk image to NO and set access permissions for other users (optional).
Using the CLI you can do:
oneimage nonpersistent centos7
oneimage chmod centos7 744