Deploy OpenNebula Front-end on VMware
In this tutorial, we’ll use vOneCloud to install an OpenNebula Front-end on top of an existing VMware installation. Completing this tutorial takes approximately five minutes.
vOneCLoud is an Open Virtual Appliance (OVA) for VMware vSphere. It contains a complete OpenNebula Front-end, installed and configured on an AlmaLinux OS. It is free to download and use, and may be used for small-size production deployments. With vOneCloud, you can deploy on top of your VMware infrastructure all of the OpenNebula services needed to use, manage and run OpenNebula.
In this tutorial, we’ll complete the following high-level steps:
Verify the system requirements.
Download vOneCloud.
Deploy the vOneCloud OVA.
Configure the vOneCloud virtual appliance.
Access the OpenNebula Front-end through the Sunstone GUI.
After finishing this tutorial, you will have deployed a complete, ready-to-use OpenNebula Front-end on top of your VMware infrastructure. You will then be able to log in via the Sunstone GUI, define hosts and deploy virtual machines.
Brief Overview of vOneCloud
vOneCloud ships with a default of 2 vCPUs, 16 GiB of RAM and 100GB of disk size. It is certified for infrastructures of the following dimensions:
Up to 1000 VMs in total
Up to 100 users, with a limit of 10 users accessing the system simultaneously
vOneCloud ships with the following components under the hood:
AlmaLinux |
8 |
OpenNebula |
6.10 (release notes) |
MariaDB |
Default version shipped in AlmaLinux 8 |
Phusion Passenger |
Default version shipped in AlmaLinux 8 (used to run Sunstone) |
vOneCloud ships with several pre-created user accounts, described below:
Account |
Interface |
Role |
Description |
|---|---|---|---|
root |
Linux |
Appliance administrator |
This user can log into the appliance (local login, no SSH). |
oneadmin |
Linux |
Service user |
Used to run all OpenNebula services. |
oneadmin |
OpenNebula Sunstone |
Cloud administrator |
Cloud administrator. Run any task in OpenNebula, including creating other users. |
vOneCloud includes the Control Console, a text-based interface that offers menus for configuring the appliance. You can access the Control Console by opening the vOneCloud appliance console in vCenter. We will use the Control Console to configure vOneCloud in the steps below.
Note
Please bear in mind that vOneCloud is shipped only for evaluation purposes.
Step 1. Verify the System Requirements
To deploy and use the vOneCloud appliance, you will need the following:
vCenter 7.0 with ESX hosts grouped into clusters.
ESX 7.0 with at least 16 GB of free RAM and a datastore with 100 GB of free space.
- Information for connecting to vCenter7.0:
IP or DNS address
Login credentials (username and password) of an admin user
Web browser: Firefox (3.5 and above) or Chrome.
Warning
Other browsers, including Safari, are not supported and may not work well.
Step 2. Download vOneCloud
To download vOneCloud, you will need to complete the download form.
Download the OVA and save it to a convenient location.
Step 3. Deploy the vOneCloud OVA
Log in to your vCenter installation. Determine which cluster to deploy vOneCloud on.
In the left-hand pane, right-click the desired cluster, then click Deploy OVF Template.
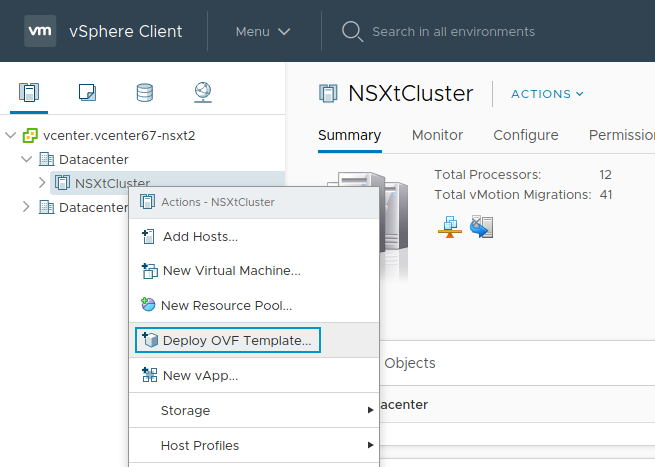
In the Deploy OVF Template dialog box, select Local file, then click Browse. Search for and select the vOneCloud appliance OVA that you downloaded.
Click Next. In the next few screens, follow the vCenter wizard to deploy vOneCloud as you would any other OVA. You will need to select the compute resource to deploy on, the datastore where the OVA will be copied, and the network that the virtual appliance will use.
Note
The datastore used for the vOneCloud appliance needs to have at least 100 GB of available space.
The final screen displays a summary of deployment information. Click Finish.
Wait for the deployment to complete. This should not take more than a few moments.
After the VM has finished booting, the Web Console should display the OpenNebula Control Console:
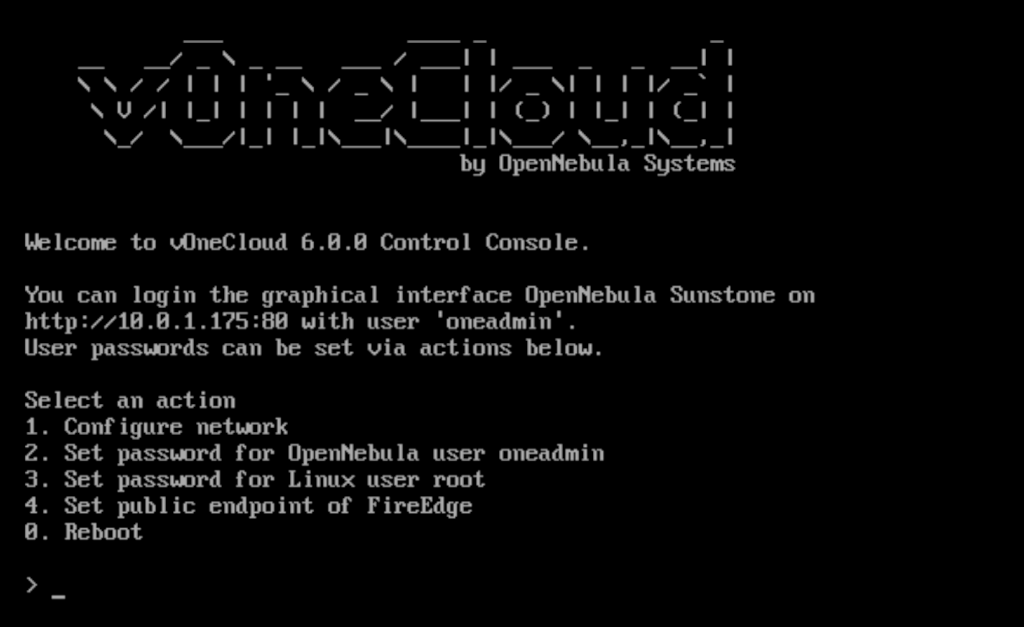
At this point, the vOneCloud virtual appliance is up and running.
Note
If instead of the Control Console you see a normal Linux tty login screen:

then the virtual appliance is displaying the wrong tty terminal. The vOneCloud Control Console is on tty1. To access tty1, press Ctrl+Alt+F1.
In the next steps we’ll configure the vOneCloud appliance.
Step 4. Configure vOneCloud
We’ll configure the following:
Network connection for the vOneCloud appliance
OpenNebula user
oneadminpasswordLinux
rootpasswordIP address or FQDN for the public endpoint of Sunstone
Step 4.1. Configure the Network
The vOneCloud appliance is configured to connect automatically via DHCP. If you are using DHCP, you can skip to the next step. If using a manual network configuration, read on.
To configure the network, in the Control Console press 1. Then, follow these steps:
Select Edit a connection.
Select System eth0.
Select IPv4 Configuration, then Show.
Change the configuration from
AutomatictoManual.
- Fill in the required information for manual configuration:
Addresses: IPv4 address in /24 notation, e.g.
10.0.1.249/24. To add more addresses, use the Add item under the Addresses field.Gateway: IP address of the Gateway for the appliance.
DNS servers: IP address(es) of one or more DNS servers.
Search domain (optional): Search domains for DNS.
Below is an example of a static network configuration on the available network interface, eth0. The interface is set on the 10.0.1.x Class C network, the gateway is at 10.0.1.1 and the DNS server at 8.8.8.8.
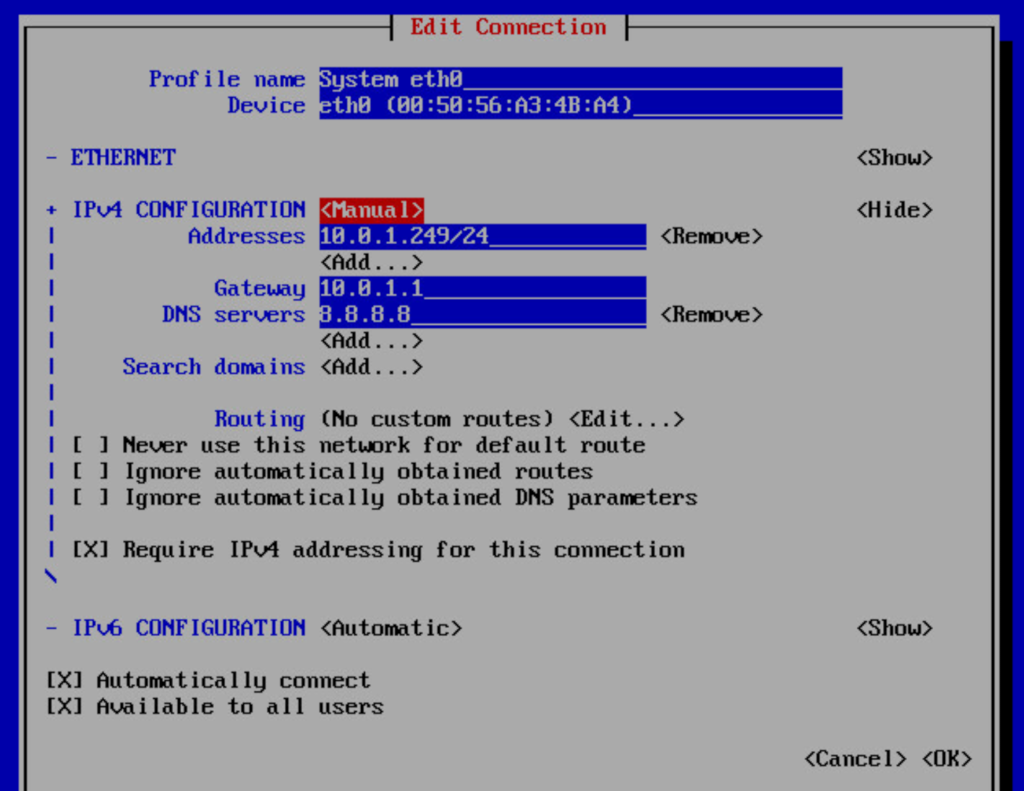
After filling in the information, select OK to exit the dialog.
In the next screen, select Activate a connection and ensure that System eth0 is activated. Then, select Set system hostname and type a hostname.
Step 4.2. Configure the OpenNebula User Password
In the Control Console, press 2 to configure the password for the OpenNebula user, oneadmin.
Enter the desired password. You will use this password to log into the Sunstone GUI in the last step of this tutorial.
Important
This password is for the OpenNebula system user account, not to be confused with the Linux user oneadmin.
Step 4.3. Configure the Linux root User Password
In the Control Console, press 3 to set the password for the Linux OS root user. This is your master password for the virtual appliance.
Warning
This password is not often used, so it’s easy to forget. As in all Unix-like systems, there is no way to recover a lost root password, so ensure it is stored in a safe place.
Step 4.4. Configure a Public IP for vOneCloud
In the Control Console, press 4 to select the FQDN or public IP address that will serve as the endpoint for accessing the Sunstone GUI.
At this point, the vOneCloud appliance is configured and ready to be accessed through the Sunstone GUI.
Important
Bear in mind that in this evaluation version, the FireEdge server for the Sunstone UI is listening on unencrypted HTTP over a public IP address.
Step 5. Access the OpenNebula Front-end through the Sunstone GUI
Open a web browser (Firefox or Chrome) and enter the public IP or FQDN you defined as the Sunstone endpoint in Step 4.4. For example, http://10.0.1.176.
You should be greeted by the Sunstone login screen:
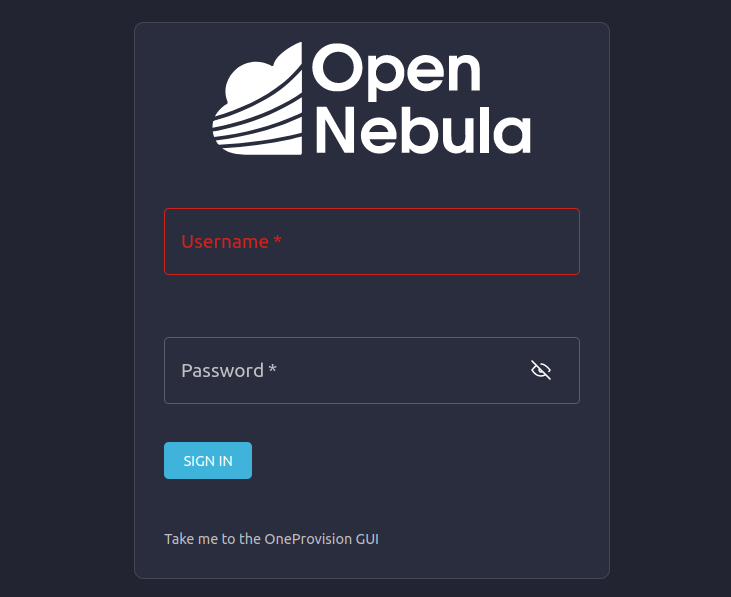
In the Username field, type oneadmin. In the Password field, enter the password you defined for the OpenNebula user in Step 4.2.
Sunstone should display the Dashboard:
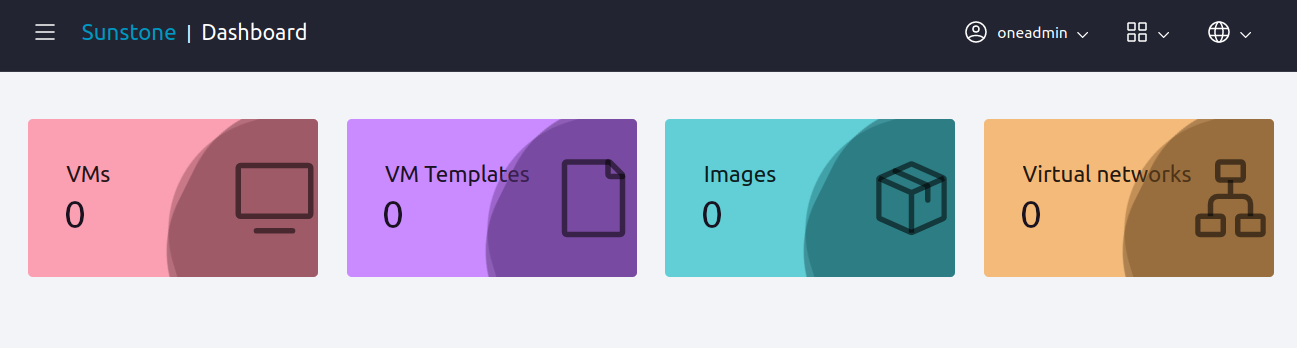
Congratulations — you have deployed and fully configured an OpenNebula Front-end on your VMware infrastructure. At this point, you are ready to add computing clusters to OpenNebula and launch virtual machines.
Note
If you get an error message from Sunstone when attempting to log in, it means the public endpoint for Sunstone is not properly configured.
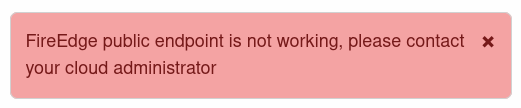
Return to the Control Console and configure a public IP or FQDN (see Step 4.4 above).
Accessing the Linux CLI in the Virtual Appliance
If wish to access the Linux OS running on the virtual appliance, you can do so in one of two ways:
- Using vCenter:
When connected to the Control Console, change to tty2 by pressing
Ctrl+Alt+F2. Then, log in to the system asrootwith the password you defined in Step 4.3.
Next Steps
Want to try out automatic resource provisioning on public infrastructure? Follow the Operations Guide to deploy an Edge Cluster on AWS — in under 10 minutes — and add computing power to your OpenNebula cloud.