Managing Virtual Machines Instances
This guide follows the Creating Virtual Machines guide. Once a Template is instantiated to a Virtual Machine, there are a number of operations that can be performed using the onevm command.
Virtual Machine States
The life-cycle of a Virtual Machine within OpenNebula includes the following stages:
Note
Note that this is a simplified version. If you are a developer you may want to take a look at the complete diagram referenced in the Virtual Machines States Reference guide):
Short state |
State |
Meaning |
|---|---|---|
|
|
By default a VM starts in the pending state, waiting for a resource to run on. It will stay in this state until the scheduler decides to deploy it, or the user deploys it using the |
|
|
The owner has held the VM and it will not be scheduled until it is released. It can be, however, deployed manually. |
|
|
The VM is waiting for one or more disk images to finish the initial copy to the repository (image state still in |
|
|
The system is transferring the VM files (disk images and the recovery file) to the host in which the virtual machine will be running. |
|
|
OpenNebula is waiting for the hypervisor to create the VM. |
|
|
The VM is running (note that this stage includes the internal virtualized machine booting and shutting down phases). In this state, the virtualization driver will periodically monitor it. |
|
|
The VM is migrating from one resource to another. This can be a life migration or cold migration (the VM is saved, powered-off or powered-off hard and VM files are transferred to the new resource). |
|
|
A disk attach/detach, nic attach/detach operation is in process. |
|
|
A system snapshot is being taken. |
|
|
The system is saving the VM files after a migration, stop or suspend operation. |
|
|
In this phase the system cleans up the Host used to virtualize the VM, and additionally disk images to be saved are copied back to the system datastore. |
|
|
OpenNebula has sent the VM the shutdown ACPI signal, and is waiting for it to complete the shutdown process. If after a timeout period the VM does not disappear, OpenNebula will assume that the guest OS ignored the ACPI signal and the VM state will be changed to running, instead of done. |
|
|
The VM is stopped. VM state has been saved and it has been transferred back along with the disk images to the system datastore. |
|
|
Same as stopped, but the files are left in the host to later resume the VM there (i.e. there is no need to re-schedule the VM). |
|
|
Same as suspended, but no checkpoint file is generated. Note that the files are left in the host to later boot the VM there. When the VM guest is shutdown, OpenNebula will put the VM in this state. |
|
|
The VM is shut down. The VM disks are transferred to the system datastore. The VM can be resumed ater. |
|
|
The VM failed. |
|
|
The VM couldn’t be reached, it is in an unknown state. |
|
|
The VM is waiting for the drivers to clean the host after a |
|
|
The VM is done. VMs in this state won’t be shown with |
Create and List Virtual Machines
Note
Read the Creating Virtual Machines guide for more information on how to manage and instantiate VM Templates.
Note
Read the complete reference for Virtual Machine templates.
Assuming we have a VM Template registered called vm-example with ID 6, then we can instantiate the VM issuing a:
onetemplate list
ID USER GROUP NAME REGTIME
6 oneadmin oneadmin vm_example 09/28 06:44:07
onetemplate instantiate vm-example --name my_vm
VM ID: 0
If the template has USER INPUTS defined the CLI will prompt the user for these values:
onetemplate instantiate vm-example --name my_vm
There are some parameters that require user input.
  * (BLOG_TITLE) Blog Title: <my_title>
  * (DB_PASSWORD) Database Password:
VM ID: 0
Afterwards, the VM can be listed with the onevm list command. You can also use the onevm top command to list VMs continuously.
onevm list
    ID USER     GROUP    NAME         STAT CPU     MEM        HOSTNAME        TIME
     0 oneadmin oneadmin my_vm        pend   0      0K                 00 00:00:03
The scheduler will automatically deploy the VM in one of the hosts with enough resources available. The deployment can also be forced by oneadmin using onevm deploy:
onehost list
  ID NAME               RVM   TCPU   FCPU   ACPU   TMEM   FMEM   AMEM   STAT
   2 testbed              0    800    800    800    16G    16G    16G     on
onevm deploy 0 2
onevm list
    ID USER     GROUP    NAME         STAT CPU     MEM        HOSTNAME        TIME
     0 oneadmin oneadmin my_vm        runn   0      0K         testbed 00 00:02:40
and details about it can be obtained with show:
onevm show 0
VIRTUAL MACHINE 0 INFORMATION
ID                  : 0
NAME                : my_vm
USER                : oneadmin
GROUP               : oneadmin
STATE               : ACTIVE
LCM_STATE           : RUNNING
START TIME          : 04/14 09:00:24
END TIME            : -
DEPLOY ID:          : one-0

PERMISSIONS
OWNER          : um-
GROUP          : ---
OTHER          : ---

VIRTUAL MACHINE MONITORING
NET_TX              : 13.05
NET_RX              : 0
USED MEMORY         : 512
USED CPU            : 0

VIRTUAL MACHINE TEMPLATE
...

VIRTUAL MACHINE HISTORY
 SEQ        HOSTNAME REASON           START        TIME       PTIME
   0         testbed   none  09/28 06:48:18 00 00:07:23 00 00:00:00
Searching for VM Instances
You can search for VM instances by using the --search option of the onevm list command. This is specially useful on large environments with many VMs. The filter must be in a VM.KEY=VALUE format and will return all the VMs which fit the filter.
Searching is performed using JSON on the whole body of the VM. You can use the MySQL JSON path without the leading $., information about the path structure can be found in the [MySQL Documentation](https://dev.mysql.com/doc/refman/5.7/en/json.html#json-path-syntax) or [MariaDB Documentation](https://mariadb.com/kb/en/jsonpath-expressions/). Currently, the value is wrapped in % for the query, so it will match if it contains the value provided.
For example, for searching a VM with a specific MAC address:
onevm list --search 'VM.TEMPLATE.NIC[*].MAC=02:00:0c:00:4c:dd'
 ID    USER     GROUP    NAME    STAT UCPU UMEM HOST TIME
 21005 oneadmin oneadmin test-vm pend    0   0K      1d 23h11
Equivalently if there are more than one VM instance that matches the result they will be shown. For example, VMs NAME containing a pattern:
onevm list --search 'VM.NAME=test-vm'
 ID    USER     GROUP    NAME     STAT UCPU UMEM HOST TIME
 21005 oneadmin oneadmin test-vm  pend    0   0K       1d 23h13
 2100  oneadmin oneadmin test-vm2 pend    0   0K      12d 17h59
Warning
This feature is only available for MySQL backend with a version higher or equal than 5.6.
Basic Virtual Machine Operations
Terminating VM Instances
You can terminate an instance with the onevm terminate command, from any state. It will shutdown (if needed) and delete the VM. This operation will free the resources (images, networks, etc) used by the VM.
If the instance is running, there is a --hard option that has the following meaning:
terminate: Gracefully shuts down and deletes a running VM, sending the ACPI signal. Once the VM is shutdown the host is cleaned, and persistent and deferred-snapshot disk will be moved to the associated datastore. If after a given time the VM is still running (e.g. guest ignoring ACPI signals), OpenNebula will returned the VM to theRUNNINGstate.terminate --hard: Same as above but the VM is immediately destroyed. Use this action instead ofterminatewhen the VM doesn’t have ACPI support.
Pausing VM Instances
There are two different ways to temporarily stop the execution of a VM: short and long term pauses. A short term pause keeps all the VM resources allocated to the hosts so its resume its operation in the same hosts quickly. Use the following onevm commands or Sunstone actions:
suspend: the VM state is saved in the running Host. When a suspended VM is resumed, it is immediately deployed in the same Host by restoring its saved state.poweroff: Gracefully powers off a running VM by sending the ACPI signal. It is similar to suspend but without saving the VM state. When the VM is resumed it will boot immediately in the same Host.poweroff --hard: Same as above but the VM is immediately powered off. Use this action when the VM doesn’t have ACPI support.
Note
When the guest is shutdown from within the VM, OpenNebula will put the VM in the poweroff state.
You can also plan a long term pause. The Host resources used by the VM are freed and the Host is cleaned. VM disk state is saved in the system datastore. The following actions are useful if you want to preserve network and storage allocations (e.g. IPs, persistent disk images):
undeploy: Gracefully shuts down a running VM, sending the ACPI signal. The Virtual Machine disks are transferred back to the system datastore. When an undeployed VM is resumed, it is be moved to the pending state, and the scheduler will choose where to re-deploy it.undeploy --hard: Same as above but the running VM is immediately destroyed.stop: Same asundeploybut also the VM state is saved to later resume it.
When the VM is successfully paused you can resume its execution with:
resume: Resumes the execution of VMs in the stopped, suspended, undeployed and poweroff states.
Rebooting VM Instances
Use the following commands to reboot a VM:
reboot: Gracefully reboots a running VM, sending the ACPI signal.reboot --hard: Performs a ‘hard’ reboot.
Delaying VM Instances
The deployment of a PENDING VM (e.g. after creating or resuming it) can be delayed with:
hold: Sets the VM to hold state. The scheduler will not deploy VMs in theholdstate. Please note that VMs can be created directly on hold, using ‘onetemplate instantiate –hold’ or ‘onevm create –hold’.
Then you can resume it with:
release: Releases a VM from hold state, setting it to pending. Note that you can automatically release a VM by scheduling the operation as explained below
Hotplug Devices to a Virtual Machine
Warning
Hotplugging might not be available for every supported hypervisor. Please check the limitations of the specific virtualization driver you’re using to ensure this feature is available before using it.
Disk Hot-plugging
New disks can be hot-plugged to running VMs with the onevm disk-attach and disk-detach commands. For example, to attach to a running VM the Image named storage:
onevm disk-attach one-5 --image storage
To detach a disk from a running VM, find the disk ID of the Image you want to detach using the onevm show command, and then simply execute onevm detach vm_id disk_id:
onevm show one-5
...
DISK=[
  DISK_ID="1",
...
  ]
...
onevm disk-detach one-5 1
NIC Hot-plugging
You can hot-plug network interfaces to VMs in the RUNNING, POWEROFF or SUSPENDED states. Simply specify the network where the new interface should be attached to, for example:
onevm show 2

VIRTUAL MACHINE 2 INFORMATION
ID                  : 2
NAME                : centos-server
STATE               : ACTIVE
LCM_STATE           : RUNNING

...

VM NICS
ID NETWORK      VLAN BRIDGE   IP              MAC
 0 net_172        no vbr0     172.16.1.201    02:00:ac:10:0

...
onevm nic-attach 2 --network net_172
After the operation you should see two NICs, 0 and 1:
onevm show 2
VIRTUAL MACHINE 2 INFORMATION
ID                  : 2
NAME                : centos-server
STATE               : ACTIVE
LCM_STATE           : RUNNING

...


VM NICS
ID NETWORK      VLAN BRIDGE   IP              MAC
 0 net_172        no vbr0     172.16.1.201    02:00:ac:10:00:c9
                              fe80::400:acff:fe10:c9
 1 net_172        no vbr0     172.16.1.202    02:00:ac:10:00:ca
                              fe80::400:acff:fe10:ca
...
It is possible to attach (and live-attach) PCI and SR-IOV interfaces. Simply select the device by its address, id, vendor or class.
onevm nic-attach 2 --network net_172 onevm nic-attach 2 --network net_172 --pci '00:06.1'
Important, predictable PCI addresses for guests will be only generated if PCI bus 1 is present in the virtual machine as PCI bridges cannot be hotplugged.
You can also detach a NIC by its ID. If you want to detach interface 1 (MAC 02:00:ac:10:00:ca), execute:
onevm nic-detach 2 1
NIC update
Qos attributes can be updated by the command onevm nic-update. If the Virtual Machine is running the action triggers the driver action to live-update the network parameters.
cat update_nic.txt
NIC = [
    INBOUND_AVG_BW = "512",
    INBOUND_PEAK_BW = "1024"
]
onevm nic-update 0 0 update_nic.txt
Security Group Hot-plugging
You can live attach or detach security groups to VMs. Simply specify the VM, network interface and security group to attach, for example:
onevm sg-attach centos-server 0 101
Similary to detach a security group execute:.
onevm sg-detach centos-server 0 101
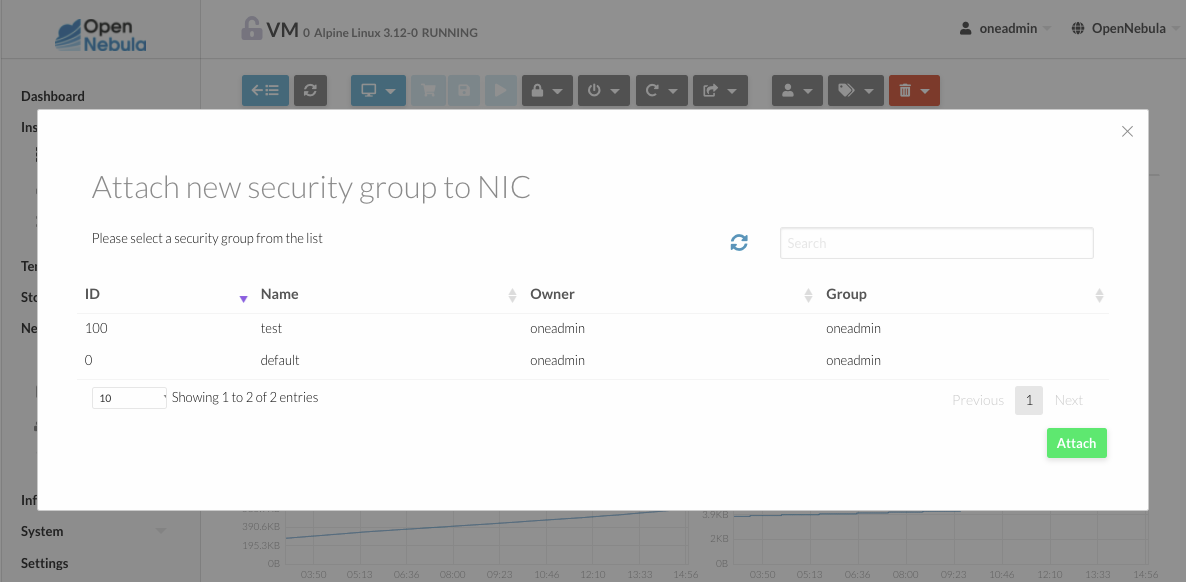
On Sunstone, you can attach and detach security groups to a NIC on a running or power off VM going to the network tab.
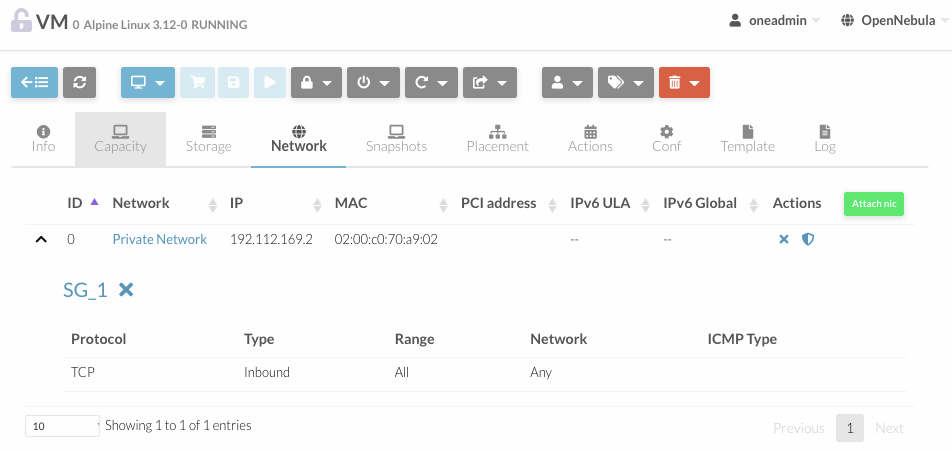
To attach a new security group, you need to click on the shield on the NIC row. A dialog will be displayed where you can find all the security groups that do not belong to the selected network.
To detach the security group, you must click on the X next to the security group. A confirm dialog will be displayed to ensure that you want to detach the security group.
PCI devices
You can attach or detach a PCI to a Virtual Machine in POWEROFF and UNDEPLOYED state. Example:
onevm pci-attach alpine01 --pci_class 0c03 --pci_device 0015 --pci_vendor 1912
onevm pci-detach alpine01 0
Virtual Machine System Snapshots
Warning
Snapshotting might not be available for every supported hypervisor. Please check the limitations of the specific virtualization driver you’re using to ensure this feature is available before using it.
A system snapshot will contain the current disks and memory state. You can create, delete and restore snapshots for running VMs.
onevm snapshot-create 4 "just in case"
onevm show 4
...
SNAPSHOTS
  ID         TIME NAME                                           HYPERVISOR_ID
   0  02/21 16:05 just in case                                   onesnap-0
onevm snapshot-revert 4 0 --verbose
VM 4: snapshot reverted
Warning
Snapshots for VMs running under the KVM hypervisor presents consideration the following limitations:
Snapshots are only available if all the VM disks use the qcow2 driver.
Virtual Machine Disk Snapshots
There are two kinds of operations related to disk snapshots:
disk-snapshot-create,disk-snapshot-revert,disk-snapshot-delete,disk-snapshot-rename: Allows the user to take snapshots of the disk states and return to them during the VM life-cycle. It is also possible to rename or delete snapshots.disk-saveas: Exports VM disk (or a previously created snapshot) to an Image in an OpenNebula Datastore. This is a live action.
Warning
Disk snapshost might have different limitations depending on the hypervisor. Please check the limitations of the specific virtualization driver you’re using to ensure this feature is available before using it.
Managing Disk Snapshots
A user can take snapshots of VM disks to create a checkpoint of the state of an specific disk at any time. These snapshots can be organized, depending on the storage backend:
In a tree-like structure, meaning that every snapshot has a parent, except for the first snapshot whose parent is
-1. The active snapshot, the one the user has last reverted to, or taken, will act as the parent of the next snapshot. It’s possible to delete snapshots that are not active and that have no children.Flat structure, without parent/child relationship. In that case, snapshots can be freely removed.
Disk snapshots are managed with the following commands:
disk-snapshot-create <vmid> <diskid> <name>: Creates a new snapshot of the specified disk.disk-snapshot-revert <vmid> <diskid> <snapshot_id>: Reverts to the specified snapshot. The snapshots are immutable, therefore the user can revert to the same snapshot as many times as he wants, the disk will return always to the state of the snapshot at the time it was taken.disk-snapshot-delete <vmid> <diskid> <snapshot_id>: Deletes a snapshot if it has no children and is not active.
disk-snapshot-create can take place when the VM is in RUNNING state, provided that the drivers support it, while disk-snapshot-revert requires the VM to be POWEROFF or SUSPENDED. Live snapshots are only supported for some hypervisors and storage drivers:
Hypervisor
VM_MAD=kvmcombined withTM_MAD=qcow2datastores. In this case OpenNebula will request that the hypervisor executesvirsh snapshot-create.Hypervisor
VM_MAD=kvmwith Ceph datastores (TM_MAD=ceph). In this case OpenNebula will initially create the snapshots as Ceph snapshots in the current volume.
With these combinations (CEPH and qcow2 datastores and KVM hypervisor) you can enable QEMU Guest Agent. With this agent enabled the filesystem will be frozen while the snapshot is being done.
Warning
OpenNebula will not automatically handle live disk-snapshot-create and disk-snapshot-revert operations for VMs in RUNNING if the virtualization driver do not support it (check the limitations of the corresponding virtualization driver guide to know if this feature is available for your hypervisor). In this case the user needs to suspend or poweroff the VM before creating the snapshot.
See the Storage Driver guide for a reference on the driver actions invoked to perform live and non-live snapshost.
Warning
Depending on the DISK/CACHE attribute the live snapshot may or may not work correctly. To be sure, you can use CACHE=writethrough, although this delivers the slowest performance.
Persistent Images and Disk Snapshots
These actions are available for both persistent and non-persistent images. In the case of persistent images the snapshots will be preserved upon VM termination and will be able to be used by other VMs using that image. See the snapshots section in the Images guide for more information.
Saving a VM Disk to an Image (disk-saveas)
Any VM disk can be saved to a new image (if the VM is in RUNNING, POWEROFF, SUSPENDED, UNDEPLOYED or STOPPED states). This is a live operation that happens immediately. This operation accepts --snapshot <snapshot_id> as an optional argument, which specifies a disk snapshot to use as base of the new Image, instead of the current disk state (value by default).
Warning
This action is not in sync with the hypervisor. If the VM is in RUNNING state make sure the disk is unmounted (preferred), synced or quiesced in some way or another before doing the disk-saveas operation.
Resizing VM Resources
You may resize the capacity assigned to a Virtual Machine in terms of the virtual CPUs, memory and CPU allocated. VM resizing can be done in any of the following states: POWEROFF, UNDEPLOYED and with some limitations also live in RUNNING state.
If you have created a Virtual Machine and you need more resources, the following procedure is recommended:
Perform any operation needed to prepare your Virtual Machine for shutting down, e.g. you may want to manually stop some services
Poweroff the Virtual Machine
Resize the VM
Resume the Virtual Machine using the new capacity
Note that using this procedure the VM will preserve any resource assigned by OpenNebula, such as IP leases.
The following is an example of the previous procedure from the command line:
onevm poweroff web_vm
onevm resize web_vm --memory 2G --vcpu 2
onevm resume web_vm
Live Resize of Capacity
If you need to resize the capacity in the RUNNING state you have to setup some extra attributes to VM template, this attributes must be set before the VM is started. These attributes are driver specific, more info for KVM and vCenter.
Warning
Hotplug is only implemented only for KVM and vCenter. Added CPUs will be in offline state after the resize. Enable them with echo 1 > /sys/devices/system/cpu/cpu<ID>/online
Resizing VM Disks
If the disks assigned to a Virtual Machine need more size, this can achieved at instantiation time of the VM. The SIZE parameter of the disk can be adjusted and, if it is bigger than the original size of the image, OpenNebula will:
Increase the size of the disk container prior to launching the VM
Using the contextualization packages, at boot time the VM will grow the filesystem to adjust to the new size.
You can override the size of a DISK in a VM Template at instantiation:
onetemplate instantiate <template> --disk u2104:size=20000 # Image u2104 will be resized to 2 GB
You can also resize VM disks for both RUNNING and POWEROFF VMs.
onevm disk-resize <vm_id> <disk_id> <new_size> # <new_size> must be greater than current disk size
This will make the VM disk grow on the hypervisor node. Then the contextualization service running inside the guest OS will expand the filesystem with the newfound free space. The support for this filesystem expansion depends on the Guest OS.
Important
In FreeBSD the resize of the root filesystem inside the guest OS is not performed automatically by the Contextualization Service. This leads to filesystem corruption and permanent data loss. This only applies to the partition mounted on / , partitions with other mountpoints will be resized.
Important
In vCenter a disk can be resized only if the VM is in poweroff state and the VM has no snapshots or the vCenter template, which the VM is based on, doesn’t use linked clones.
Updating the Virtual Machine Configuration
Some of the VM configuration attributes defined in the VM Template can be updated after the VM is created. The onevm updateconf command will allow you to change the following attributes:
Attribute |
Sub-attributes |
|---|---|
|
|
|
|
|
|
|
|
|
|
|
|
|
|
|
|
|
Any value, except |
Visit the Virtual Machine Template reference for a complete description of each attribute.
Warning
This action might not be supported for RUNNING VMs depending on the hypervisor. Please check the limitation section of the specific virtualization driver.
Note
In running state only changes in CONTEXT take effect immediately, other values may need a VM restart. Also, the action may fail and the context will not be changed if the VM is running. You can try to manualy trigger the action again.
Cloning a Virtual Machine
A VM Template or VM instance can be copied to a new VM Template. This copy will preserve the changes made to the VM disks after the instance is terminated. The template is private, and will only be listed to the owner user.
There are two ways to create a persistent private copy of a VM:
Instantiate a VM Template with the to persistent option.
Save a existing VM instance with
onevm save
Instantiate to persistent
When instantiating to persistent the Template is cloned recursively (a private persistent clone of each disk Image is created), and that new Template is instantiated.
To “instantiate to persistent” use the --persistent option:
onetemplate instantiate web_vm --persistent --name my_vm
VM ID: 31
onetemplate list
  ID USER            GROUP           NAME                                REGTIME
   7 oneadmin        oneadmin        web_vm                       05/12 14:53:11
   8 oneadmin        oneadmin        my_vm                        05/12 14:53:38
oneimage list
  ID USER       GROUP      NAME            DATASTORE     SIZE TYPE PER STAT RVMS
   7 oneadmin   oneadmin   web-img         default       200M OS   Yes used    1
   8 oneadmin   oneadmin   my_vm-disk-0    default       200M OS   Yes used    1
Equivalently, in Sunstone activate the “Persistent” switch next to the create button.
Please bear in mind the following ontemplate instantiate --persistent limitation: Volatile disks cannot be persistent. The contents of the disks will be lost when the VM is terminated. The cloned VM Template will contain the definition for an empty volatile disk.
Save a VM Instance
Alternatively, a VM that was not created as persistent can be saved before it is destroyed. To do so, the user has to poweroff the VM first and then use the save operation.
This action clones the VM source Template, replacing the disks with copies of the current disks (see the disk-snapshot action). If the VM instance was resized, the current capacity is also used. The new cloned Images can be made persistent with the --persistent option. NIC interfaces are also overwritten with the ones from the VM instance, to preserve any attach/detach action.
onevm save web_vm copy_of_web_vm --persistent
Template ID: 26
Please bear in mind the following onevm save limitations:
The VM’s source Template will be used. If this Template was updated since the VM was instantiated, the new contents will be used.
Volatile disks cannot be saved, and the current contents will be lost. The cloned VM Template will contain the definition for an empty volatile disk.
Disks and NICs will only contain the target Image/Network NAME and UNAME if defined. If your Template requires extra configuration, you will need to update the new Template.
Scheduled Actions for Virtual Machines
Scheduled actions lets you program operations over a VM to be performed in the future, e.g. Shutdown the VM after 5 hours. OpenNebula supports two types of schedule actions:
punctual, that can be also periodic.
relative actions.
One-Time Punctual Actions
Most of the onevm commands accept the --schedule option, allowing users to delay the actions until the given date and time.
Here is an usage example:
onevm suspend 0 --schedule "09/20"
VM 0: suspend scheduled at 2016-09-20 00:00:00 +0200
onevm resume 0 --schedule "09/23 14:15"
VM 0: resume scheduled at 2016-09-23 14:15:00 +0200
onevm show 0
VIRTUAL MACHINE 0 INFORMATION
ID                  : 0
NAME                : one-0

[...]

SCHEDULED ACTIONS
ID    ACTION  ARGS   SCHEDULED REPEAT   END STATUS
 0   suspend     - 09/20 00:00              Next in 12.08 days
 1    resume     - 09/23 14:15              Next in 15.67 days
These actions can be deleted or edited using the onevm sched-delete and onevm sched-update command. The time attributes use Unix time internally.
onevm sched-update 0 0

ID="0"
PARENT_ID="0"
TYPE="VM"
ACTION="suspend"
TIME="1703164454"
REPEAT="-1"
END_TYPE="-1"
END_VALUE="-1"
DONE="-1"
Note
The attributes ID, PARENT_ID and TYPE are OpenNebula system attributes and can’t be modified. For more details about the attributes which can be modified see Scheduled Action Template
Periodic Punctual Actions
To schedule periodic actions also use the option –schedule. However this command also needs more options to define the periodicity of the action:
--weekly: defines a weekly periodicity, so, the action will be execute all weeks, the days that the user defines.
--monthly: defines a monthly periodicity, so, the action will be execute all months, the days that the user defines.
--yearly: defines a yearly periodicity, so, the action will be execute all year, the days that the user defines.
--hourly: defines a hourly periodicity, so, the action will be execute each ‘x’ hours.
--end: defines when you want that the relative action finishes.
The option --weekly, --monthly and --yearly need the index of the days that the users wants execute the action.
--weekly: days separate with commas between 0 (Sunday) and 6 (Saturday). [0,6]
--monthly: days separate with commas between 1 and 31. [1,31]
--yearly: days separate with commas between 0 and 365. [0,365]
The option --hourly needs a number with the number of hours. [0,168] (1 week)
The option --end can be a number or a date:
Number: defines the number of repetitions.
Date: defines the date that the user wants to finished the action.
Here is an usage example:
onevm suspend 0 --schedule "09/20" --weekly "1,5" --end 5
VM 0: suspend scheduled at 2018-09-20 00:00:00 +0200
onevm resume 0 --schedule "09/23 14:15" --weekly "2,6" --end 5
VM 0: resume scheduled at 2018-09-23 14:15:00 +0200
onevm snapshot-create 0 snap-01 --schedule "09/23" --hourly 5 --end "12/25"
VM 0: snapshot-create scheduled at 2018-09-23 14:15:00 +0200
onevm show 0
VIRTUAL MACHINE 0 INFORMATION
ID                  : 0
NAME                : one-0

[...]

SCHEDULED ACTIONS
ID           ACTION     ARGS    SCHEDULED        REPEAT            END  STATUS
 0          suspend        -  09/20 00:00    Weekly 1,5  After 5 times  Next in 1.08 days
 1           resume        -  09/23 14:15    Weekly 2,6  After 5 times  Next in 4.67 days
 2  snapshot-create  snap-01  09/19 21:16  Each 5 hours    On 12/25/18  Next in 4.78 hours
These actions can be deleted or edited using the onevm sched-delete and onevm sched-update command. The time attributes use Unix time internally.
onevm sched-update 0 2

ID="2"
PARENT_ID="0"
TYPE="VM"
ACTION="snapshot-create"
ARGS="snap-01"
TIME="1701998190"
REPEAT="3"
DAYS="5"
END_TYPE="2"
END_VALUE="1893452400"
DONE="1701980968"
Relative Actions
Scheduled actions can be also relative to the Start Time of the VM. That is, it can be set on a VM Template, and apply to the number of seconds after the VM is instantiated.
For instance, a VM Template with the following SCHED_ACTION will spawn VMs that will automatically shutdown after 1 hour of being instantiated.
onetemplate update 0

SCHED_ACTION=[
   ACTION="terminate",
   ID="0",
   TIME="+3600" ]
This functionality is present graphically in Sunstone in the VM Template creation and update dialog, and in the VM Actions tab.
The following table summarizes the actions that can be scheduled. Note that some of the above actions need some parameters to run (e.g. a disk ID or a snapshot name).
Action |
Arguments |
|
|
|
|
|
|
|
|
|
|
|
|
|
|
|
|
|
|
|
name |
|
snap ID |
|
snap ID |
|
disk ID, name |
|
disk ID, snap ID |
|
disk ID, snap ID |
|
datastore ID, reset |
You can pass arguments to the scheduled actions using the parameter ARGS in the action definition. For example:
onevm sched-update 0 0

ID="2"
PARENT_ID="0"
TYPE="VM"
ACTION="disk-snapshot-create",
ARGS="0, disksnap_example",
DAYS="1,5",
END_TYPE="1",
END_VALUE="5",
ID="0",
REPEAT="0",
TIME="1537653600"
In this example, the first argument would be the disk and the second the snapshot name.
Note
The arguments are mandatory. If you use the CLI or Sunstone they are generated automatically for the actions.
Virtual Machine Charters
This functionality automatically adds scheduling actions in VM templates. To enable Charters, you only need add the following to sunstone-server.conf file:
:leases:
  suspend:
    time: "+1209600"
    color: "#000000"
  terminate:
    time: "+1209600"
    color: "#e1ef08"
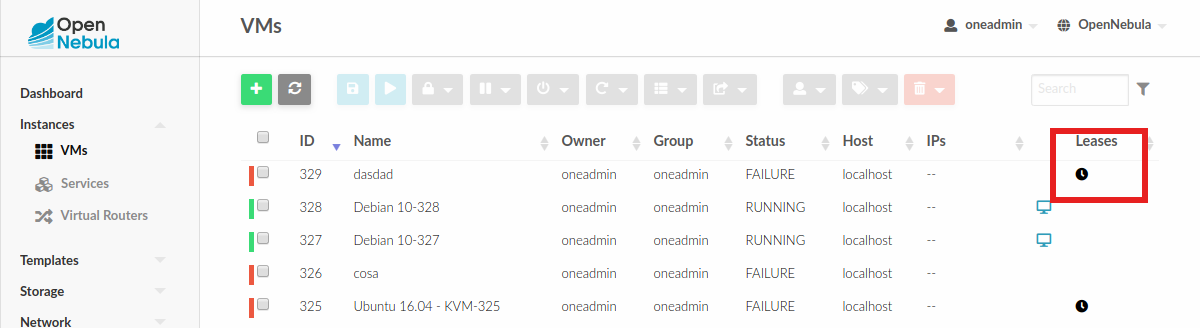
In the previous example you can see that Scheduled Actions are added to the VMs. You can tune the following values:
time |
Time for the action in secs example: +1209600 is two weeks. The order is very important since time adds to the previous scheduled action. |
color |
Is the color in hexadecimal since the icon will appear in the Vms table |
This functionality is also available in the CLI, through the following commands:
onevm create-chart
onevm sched-update
onevm sched-delete
The charters can be added into the onevm configuration file /etc/one/cli/onevm.yaml:
:charters:
  :suspend:
    :time: "+1209600"
  :terminate:
    :time: "+1209600"
The information about the charters can be checked with the command onevm show:
SCHEDULED ACTIONS
ID     ACTION     ARGS    SCHEDULED        REPEAT            END  STATUS
 1  terminate        -  01/01 03:00                               In 1.25 hours
User Defined Data
Custom attributes can be added to a VM to store metadata related to this specific VM instance. To add custom attributes simply use the onevm update command.
onevm show 0
...

VIRTUAL MACHINE TEMPLATE
...
VMID="0"
onevm update 0
ROOT_GENERATED_PASSWORD="1234"
~
~
onevm show 0
...

VIRTUAL MACHINE TEMPLATE
...
VMID="0"

USER TEMPLATE
ROOT_GENERATED_PASSWORD="1234"
Virtual Machine Monitoring
The monitoring probes gathers information attributes and insert them in the VM template. This information is mainly used for:
Monitor the status of the VM.
Gather the resource usage data of the VM.
In general, you can find the following monitoring information for a VM, note that each hypervisor may include additional attributes:
Key |
Description |
|---|---|
ID |
ID of the VM in OpenNebula. |
UUID |
Unique ID, must be unique across all hosts. |
MONITOR |
Base64 encoded monitoring information, the monitoring information includes following data: |
TIMESTAMP |
Timestamp of the measurement. |
CPU |
Percentage of 1 CPU consumed (two fully consumed cpu is 2.0). |
MEMORY |
MEMORY consumption in kilobytes. |
DISKRDBYTES |
Amount of bytes read from disk. |
DISKRDIOPS |
Number of IO read operations. |
DISKWRBYTES |
Amount of bytes written to disk. |
DISKWRIOPS |
Number of IO write operations. |
NETRX |
Received bytes from the network. |
NETTX |
Sent bytes to the network. |
Virtual Machine VM Permissions
OpenNebula comes with an advanced ACL rules permission mechanism intended for administrators, but each VM object has also implicit permissions that can be managed by the VM owner. To share a VM instance with other users or to allow them to list and show its information, use the onevm chmod command:
onevm show 0
...
PERMISSIONS
OWNER          : um-
GROUP          : ---
OTHER          : ---
onevm chmod 0 640
onevm show 0
...
PERMISSIONS
OWNER          : um-
GROUP          : u--
OTHER          : ---
Administrators can also change the VM’s group and owner with the chgrp and chown commands.
Advanced Operations for Administrators
There are some onevm commands operations meant for the cloud administrators:
Scheduling:
resched: Sets the reschedule flag for the VM. The Scheduler will migrate (or migrate –live, depending on the Scheduler configuration) the VM in the next monitorization cycle to a Host that better matches the requirements and rank restrictions. Read more in the Scheduler documentation.unresched: Clears the reschedule flag for the VM, canceling the rescheduling operation.
Deployment:
deploy: Starts an existing VM in a specific Host.migrate --live: The Virtual Machine is transferred between Hosts with no noticeable downtime.migrate: The VM gets stopped and resumed in the target host. In an infrastructure with multiple system datastores, the VM storage can be also migrated (the datastore id can be specified).
Note: By default, the above operations do not check the target host capacity. You can use the --enforce option to be sure that the host capacity is not overcommitted.
Troubleshooting:
recover: If the VM is stuck in any other state (or the boot operation does not work), you can recover the VM with the following options. Read the Virtual Machine Failures guide for more information.--success: simulates the success of the missing driver action--failure: simulates the failure of the missing driver action--retry: retries to perform the current driver action. Optionally the--interactivecan be combined if its a Transfer Manager problem.--delete: Deletes the VM, moving it to the DONE state immediately--recreate: Deletes the VM, and moves it to the PENDING state
migrateorresched: A VM in the UNKNOWN state can be booted in a different host manually (migrate) or automatically by the scheduler (resched). This action must be performed only if the storage is shared, or manually transfered by the administrator. OpenNebula will not perform any action on the storage for this migration.
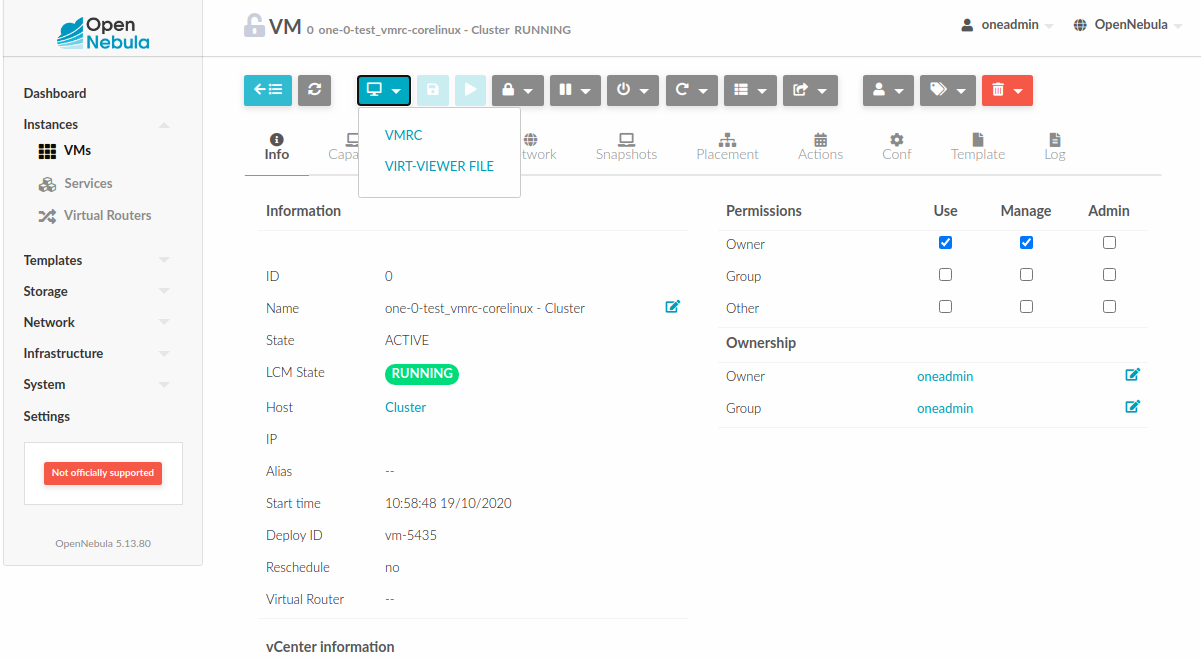
Accessing VM Console and Desktop
Sunstone provides several different methods to access your VM console and desktop: VNC, SPICE, RDP, VMRC, SSH, and virt-viewer. If configured in the VM, these methods can be used to access the VM console through Sunstone. For some of those connections, we will need to start a new FireEdge server to establish the remote connection. This section shows how these different technologies can be configured and what each requirement is.
FireEdge automatically installs dependencies for Guacamole connectinos and VMRC proxy, which are necessary to use VNC, RDP, SSH, and VMRC.
Connection |
With FireEdge |
Without FireEdge |
|---|---|---|
VNC |
Guacamole |
noVNC |
RDP |
Guacamole |
noVNC |
SSH |
Guacamole |
N/A |
SPICE |
noVNC |
noVNC |
|
noVNC |
noVNC |
VMRC |
VMRC proxy |
N/A |
Important
FireEdge server must be running to get Guacamole connections working. For VMRC, Sunstone and FireEdge must be running on the same server.
Requirements for connections via noVNC
The Sunstone GUI offers the possibility of starting a VNC/SPICE session to a Virtual Machine. This is done by using a VNC/SPICE websocket-based client (noVNC) on the client side and a VNC proxy translating and redirecting the connections on the server side.
To enable VNC/SPICE console service, you must have a GRAPHICS section in the VM template, as
stated in the documentation. Make sure the attribute IP is set correctly (0.0.0.0 to allow
connections from everywhere), otherwise no connections will be allowed from the outside.
For example, to configure this in the Virtual Machine template:
GRAPHICS=[
    LISTEN="0.0.0.0",
    TYPE="vnc"
]
Make sure there are no firewalls blocking the connections and websockets enabled in your browser.
The proxy will redirect the websocket data from the VNC proxy port to the VNC port stated in
the template of the VM. The value of the proxy port is defined in sunstone-server.conf as
:vnc_proxy_port.
You can retrieve useful information from /var/log/one/novnc.log. Your browser must support
websockets, and have them enabled.
When using secure websockets, make sure that your certificate and key (if not included in the certificate) are correctly set in the Sunstone configuration files. Note that your certificate must be valid and trusted for the wss connection to work.
If you are working with a certificate that is not accepted by the browser, you can manually add
it to the browser trust list by visiting https://sunstone.server.address:vnc_proxy_port.
The browser will warn that the certificate is not secure and prompt you to manually trust it.
Configuring your VM for VNC
VNC is a graphical console with wide support among many hypervisors and clients.
VNC without FireEdge
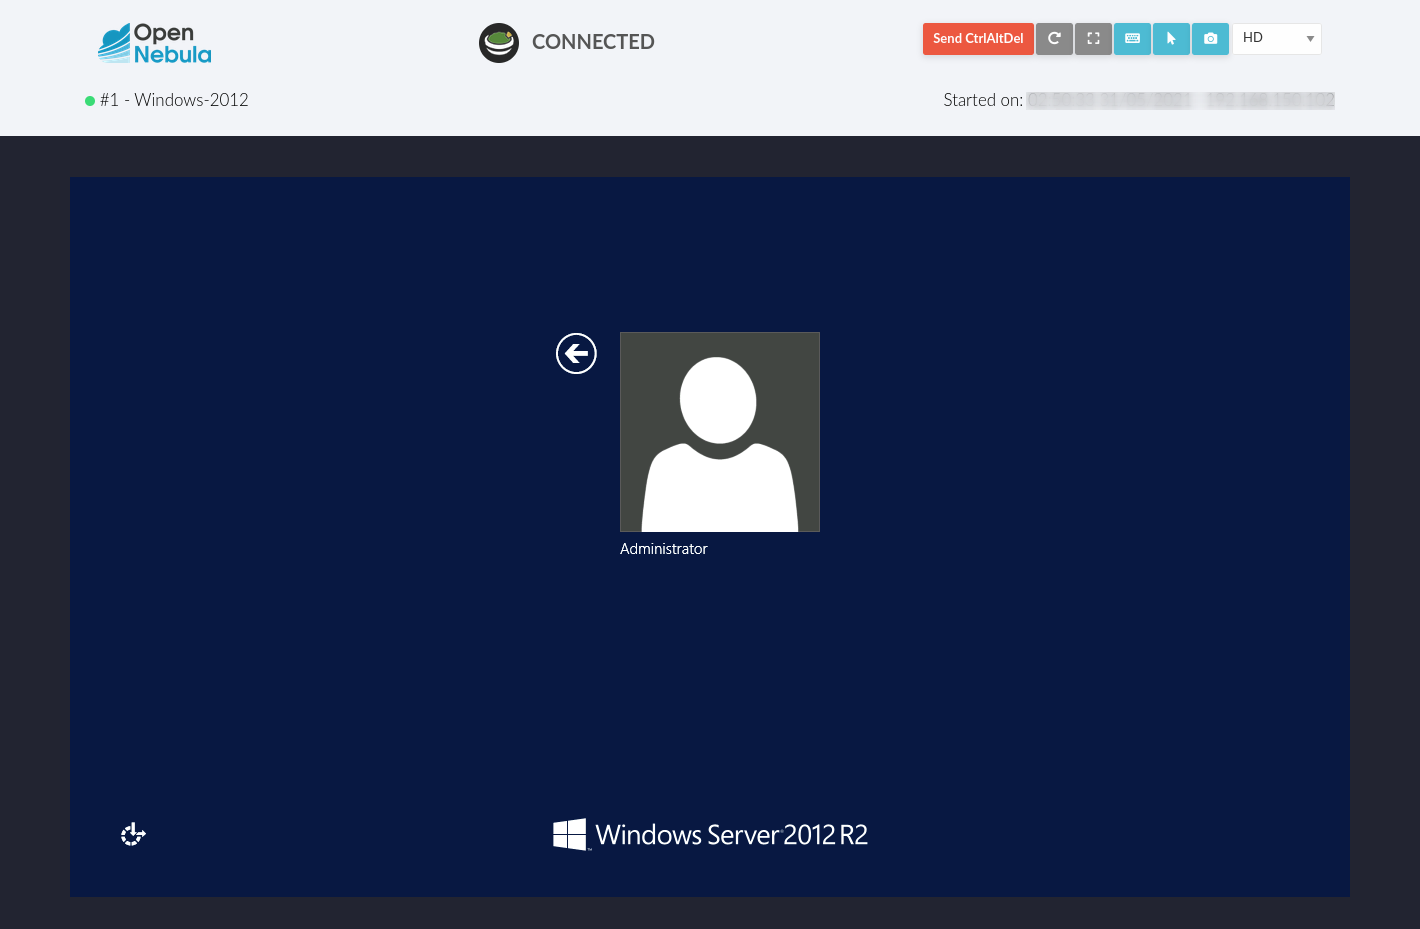
When clicking the VNC icon a request is made, and if a VNC session is possible, the Sunstone server will add the VM
Host to the list of allowed vnc session targets and create a random token associated with it. The
server responds with the session token, then a noVNC dialog pops up.
The VNC console embedded in this dialog will try to connect to the proxy, either using websockets (default) or emulating them using Flash. Only connections providing the right token will be successful. The token expires and cannot be reused.
Make sure that you can connect directly from the Sunstone Front-end to the VM using a normal VNC
client tool, such as vncviewer.
VNC with FireEdge
To enable the VNC console service you must have a GRAPHICS section in the VM template,
as stated in the documentation.
To configure it via Sunstone, you need to update the VM template. In the Input/Output tab, you can see the graphics section where you can add the IP, the port, a connection password or define your keymap.
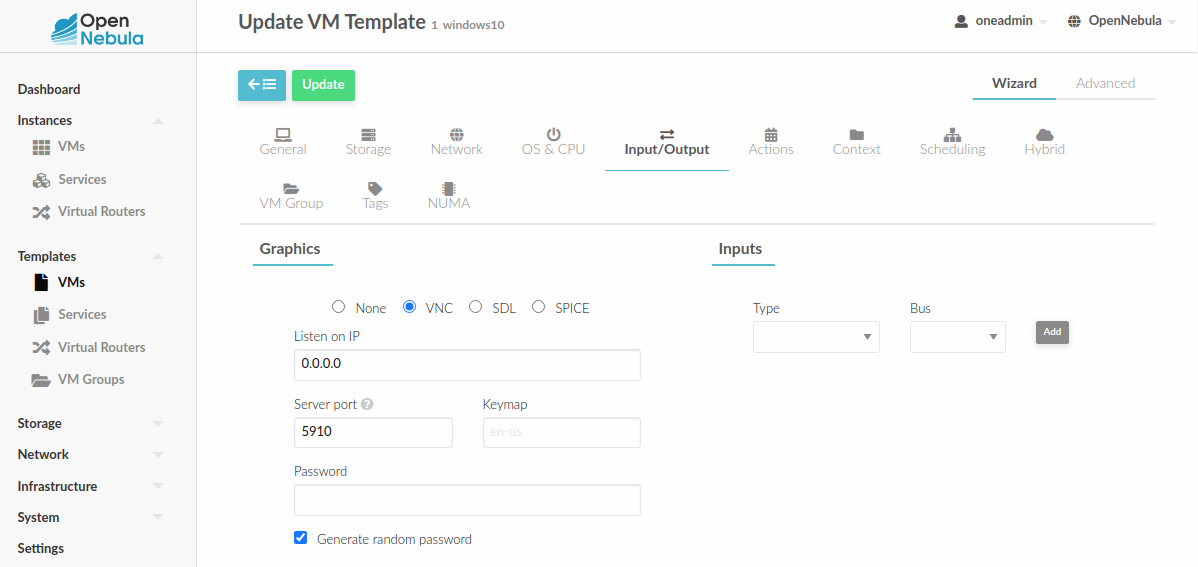
To configure this in Virtual Machine template in advanced mode:
GRAPHICS=[
    LISTEN="0.0.0.0",
    TYPE="vnc"
]
Note
Make sure the attribute IP is set correctly (0.0.0.0 to allow connections
from everywhere), otherwise, no connections will be allowed from the outside.
Configure VM for RDP
Short for Remote Desktop Protocol, it allows one computer to connect to another computer over a network in order to use it remotely.
RDP without FireEdge
RDP connections are available on Sunstone using noVNC. You will only have to download the RDP file and open it with an RDP client to establish a connection with your Virtual Machine.
RDP with FireEdge
To enable RDP connections to the VM, you must have one NIC
with RDP attribute equal to YES in the template.
Via Sunstone, you need to enable a RDP connection on one of the VM template networks, after or before its instantiation.

To configure this in Virtual Machine template in advanced mode:
NIC=[
    ...
    RDP = "YES"
]
Once the VM is instantiated, users will be able to download the file configuration or connect via browser.

RDP connection permits to choose the screen resolution from Sunstone interface.
Important
The RDP connection is only allowed to activate on a single NIC. In any case, the connection will only contain the IP of the first NIC with this property enabled. The RDP connection will work the same way for NIC ALIASES.
If the VM template has a PASSWORD and USERNAME set in the contextualization section, this will be reflected in the RDP connection. You can read about them in the Virtual Machine Definition File reference section.
Note
If your Windows VM has a firewall enabled, you can set the following in the start script of the VM (in the Context section of the VM Template):
`
netsh advfirewall firewall set rule group="Remotedesktop" new enable=yes
`
Configure VM for SSH
SSH connections are available only when a reachable Firedge server is found. Unlike VNC or RDP, SSH is a text protocol. SSH connections require a hostname or IP address defining the destination machine. Like with the RDP connections, you need to enable the SSH connection on one of the VM template networks.
For example, to configure this in the Virtual Machine template in advanced mode:
NIC=[
    ...
    SSH = "YES"
]
SSH is standardized to use port 22 and this will be the proper value in most cases. You only
need to specify the SSH port in the contextualization section as SSH_PORT if you are
not using the standard port.
Note
If the VM template has a PASSWORD and USERNAME set in the contextualization
section, this will be reflected in the SSH connection. You can read about them in the
Virtual Machine Definition File reference section.
For example, to allow connection by username and password to a guest VM, first make sure you have SSH root access to the VM, check more info here.
After that you can access the VM and configure the SSH service:
oneadmin@frontend:~$ ssh root@<guest-vm>

# Allow authentication with password: PasswordAuthentication yes
root@<guest-VM>:~$ vi /etc/ssh/sshd_config

# Restart SSH service
root@<guest-VM>:~$ service sshd restart

# Add user: username/password
root@<guest-VM>:~$ adduser <username>
Configure VM for SPICE
SPICE connections are channeled only through the noVNC proxy. SPICE support in Sunstone share a similar architecture to the VNC implementation. Sunstone use a SPICE-HTML5 widget in its console dialog that communicates with the proxy by using websockets.
Important
SPICE connections when using NAT and remote-viewer won’t work since noVNC proxy does not offer SPICE support, and a direct connection between browser and virtualization node is needed. However the SPICE HTML5 console can use noVNC proxy to offer SPICE connectivity, please use this option as an alternative
Note
For the correct functioning of the SPICE Web Client, we recommend defining by default
the SPICE parameters in /etc/one/vmm_mad/vmm_exec_kvm.conf. In this way, once the file is modified and OpenNebula is restarted, it will be applied to all the VMs instantiated from now on. You can also override these SPICE parameters in VM Template. For more info check Driver Defaults section.
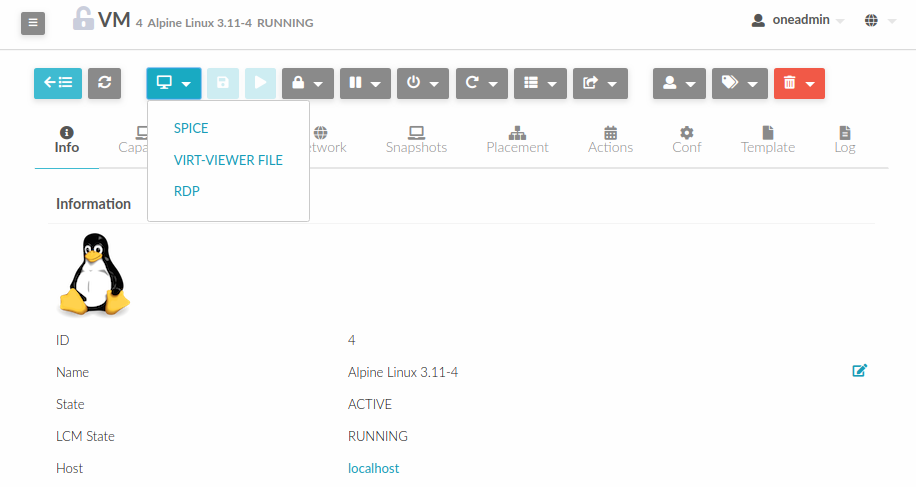
Configure VM for virt-viewer
virt-viewer connections are channeled only through the noVNC proxy. virt-viewer is a minimal tool
for displaying the graphical console of a virtual machine. It can display VNC or SPICE protocol,
and uses libvirt to look up the graphical connection details.
In this case, Sunstone allows you to download the virt-viewer configuration file for the VNC and
SPICE protocols. The only requirement is the virt-viewer being installed on the machine from which you are accessing the Sunstone.
To use this option, you will only have to enable any of two protocols in the VM. Once the VM is
instantiated and running, users will be able to download the virt-viewer file.
Configure VM for VMRC
Important
VMRC connections are available only when a reachable FireEdge server is found.
VMware Remote Console provides console access and client device connection to VMs on a remote host.
These types of connections request a TOKEN from vCenter to connect with the Virtual Machine
allocated on vCenter every time you click on the VMRC button.
To use this option, you will only have to enable VNC / VMRC connections to your VMs and start the FireEdge Server.
Note
To change the keyboard distribution in the VMRC connection, you need to change the keyboard layout in the running operating system.