NSX Setup
NSX is the Network and Security software from VMware that enables a virtual cloud network to connect and protect applications across data centers, multi-clouds, bare metal, and container infrastructures. VMware NSX Data Center delivers a complete L2-L7 networking and security virtualization platform, providing agility, automation, and dramatic cost savings that come with a software-only solution.
OpenNebula manages NSX-V and NSX-T logical switches in the following ways:
Creating new logical switches into existing transport zones.
Importing logical switches from imported vCenter clusters.
Deleting logical switches created or imported into OpenNebula.
Attaching logical switches, created or imported, to VMs.
Detaching logical switches, created or imported, to VMs.
Also, OpenNebula manages NSX-V and NSX-T Distributed Firewall (DFW) through OpenNebula Security Groups. These security groups have rules and OpenNebula can apply the rules in NSX Distributed Firewall in the following ways:
Creating firewall rules applied on logical ports.
Deleting firewall rules.
Updating firewall rules.
By default, all rules are created under a section called “OpenNebula”. OpenNebula security groups only whitelist connections, so you need to set DFW to deny connections by default and to allow them by rules.
Requirements
The NSX appliance must be deployed with only one IP Address. OpenNebula installation must be able to connect to NSX Manager with the required credentials.
At least one controller node must be deployed.
All ESXi of the cluster must be prepared for NSX.
At least one transport zone must be created. Transport zone names can only contain alphanumeric characters and underscores.
It is not mandatory to have any logical switch before starting to use OpenNebula NSX-V integration. However, it is recommended to test that logical switches are working properly by creating a logical switch from vCenter into a transport zone and attaching it to two VMs to test that overlay network is working.
NSX DFW default rule must be set to deny any connection since OpenNebula is only able to create rules to allow connections.
NSX Driver Limitations
The following limitations apply to the OpenNebula-NSX integration:
It cannot create/modify/delete transport zones
Not all parameters are available when creating logical switches
Universal logical switches are not supported
It only supports one NSX Manager per vCenter Server
The process of preparing an NSX cluster must be done from NSX Manager
ICMP subprotocols are not implemented
Transport zone names can only contain alphanumeric characters and underscores
Configuring OpenNebula to Use an NSX Manager
This is mostly an automatic process. When vCenter is connected to an NSX Manager, OpenNebula will detect it in the next monitoring cycle. As a result, a new tab called “NSX” will show in the UI allowing the configuration of the credentials (user and password) needed to connect to NSX Manager. The same process is applied when importing a new vCenter cluster that is prepared to work with NSX-V or NSX-T.
This section details how to configure OpenNebula to start working with NSX, outlining the complete process ranging from importing a vCenter cluster to checking that OpenNebula gets NSX information correctly
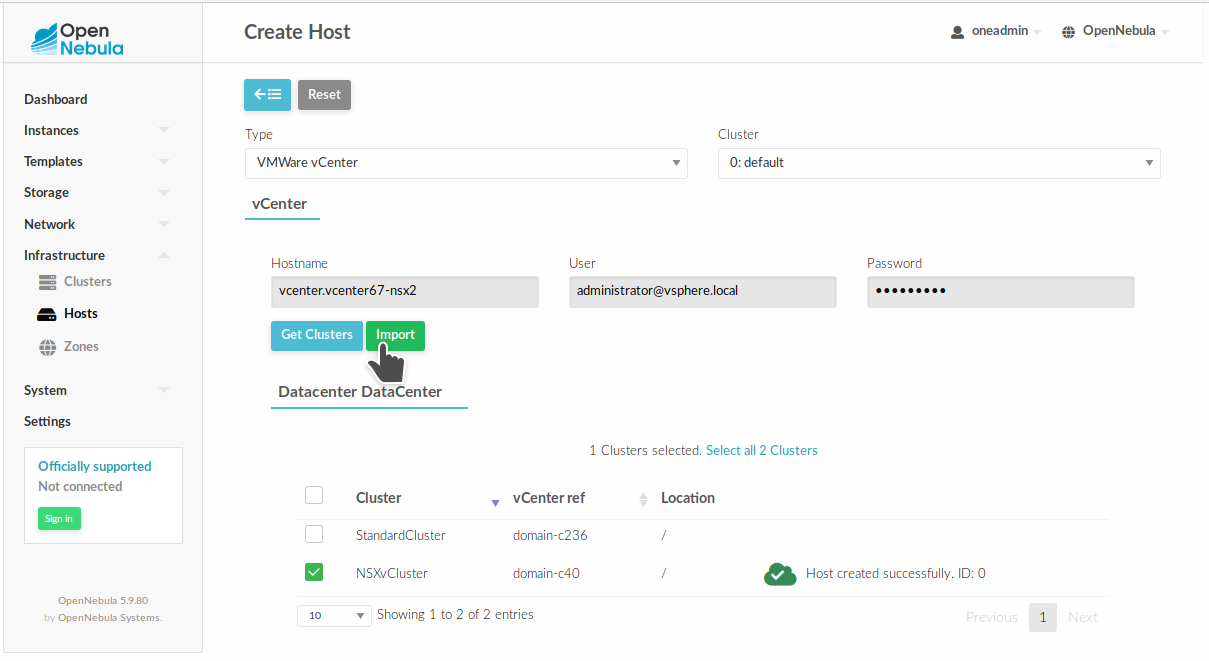
Importing a vCenter Cluster in OpenNebula
The first step is to add an ESXi cluster to OpenNebula, this cluster must have all the requirements to work with NSX-V or NSX-T.
Import from Sunstone
Import from CLI:
onevcenter hosts --vcenter <vcenter_fqdn> --vuser <vcenter_user> --vpass <vcenter_password>
Check NSX Manager Autodiscovered Attributes
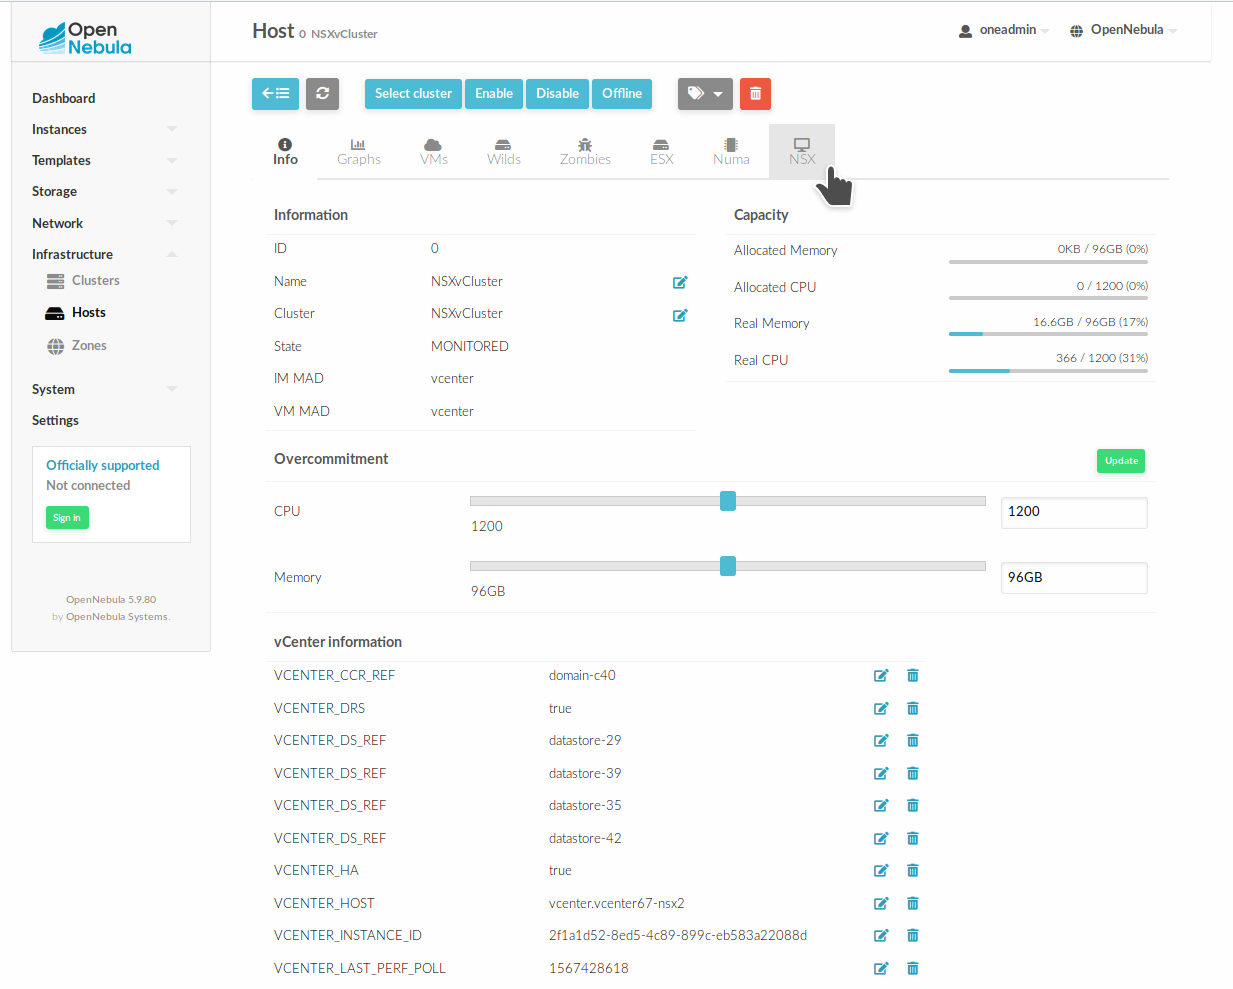
After a vCenter cluster is imported and the monitor cycle finalises, the NSX Manager registered for that cluster is detected. You can read that information by going to Infrastructure --> Hosts
After clicking on the desired OpenNebula Host, the following information is available under the NSX tab:
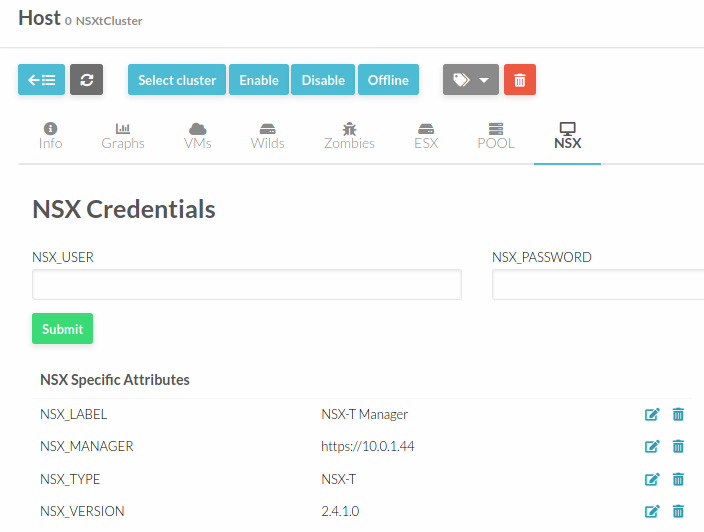
In particular the following attributes are retrieved:
NSX_MANAGER: Containing the url for that NSX Manager
NSX_TYPE: Indicating if it’s NSX-V or NSX-T
NSX_VERSION: Version of that NSX Manager
NSX_LABEL: Label read from vCenter
You have a more detailed explanation of these parameters in the NSX attributes section.
Setting NSX Manager Credentials
Once a vCenter cluster is imported as an OpenNebula Host, the next step is to introduce the NSX credentials by going to Infrastructure --> Hosts. After clicking on the relevant Host and clicking on NSX tab:
click on the NSX tab and introduce the NSX credentials. Then, click on Submit. The credentials will now be validated against NSX Manager.
Now, NSX credentials are saved in two new attributes:
NSX_USER: NSX Manager user
NSX_PASSWORD: NSX Manager Encrypted password
Remember that transport zones cannot be created from OpenNebula; they should exist beforehand. You can add transport zones in NSX Manager and OpenNebula will detect them after the following monitor cycle. At that time, the next attribute will show up:
NSX_TRANSPORT_ZONES = Containing the Transport zones availables.
NSX Non-editable Attributes
These attributes are autodiscovered and they cannot be modified manually.
Attribute |
Type |
Value |
Description |
|---|---|---|---|
NSX_LABEL |
STRING |
“NSX - Manager” | “NSX-T Manager” |
Label for NSX Manager type |
NSX_MANAGER |
STRING |
URL of endpoint |
Endpoint containing the NSX Manager URL. OpenNebula must reach that url to send commands |
NSX_TRANSPORT_ZONES |
HASH_ARRAY |
[TZ_NAME => TZ_ID, …] |
List with all the transport zones detected |
NSX_TYPE |
STRING |
Determine if is an NSX-V or NSX-T installation |
|
NSX_VERSION |
STRING |
NSX Installed version |
NSX Editable Attributes
These parameters can be introduced manually in the NSX tab
Parameter |
Type |
Mandatory |
Description |
|---|---|---|---|
NSX_USER |
STRING |
YES |
NSX Manager user |
NSX_PASSWORD |
STRING |
YES |
NSX Manager password |
Driver tuning
Drivers can be customized; please have a look at NSX Driver Section in the Integration Guide.