Managing Users
OpenNebula supports user accounts and groups. This guide shows how to manage users, groups are explained in their own guide. To manage user rights, visit the Managing ACL Rules guide.
A user in OpenNebula is defined by a username and a password. You don’t need to create a new Unix account in the front-end for each OpenNebula user, they are completely different concepts. OpenNebula users are authenticated using a session string (with <user>:<password> format), this is included in every operation and validated by OpenNebula service.
Each user has a unique ID, and belongs at least to one group.
After the installation, you will have two administrative accounts, oneadmin and serveradmin and two default groups oneadmin and users. You can check it using the oneuser list and onegroup list commands.
There are different user accounts in OpenNebula, depending on the default permissions granted to them:
Administrators, the
oneadminaccount is created the first time OpenNebula is started.oneadminhas enough privileges to perform any operation on any object (similar torootuser in UNIX like systems). Any other user added tooneadmingroup is considered and administrator user and has the same privileges thanoneadmin.Users accounts may access most of the functionality offered by OpenNebula to manage resources.
Group Administrators similar to users but can manage user accounts and resources in their group.
Service Users, they are used by the OpenNebula services (e.g Sunstone web interface, OneFlow, …) to proxy auth request. By default,
serveradminuser is created the first time OpenNebula service is started. This user is only intended to be used by OpenNebula services.
Note
oneadmin credentials are set the first time OpenNebula service is started. By default, it looks for a session string in /var/lib/one/.one/one_auth and define the credentials accordingly to it.
Managing Users
User accounts within the OpenNebula system are managed by oneadmin with the oneuser command. This section will show you how to manage users in OpenNebula.
Adding Users
A new user can be easily created by running the oneuser create command or by using the corresponding Sunstone dialog.
oneuser create <user_name> <password>
ID: 3
Warning
When defining user names and passwords consider the following invalid characters:
username = [" ", ":", "\t", "\n", "\v", "\f", "\r"]
password = [" ", "\t", "\n", "\v", "\f", "\r"]
Some auth drivers does not require password (ldap) in this case user could be created without it.
oneuser create --driver ldap <user_name>
ID: 4
When user is bing created with different auth driver which does not require password
The user types listed above are mainly defined by the group to which the user belongs to. So probably after creating the user you may want to modify the groups of it. In order to do so oneuser chgrp can be used:
# Make <user_name> an administrator user.
oneuser chgrp <user_name> oneadmin
Disable User
To temporarily disable user you can use command oneuser disable to enable it use oneuser enable. Disabled users can’t execute any action and can’t log to sunstone.
Deleting Users
In order to delete a user that’s not needed anymore oneuser delete command can be used.
User Authentication
Sunstone Web interface
In order to authenticate yourself as a user by using Sunstone you just need to provide your user and password in the login page.
CLI & APIs
In order to authenticate with OpenNebula when using the CLI or any API binding, you need a valid password or authentication token to generate the session string.
The default driver, core, is a simple user-password match mechanism. To configure a user account we need to put our session string in a well known place so the can be used when needed. By default we need to put it into $HOME/.one/one_auth. The session string is just a single line with the format <username>:<password>. For example, for user oneadmin and password opennebula the file would be:
cat $HOME/.one/one_auth
oneadmin:opennebula
Once configured you will be able to access the OpenNebula API and use the CLI tools:
oneuser show
USER 0 INFORMATION
ID              : 0
NAME            : oneadmin
GROUP           : oneadmin
PASSWORD        : c24783ba96a35464632a624d9f829136edc0175e
Note
OpenNebula does not store the plain password but a hashed version in the database, as show by the oneuser example above.
Check this guide to know how you can customize shell variables.
Tokens
$HOME/.one/one_auth is just protected with the standard filesystem permissions. To improve the system security you can use authentication tokens. In this way there is no need to store plain passwords, OpenNebula can generate or use an authentication token with a given expiration time. By default, the tokens are also stored in $HOME/.one/one_auth.
Furthermore, if the user belongs to multiple groups, a token can be associated to one of those groups, and when the user operates with that token he will be effectively in that group, i.e. he will only see the resources that belong to that group, and when creating a resource it will be placed in that group.
Create a token
Any user can create a token:
oneuser token-create
File /var/lib/one/.one/one_auth exists, use --force to overwrite.
Authentication Token is:
testuser:b61010c8ef7a1e815ec2836ea7691e92c4d3f316
The command will try to write $HOME/.one/one_auth if it does not exist.
The expiration time of the token is by default 10h (36000 seconds). When requesting a token the option --time <seconds> can be used in order to define exactly when the token will expire. A value of -1 disables the expiration time.
The token can be created associated with one of the group the user belongs to. If the user logins with that token, he will be effectively only in that group, and will only be allowed to see the resources that belong to that group, as opposed to the default token, which allows access to all the resources available to the groups that the user belongs to. In order to specify a group, the option --group <id|group> can be used. When a group specific token is used, any newly created resource will be placed in that group.
List the tokens
Tokens can be listed by doing:
oneuser show
[...]
TOKENS
     ID EGID  EGROUP     EXPIRATION
3ea673b 100   groupB     2016-09-03 03:58:51
c33ff10 100   groupB     expired
f836893 *1    users      forever
The asterisk in the EGID column means that the user’s primary group is 1 and that the token is not group specific.
Set (enable) a token
A token can be enabled by doing:
oneuser token-set --token b6
export ONE_AUTH=/var/lib/one/.one/5ad20d96-964a-4e09-b550-9c29855e6457.token; export ONE_EGID=-1
export ONE_AUTH=/var/lib/one/.one/5ad20d96-964a-4e09-b550-9c29855e6457.token; export ONE_EGID=-1
Delete a token
A token can be removed similarly, by doing:
oneuser token-delete b6
Token removed.
User Templates
The USER TEMPLATE section can hold any arbitrary data. You can use the oneuser update command to open an editor and add, for instance, the following DEPARTMENT and EMAIL attributes:
oneuser show 2
USER 2 INFORMATION
ID             : 2
NAME           : regularuser
GROUP          : 1
PASSWORD       : 5baa61e4c9b93f3f0682250b6cf8331b7ee68fd8
AUTH_DRIVER    : core
ENABLED        : Yes

USER TEMPLATE
DEPARTMENT=IT
EMAIL=user@company.com
These attributes can be later used in the Virtual Machine Contextualization. For example, using contextualization the user’s public ssh key can be automatically installed in the VM:
ssh_key = "$USER[SSH_KEY]"
The User template can be used to customize the access rights for the VM_USE_OPERATIONS, VM_MANAGE_OPERATIONS and VM_ADMIN_OPERATIONS. For a description of these attributes see VM Operations Permissions
Manage your Own User
Users can see their account information, and change their password.
For instance, as regularuser you could do the following:
oneuser list
[UserPoolInfo] User [2] not authorized to perform action on user.
oneuser show
USER 2 INFORMATION
ID             : 2
NAME           : regularuser
GROUP          : 1
PASSWORD       : 5baa61e4c9b93f3f0682250b6cf8331b7ee68fd8
AUTH_DRIVER    : core
ENABLED        : Yes

USER TEMPLATE
DEPARTMENT=IT
EMAIL=user@company.com
oneuser passwd 1 abcdpass
As you can see, any user can find out his ID using the oneuser show command without any arguments.
Regular users can retrieve their quota and user information in the settings section in the top right corner of the main screen: 
Finally some configuration attributes can be set to tune the behavior of Sunstone or OpenNebula for the user. For a description of these attributes please check the group configuration guide.
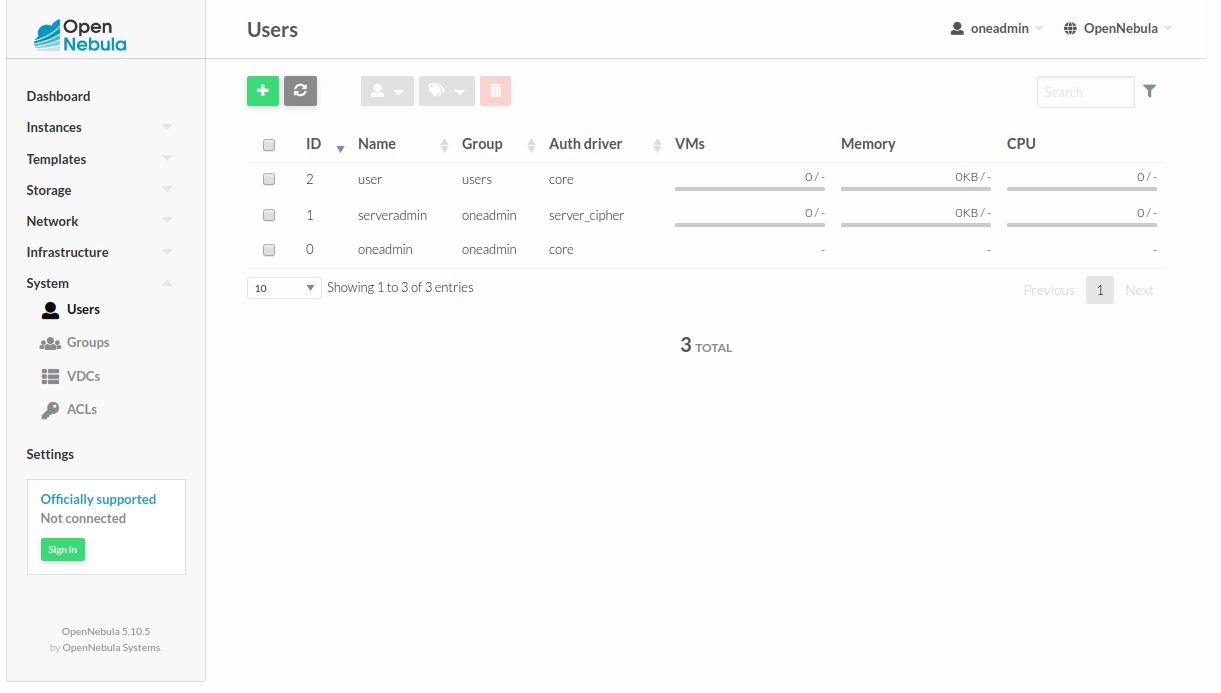
Managing Users in Sunstone
All the described functionality is available graphically using Sunstone:
Change credentials for oneadmin or serveradmin
In order to change the oneadmin credentials you have to do the following in the frontend node:
oneuser passwd 0 <PASSWORD> echo 'oneadmin:<PASSWORD>' > /var/lib/one/.one/one_auth
Warning
After changing the password, please restart OpenNebula service.
In order to change serveradmin credentials you have to do the following in the fontend follow these steps.
    # oneuser passwd 1 --sha256 <PASSWORD>
    # echo 'serveradmin:PASSWORD' > /var/lib/one/.one/oneflow_auth
    # echo 'serveradmin:PASSWORD' > /var/lib/one/.one/onegate_auth
    # echo 'serveradmin:PASSWORD' > /var/lib/one/.one/sunstone_auth

Restart Sunstone after changing the password.