Deploy OpenNebula On-prem with an ISO
Introduction
OpenNebula provides an ISO image for rapid deployment of an OpenNebula Front-end or processing node. The ISO installs a preconfigured deployment of OpenNebula Enterprise Edition running on a minimal installation of AlmaLinux 9. The ISO image can be flashed to bootable, removable media (such as a USB disk) for local installation or mapped via IPMI Virtual Media for remote hardware management.
Once the ISO has booted and finished setup, a preconfigured OpenNebula cloud will be ready for immediate use, installed on a single bare-metal server, complete with the OpenNebula Front-end server and a single KVM hypervisor node. The same ISO can be used to install other KVM hypervisor nodes within the same infrastructure. The installed software includes a menu and a set of Ansible playbooks to make the OpenNebula infrastructure management simpler.
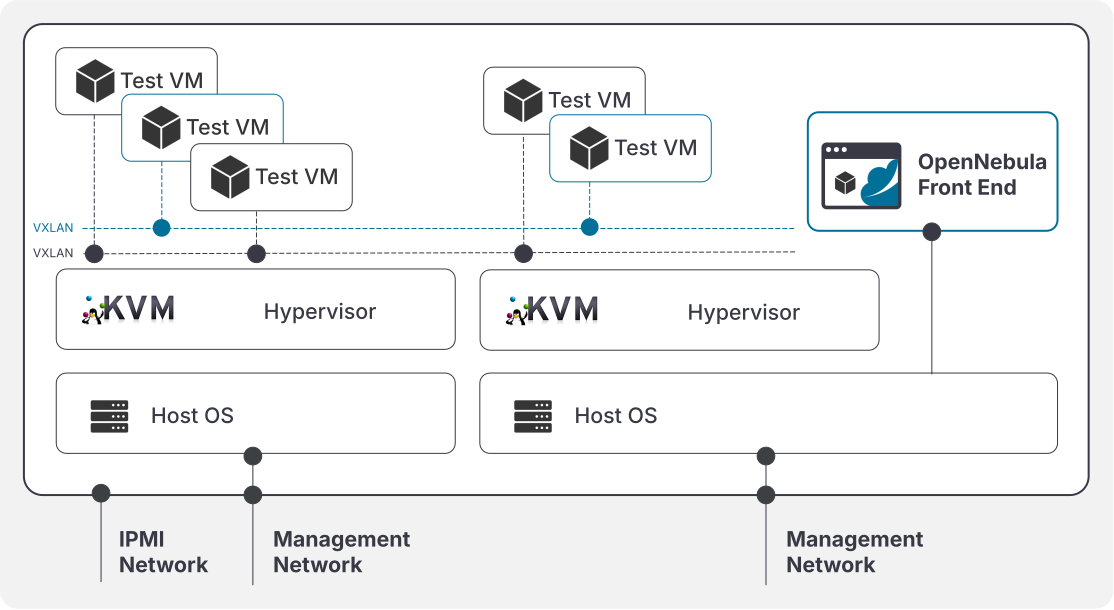
Hardware and Personnel Requirements
The OpenNebula PoC deployment needs a server with a processor with x86_64-v2 capabilities. Any CPU supporting at least the extensions of Intel Nehalem/Silvermont or AMD Bulldozer/Jaguar should be enough. See the minimal hardware requirements in Table 1.1 below:
| Component | Required |
|---|---|
| CPU | - Intel: Nehalem/Silvermont - AMD: Bulldozer/Jaguar - Virtualization enabled at BIOS level |
| Memory | - 64 GB for Front-end and nodes |
| Disk | - 512 GB |
| Network | Single Node Not required for the installation Multiple Node 1 Network Interface |
Table 1.1. Hardware requirements
| Service | Port | Comment |
|---|---|---|
| sshd | 22 | Used for the OpenNebula core interactions with hypervisor nodes. Should be accessible on all hypervisor nodes from the OpenNebula Front-end and vice versa |
| FireEdge Sunstone | 2616 | Web-based graphical user interface. Should be accessible from OpenNebula Front-end node to PoC users |
Table 1.2 Ports accessibility
Personnel who execute the installation and operate the OpenNebula PoC deployment are expected to possess the following hands-on skills and knowledge:
- Generic Linux administration skills, such as managing users and groups, navigating the Linux filesystem and managing files.
- A good understanding of virtualization concepts, including virtualized networking and storage.
- Knowledge of common linux utilities, services and tools; such as, but not limited to:
- Linux storage subsystem: Local disks management
- Networking utilities: iptables, tcpdump, iproute2 and Linux bridges
- Virtualization management: KVM, QEMU, libvirt/virsh
- Linux services configuration and operation: Passwordless SSH configuration
Step 1. ISO Download and Preparation
In order to obtain an installation ISO image, contact us by filling the Request a Demo form or by email at: sales@opennebula.io. Installation images are generated for each deployment individually, therefore distribution needs to be arranged by your PoC coordinator.
Once your OpenNebula Systems contact makes the ISO available, there are two different installation options:
- Installation via IPMI virtual media
- Installation using an external USB disk
Other installation methods (such as PXE-based installations), while possible, are out of the scope of this guide.
Note that the recommended way to mount the ISO is over the LAN using one of the mechanisms supported by your BMC protocols (e.g HTTP, HTTPS, NFS, CIFS). Mounting the ISO via HTML5/java virtual console could be less reliable because of network glitches between the client PC you are accessing the server’s BMC from and the BMC itself.
As soon as the ISO is mounted as Virtual Media select the Boot from Virtual Media option in the BMC settings, and then restart the server.
If installing from the external USB disk, the bootable USB disk should be prepared before beginning the installation. Once the USB disk is ready, it should be attached to the server you will install OpenNebula on. The procedure for preparing the bootable PoC disk depends on your client workstation operating system. Below you will find instructions for preparing the USB disk on different operating systems.
Whichever OS you choose to use, make sure you are writing the image in DD mode (disk dump). Modern software adds some persistence to the USB units that will not allow the installation.
1.1 Windows 11
You can create a bootable USB disk using a third-party utility such as Rufus. The below instructions assume that Rufus is used.
Launch the Rufus application.
In the Device List, select the USB disk you want to write the PoC ISO to.
Click the Select button, then select the PoC ISO that you downloaded before.
Set up the DD mode for the image creation, all other options should be left with default values, then click Start.
The app will display a number of warnings about destroying the data on the USB disk. Accept them, then wait until the write process is completed.
1.2 Linux
Attach your removable media, then identify it by running
lsblk. Typically, it should be listed as something like/dev/sdXor/media/user/SanDisk, e.g./dev/sdb1.Write down the path of the downloaded ISO, as this will be needed in the next command.
To copy the ISO to your removable media, run the
ddcommand as below, changing the path to the ISO and the device file according to your system:dd if=/path/to/iso/AlmaLinux-OnePoC.iso of=/dev/sdXWait for the process to complete, then safely remove the media from your workstation.
1.3 Mac OSX
Attach your removable media, then identify it by running
diskutil list. Typically, it should be listed as something like/dev/sdX, e.g./dev/sdb1.Write down the path of the downloaded ISO, as this will be needed in the next command.
To copy the ISO to your removable media, run the
ddcommand as below, changing the path to the ISO and the device file according to your system:dd if=/path/to/iso/AlmaLinux-OnePoC.iso of=/dev/sdXWait for the process to complete, then safely remove the media from your workstation.
Step 2. Installation Procedure
Ensure that the environment where you wish to install the ISO meets the requirements listed in the table in the requirements section.
Copy the prepared ISO file to a removable drive that can be inserted into the physical server intended for use as the OpenNebula Front-end. Please note that if you perform the install via IPMI (or other out-of-band systems), you may have the option to upload the ISO and connect virtually.
Set up your server to boot from the removable media.
Restart the server. It will boot from the first boot disk device. The bootloader will appear, depending on whether your server is using UEFI or MBR boot, you will see one of the following screens for roughly 30 seconds.
UEFI boot screen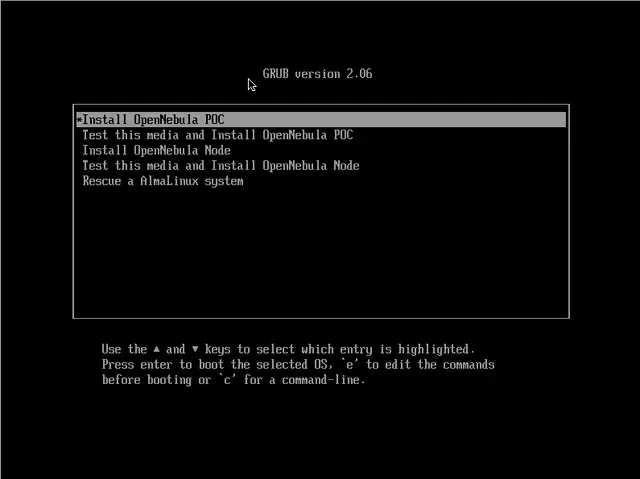 MBR boot screen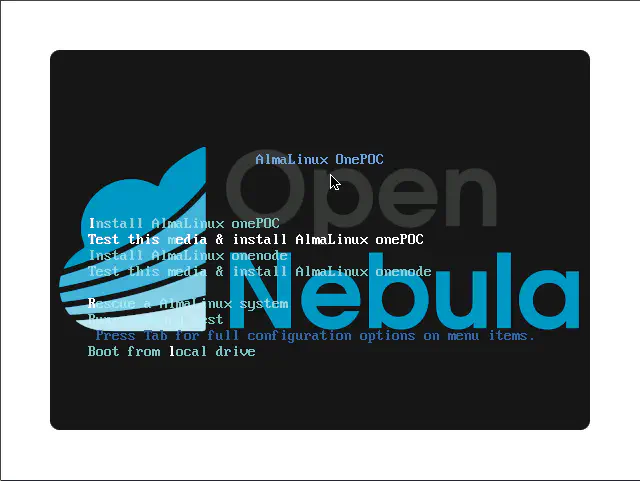
The options are as follows:
- Install OpenNebula POC: Installs a OpenNebula Front-end on the server as well as a hypervisor node.
- Install OpenNebula Node: Installs a OpenNebula hypervisor node. This is only necessary if you want to add this server as an available Host to already running Front-end.
- The options that start with Test this media perform a checksum of the image before installing it.
There will be no more prompts — please wait for the installation to complete. You will know the installation is finished when the machine reboots. Once the installation has completed, log in to the server with the following credentials:
User: root
Password:  0p3nN3bul4
Once logged in, run
onefemenu(orsudo nmtui) to configure your Management Network so you can access the OpenNebula web interface. Please ensure this is configured on the physical interface connected to your internal infrastructure. Do not alter the preconfigured bridge interface created for OpenNebula internal networking.Restart networking.
Access the OpenNebula web interface via the IP you configured in Step 6 above, on port 2616 using http (i.e. point your browser to
http://<ASSIGNED-IP>:2616).The PoC OpenNebula instance generates a random password for the user oneadmin. It can be checked running
onefemenuand selecting Show oneadmin password.Use the oneadmin user with the previously obtained password to access to the Sunstone web interface.
Step 3. Cloud Use Cases Validation
Once the OpenNebula platform is deployed, it is recommended to execute basic use case tasks to ensure that the PoC cloud operates as expected. The OpenNebula PoC cloud includes a preconfigured Virtual Network and storage, as well as a pre-installed VM image and template which you can use to instantiate a test VM.
3.1 Setting up VXLAN Virtual Network
Before starting with instantiating VMs it’s desirable to have at least a single Virtual Network (vNet) for the VMs to connect to.
Follow the steps below to create a new Virtual Network.
Log in to the Sunstone web interface as user oneadmin, as instructed in steps 9 and 10 in the previous section.
Click on Virtual networks card:
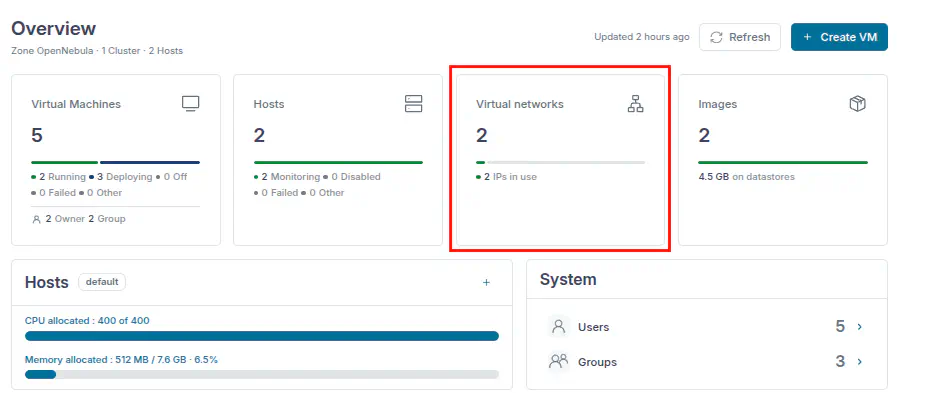
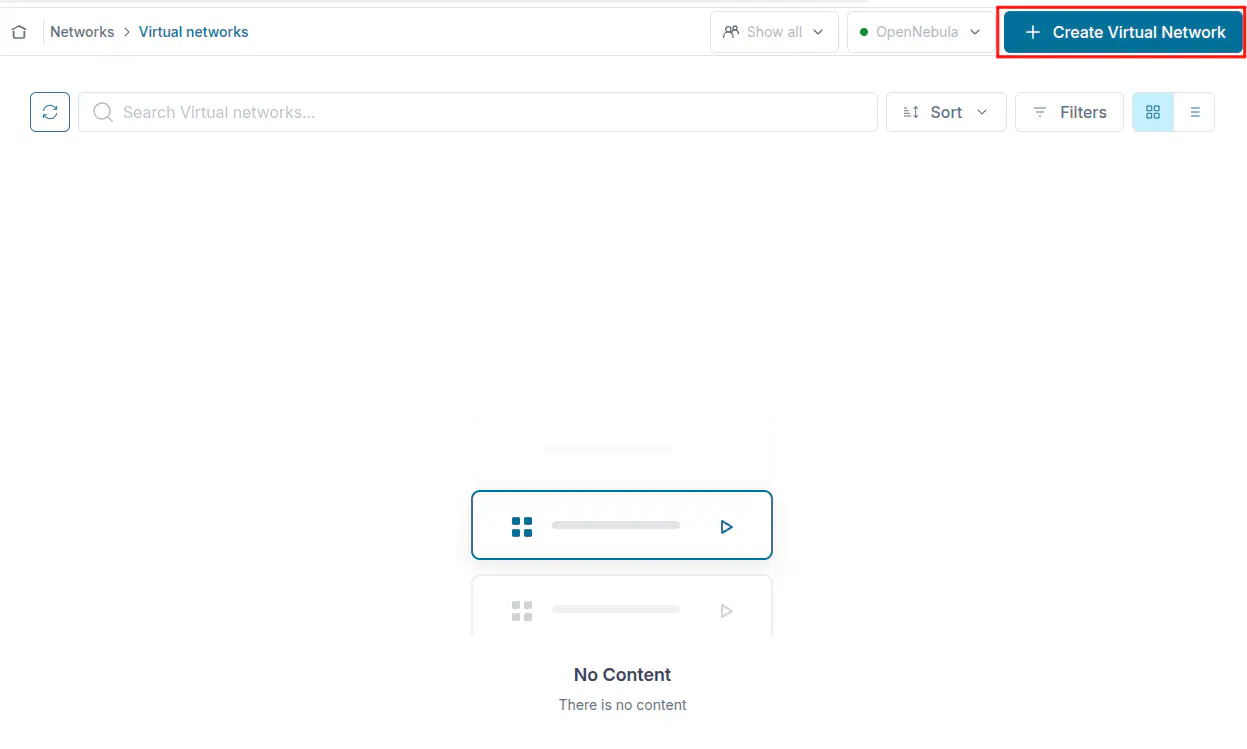
Press + Create Virtual Network:
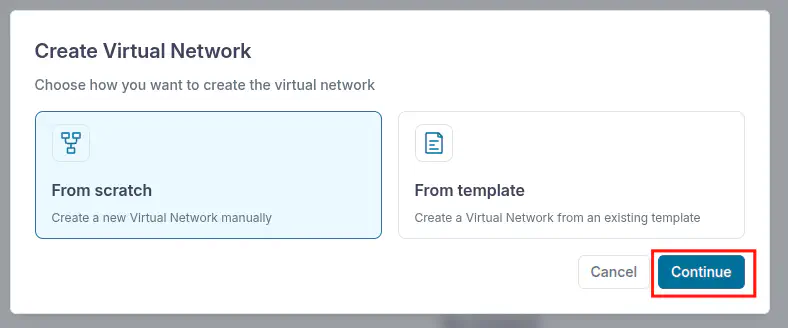
Choose From scratch:
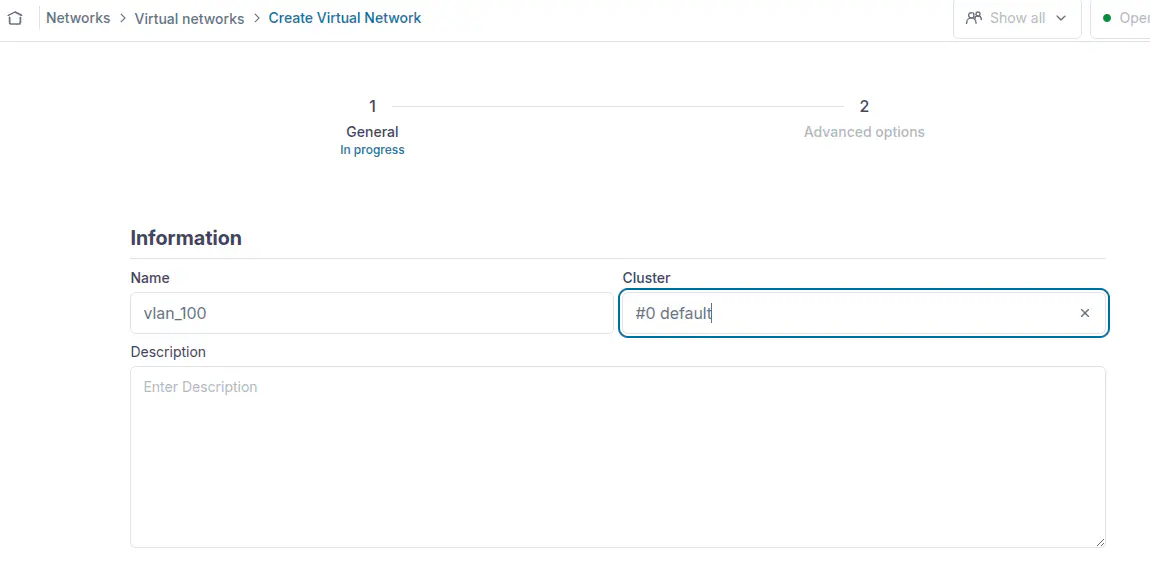
Specify the vNet name and select a Cluster the vNet should be associated with and press Next:
Select the VXLAN tab and specify the device name of the physical network card on the Host to route traffic. Use the real name on your Host as shown by the
ip linkcommand. In this example we useenX0. Set the VXLAN ID and VXLAN mode toevpn: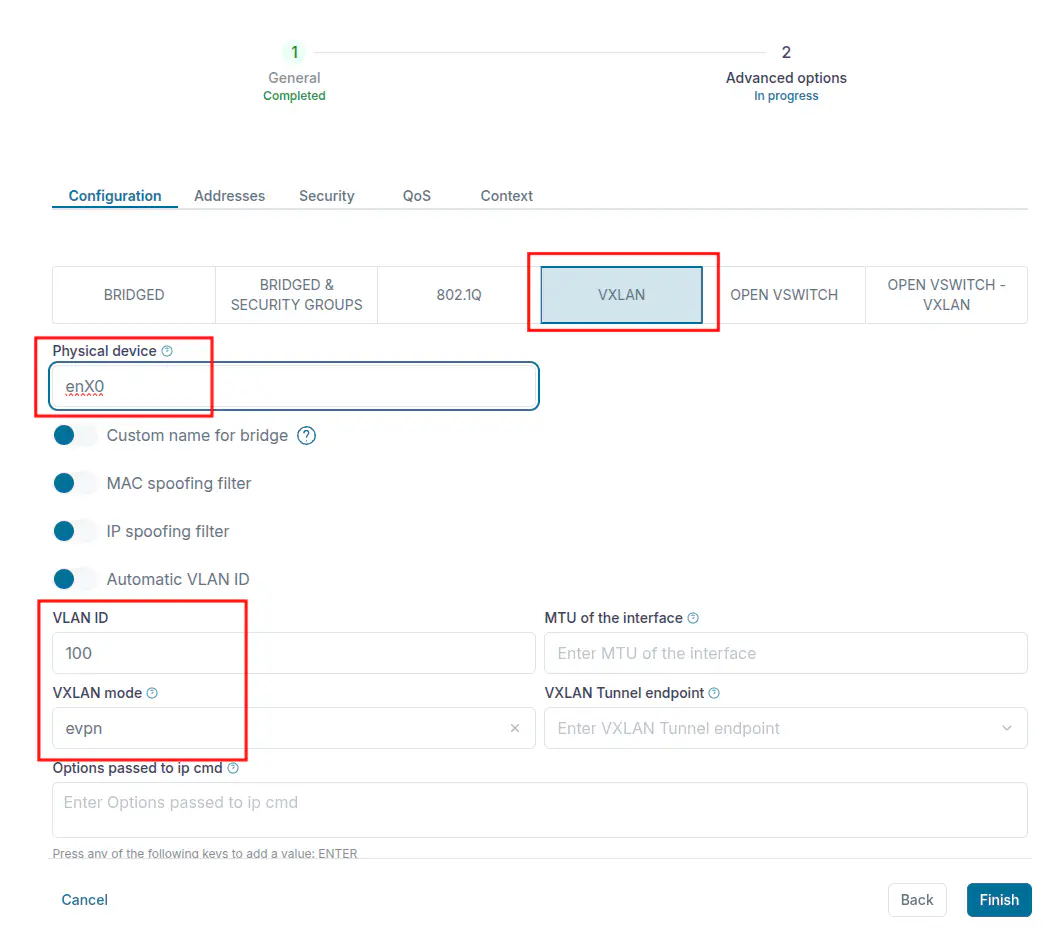
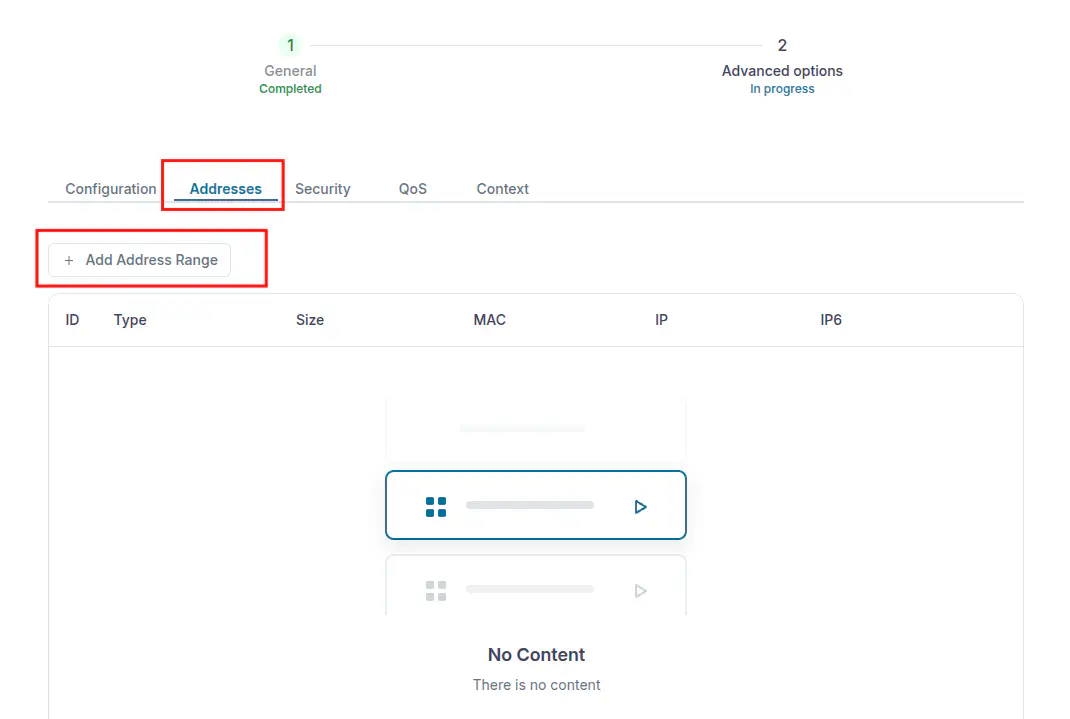
Go to the Addresses tab and click + Add address range:
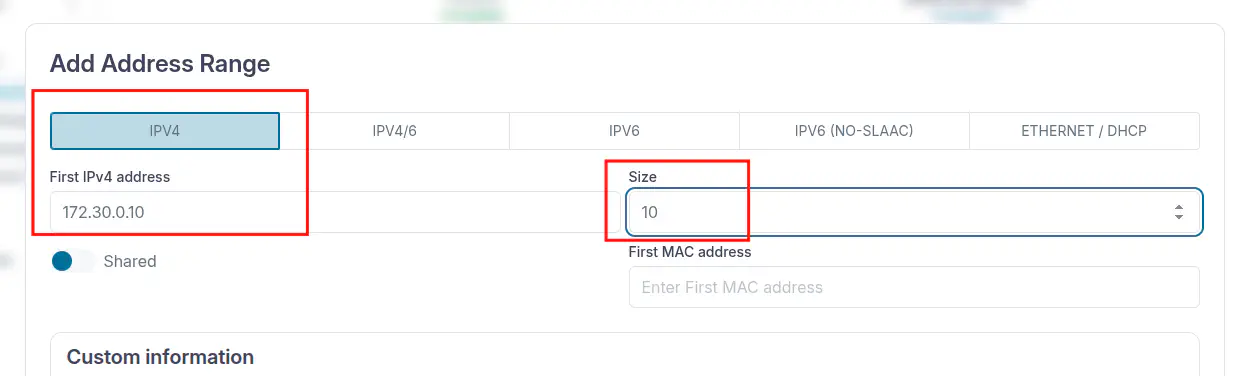
Specify first IP address and network size (minimum 10):
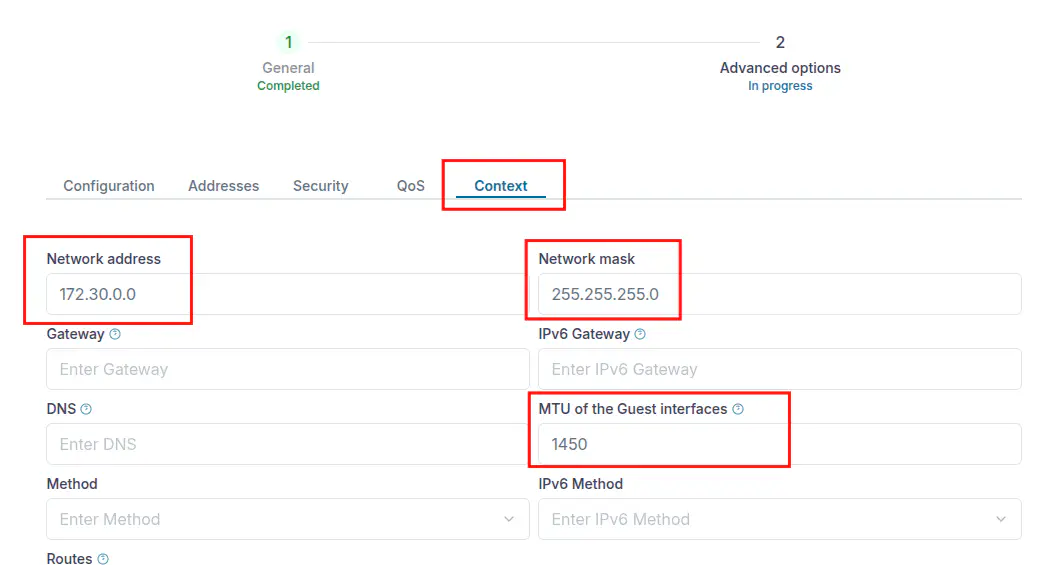
Go to the Context tab, provide Network address, Network mask, MTU value for the Guest interfaces and other parameters if necessary:
Press Finish to complete vNet creation.
3.2 Updating the VM template
To avoid changing network settings on each VM instantiation, a proper network configuration can be specified in the VM template.
- Navigate to the Templates -> VM Templates. Select the desired VM template and press update button.
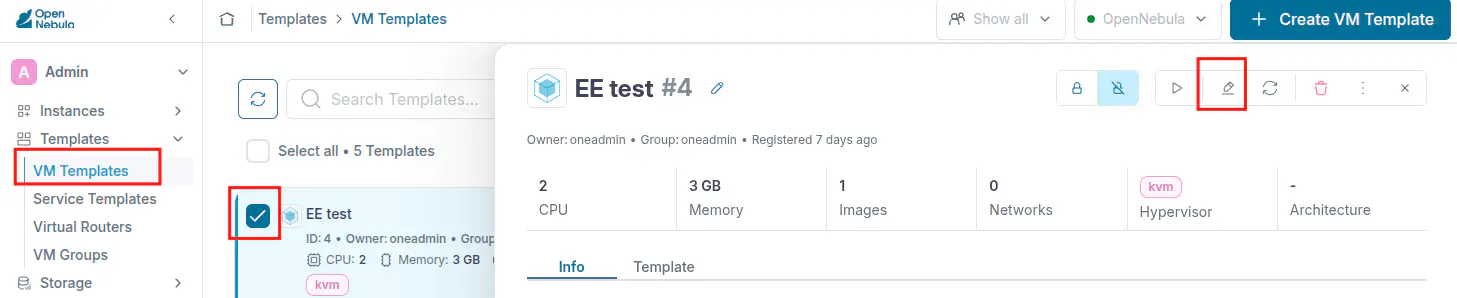
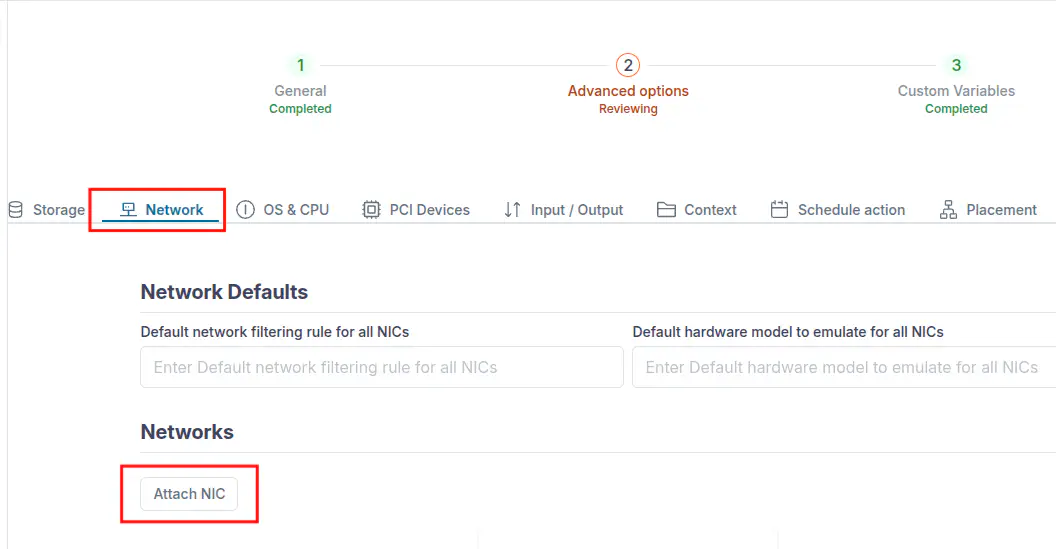
Click Next to proceed and on the next view select the Network tab. Press Attach NIC to configure a new network adapter.
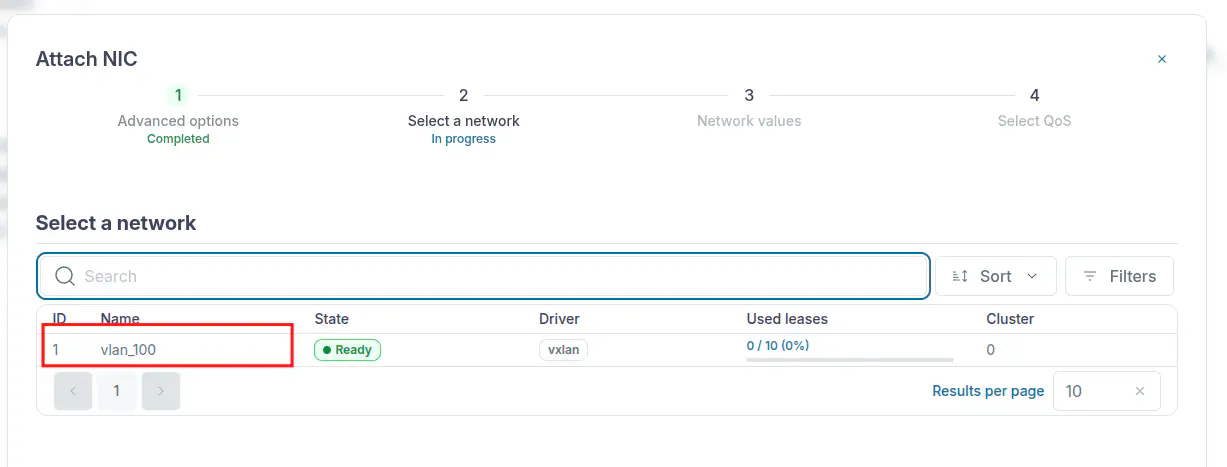
Click Next to move to the Select network step and choose previously created vNet. Click Next on subsequent stages and then Finish to complete.
3.3 Instantiating a Single VM
To instantiate a VM via the OpenNebula web interface, complete the following steps:
Log in to the Sunstone web interface as user oneadmin.
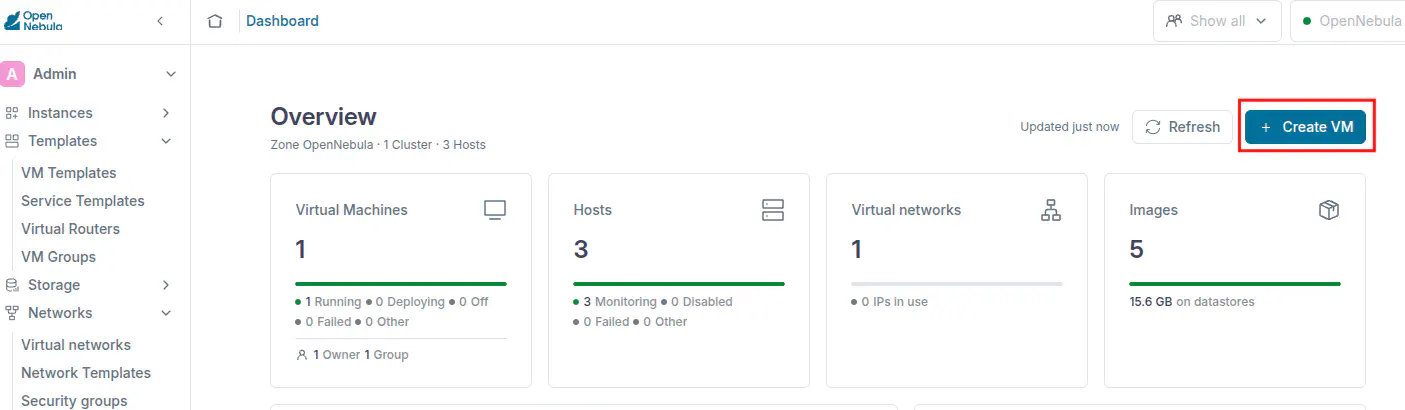
Click + Create VM:
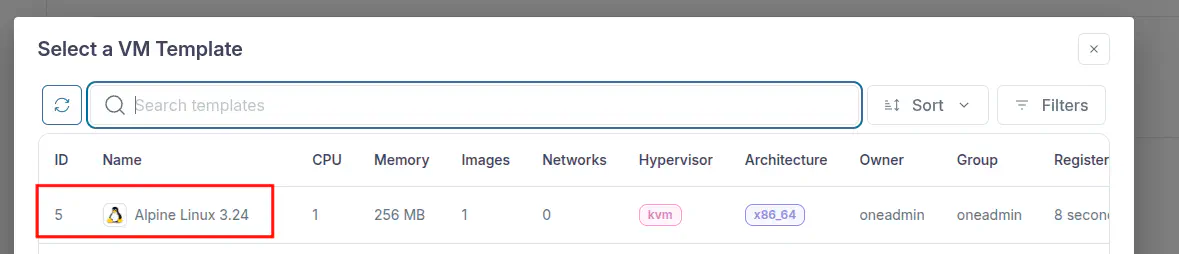
- Select an available template and you will be taken to the instance configuration wizard.
- In the next screen you can configure various parameters for the VM. The only mandatory parameter is the VM name; you can leave all others at their default values. Enter the VM name, then click Next.
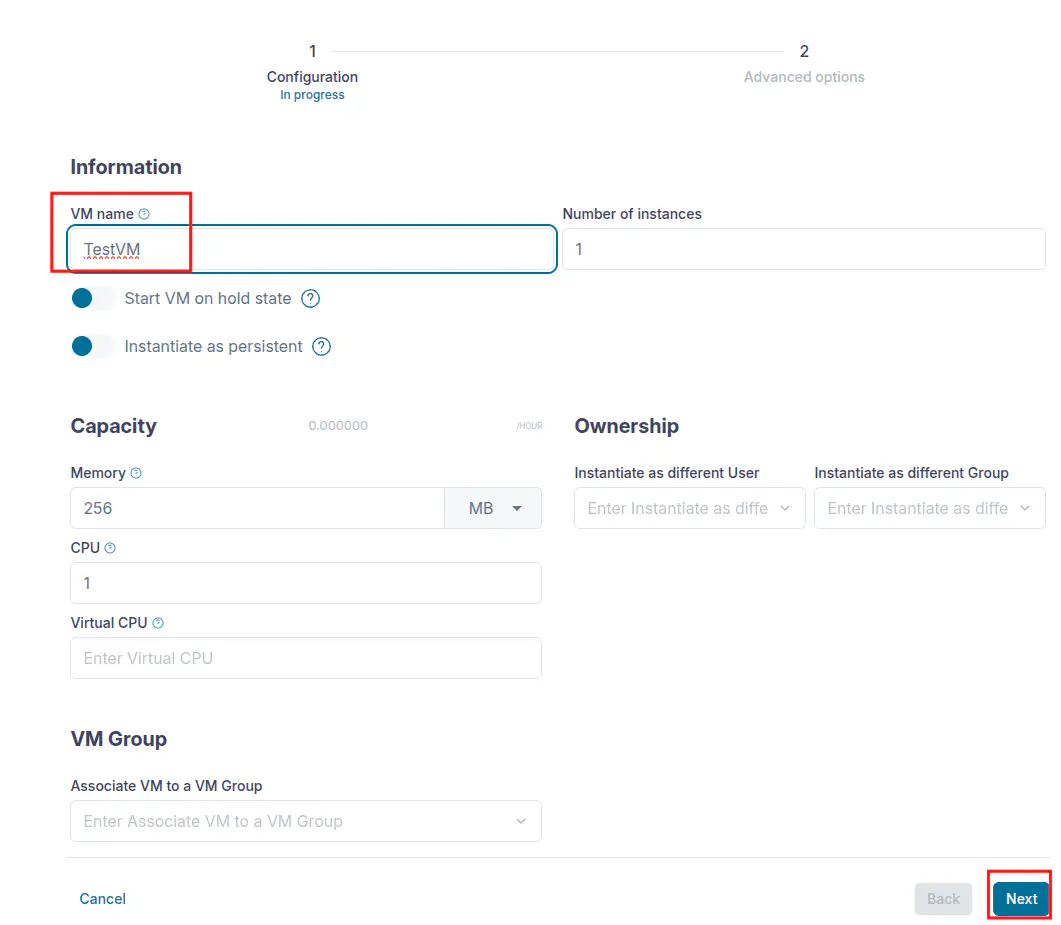
- Since the Virtual Network and datastores have been previously configured during the installation, in the next step all parameters are already set to their default values. To deploy the VM, click Finish.
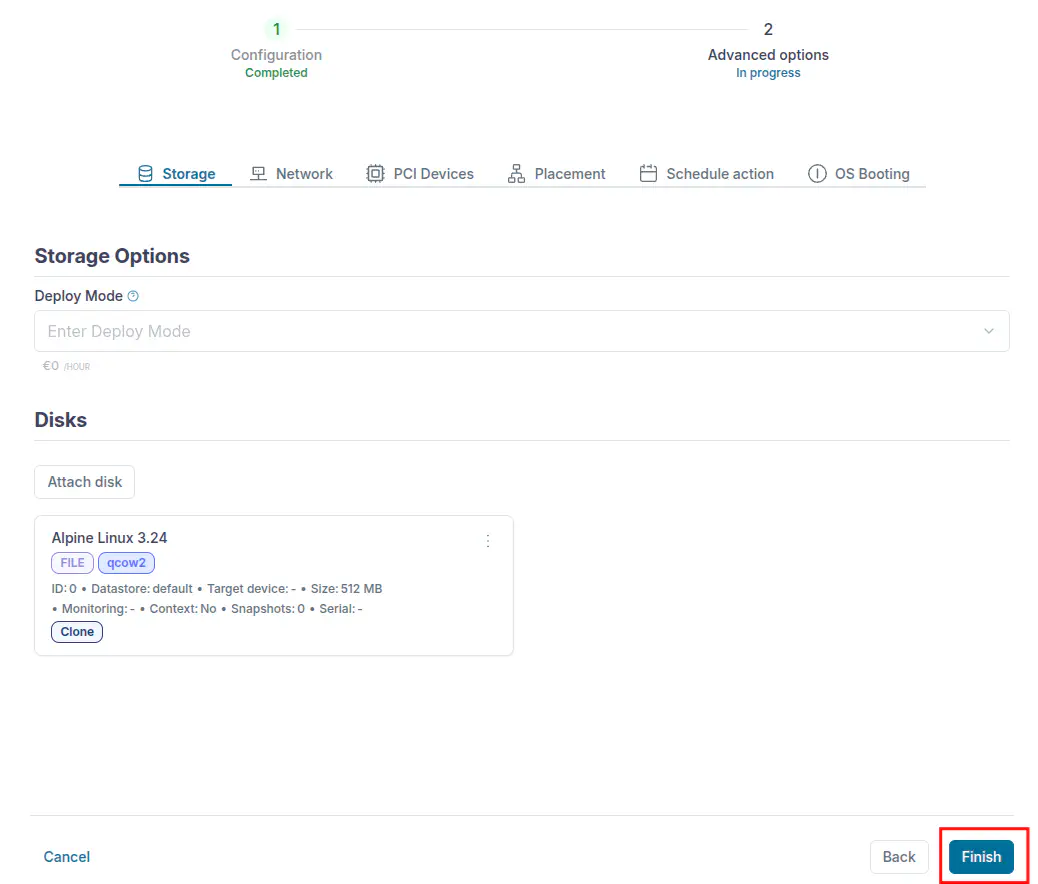
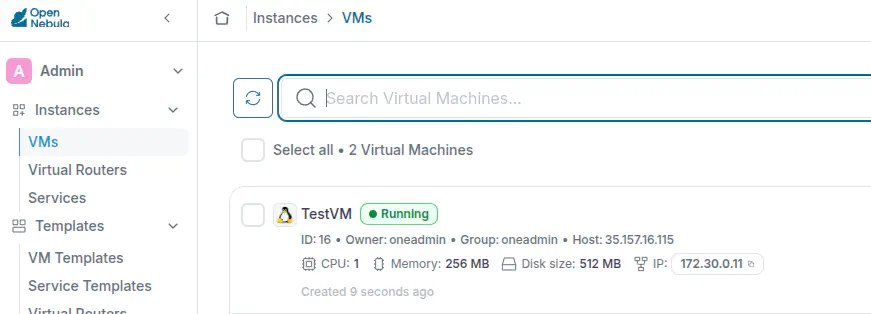
The VM deployment process begins in the background. After a few moments the VM will be fully deployed, and its status will change to RUNNING.
Select the running VM, click on the actions menu (ellipsis) and navigate to the VNC menu item.
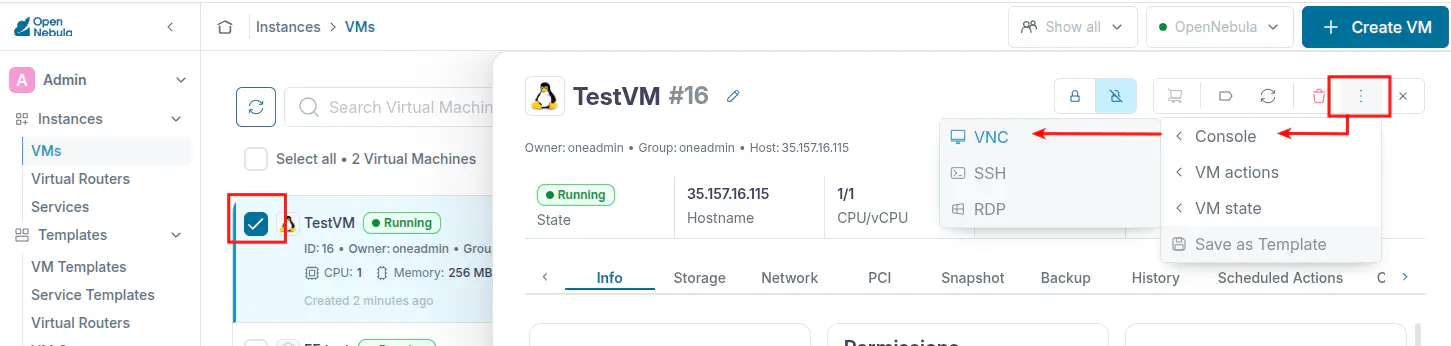
Confirm that you see the startup screen of the VM.
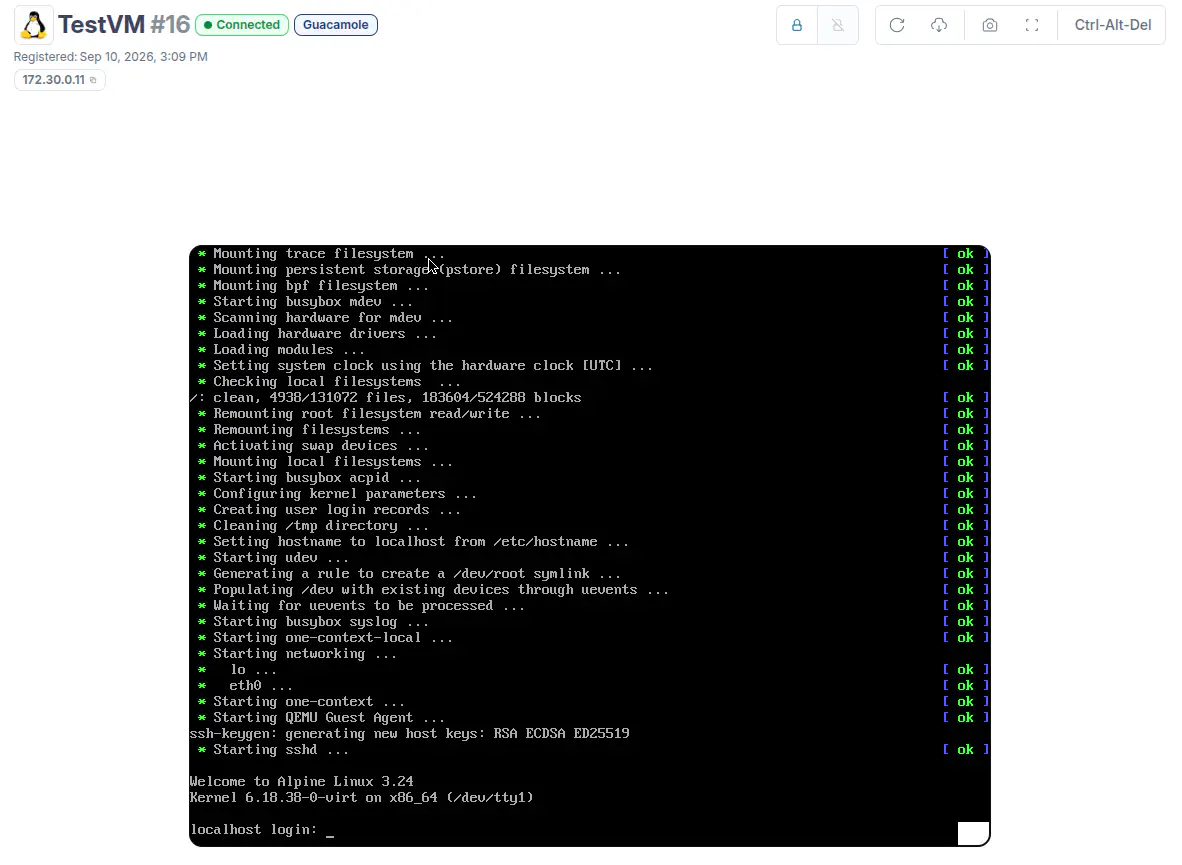
Log in to the deployed VM using the following credentials:
User: root
Password: opennebula
3.4 Instantiating Multiple VMs
Instantiate one more VM following the steps specified in the previous section. Once a VM is running, capture the IP address assigned to it (note that actual IP addresses might vary).
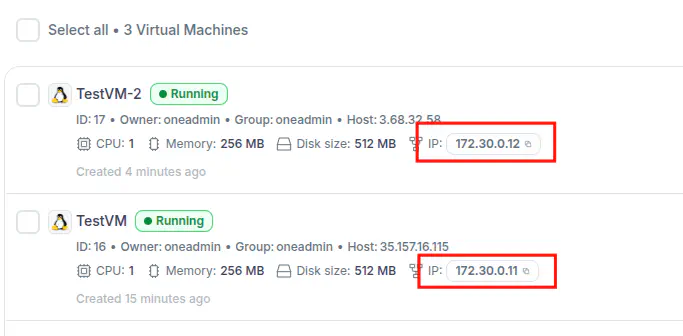
Open the new VM’s console and log in with the following credentials:
 User: root
 Password:  opennebula
Check the IP address assigned to the previous VM (in the example below, 172.31.0.11). Run the ping command to this IP to validate connectivity between VMs.
3.5 Instantiating a VM Using a Custom Image
Before attempting to upload a custom image, it is recommended to review the official documentation on Managing Images in OpenNebula. To create a VM using the custom image, follow these steps:
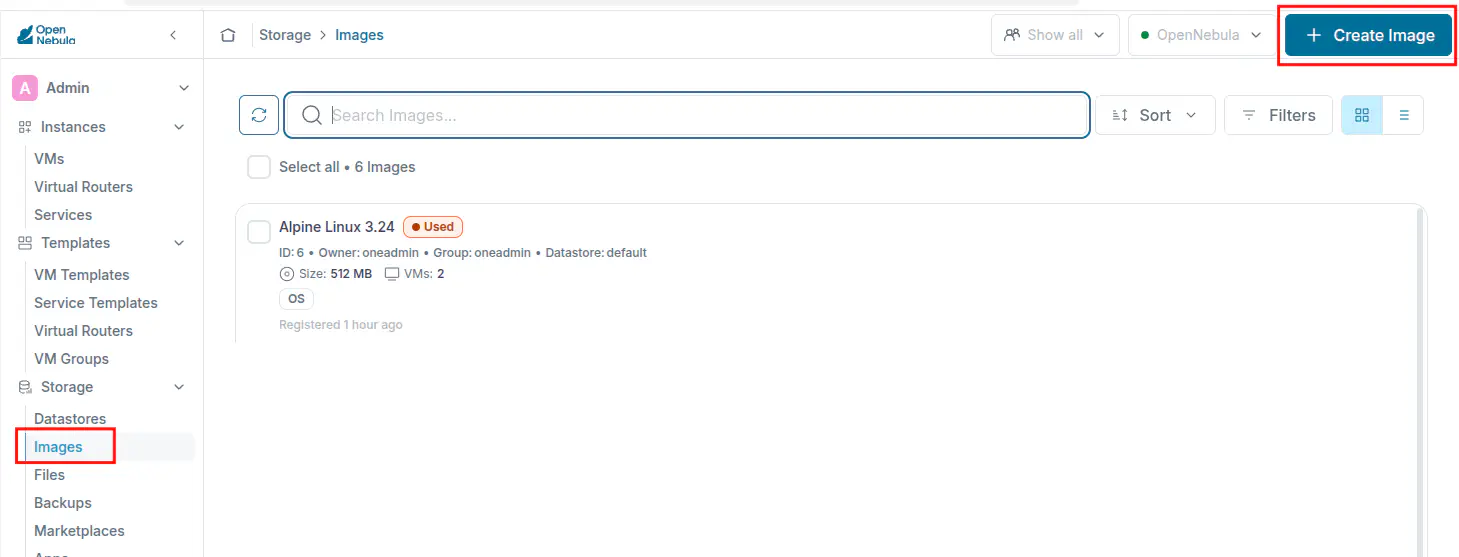
Navigate to Storage -> Images, then click Create image to create a new image:
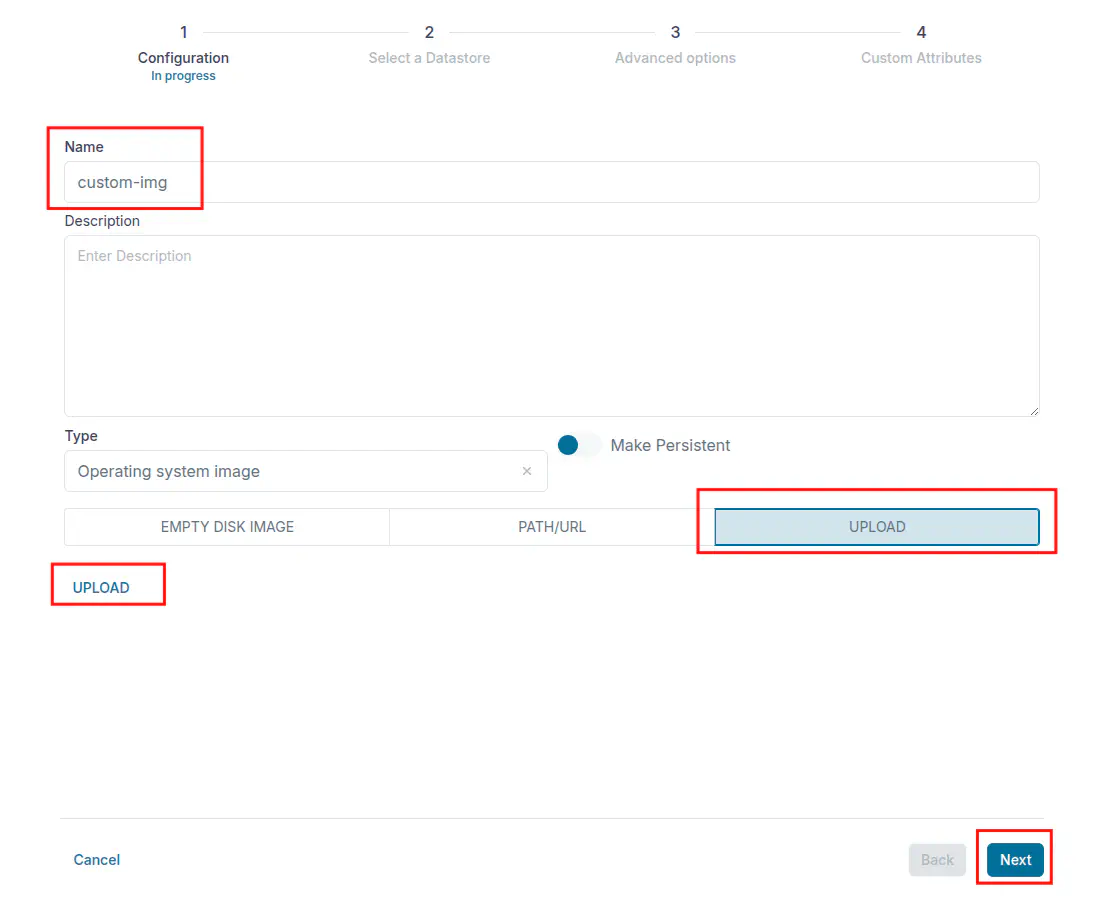
Enter a name for your custom image, then click the Upload tab. Select the image file you wish to upload, then click Next.
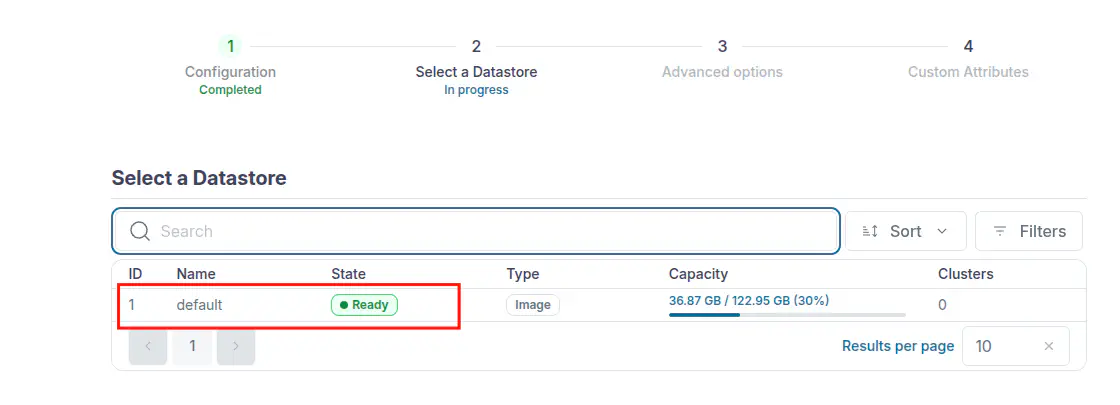
Select the datastore to save your image. Caution: Check the size of the raw image to upload, and ensure there is enough space available for it in the target datastore. Once selected, proceed with Next and then Finish.
- Wait for the image to finish uploading.

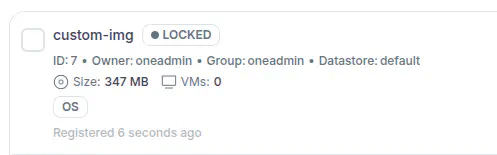
- Once uploaded, image will be processed by OpenNebula. It may take a while and during that process the new image remains in LOCKED state.
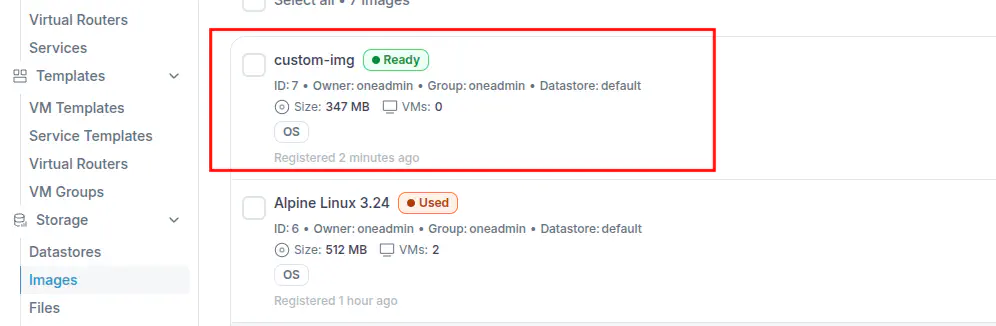
- After the image file is processed, Sunstone should display the new image in the Images view as READY
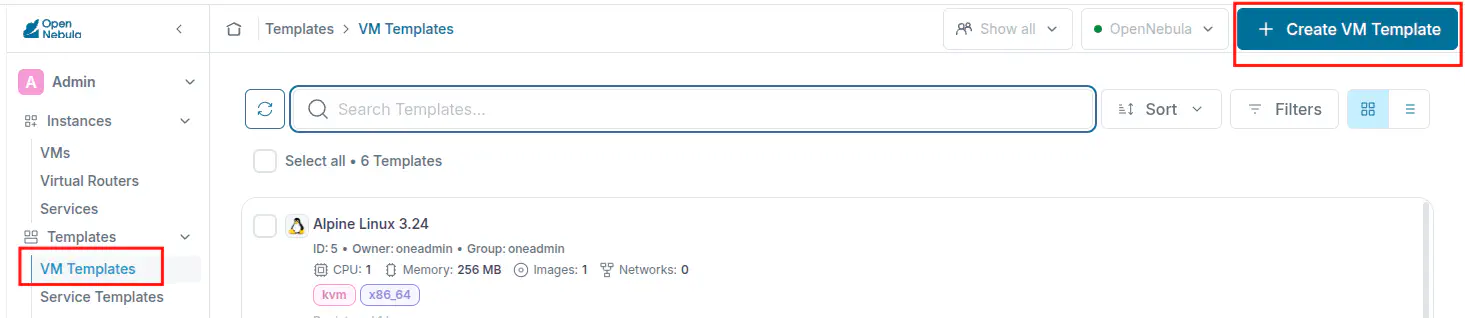
- Now you will must create a new VM template using the custom image. Navigate to Templates -> VM Templates, then click Create template to create a new VM template.
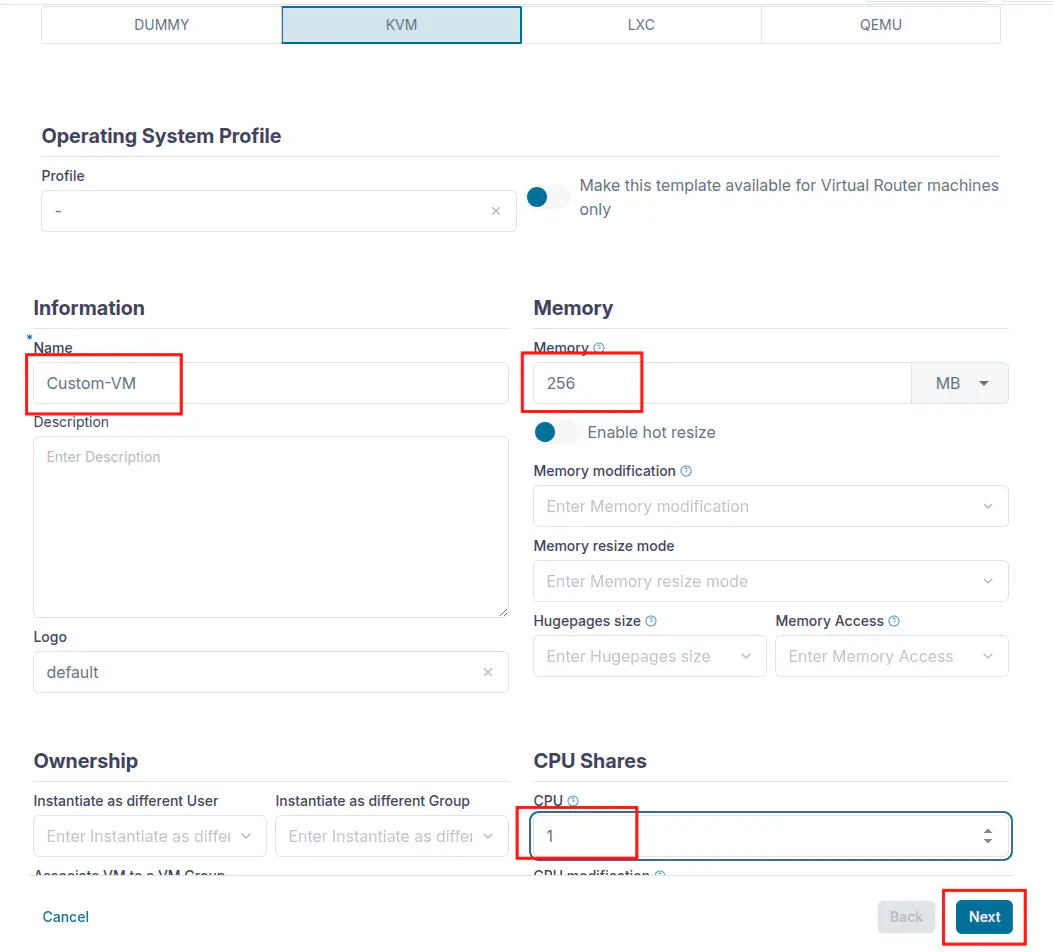
- On the template screen, select KVM for the hypervisor. Enter a name for the VM, and the physical/virtual CPU and memory settings for the VM template. Click Next.
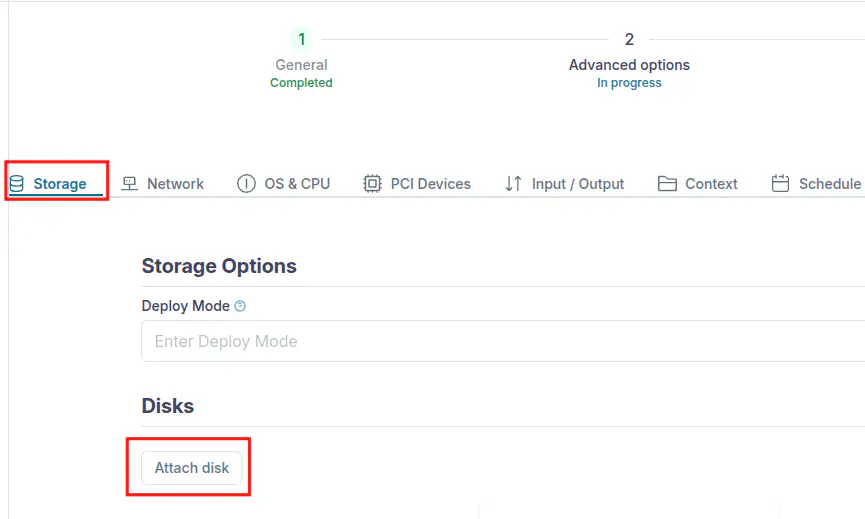
- On the Advanced Options screen, select the Storage tab, then click Attach disk:
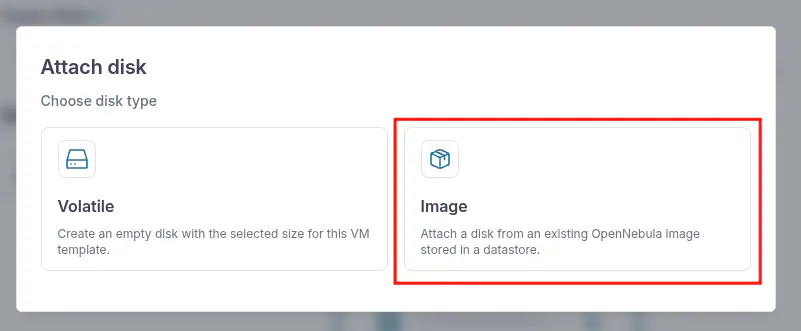
- Select the Image option:
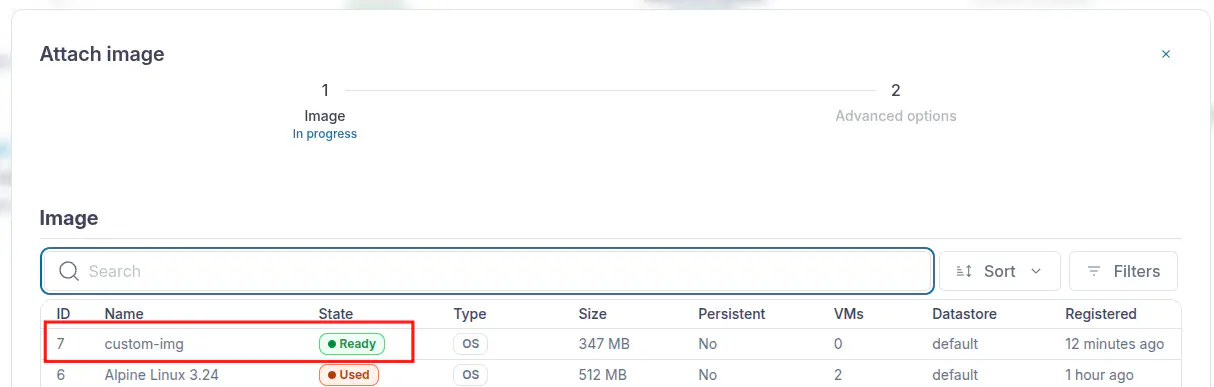
- Choose the recently uploaded image and click Next followed by Finish:
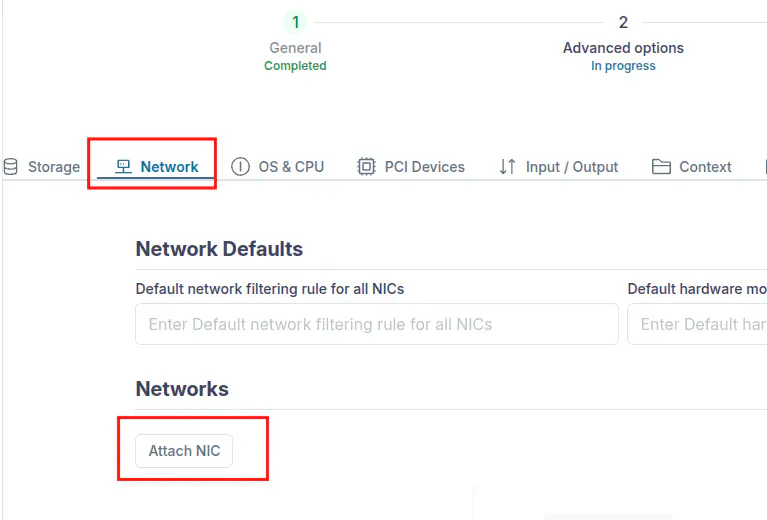
- Now you return to the Advanced options step. Switch to the Network tab and click Attach NIC:
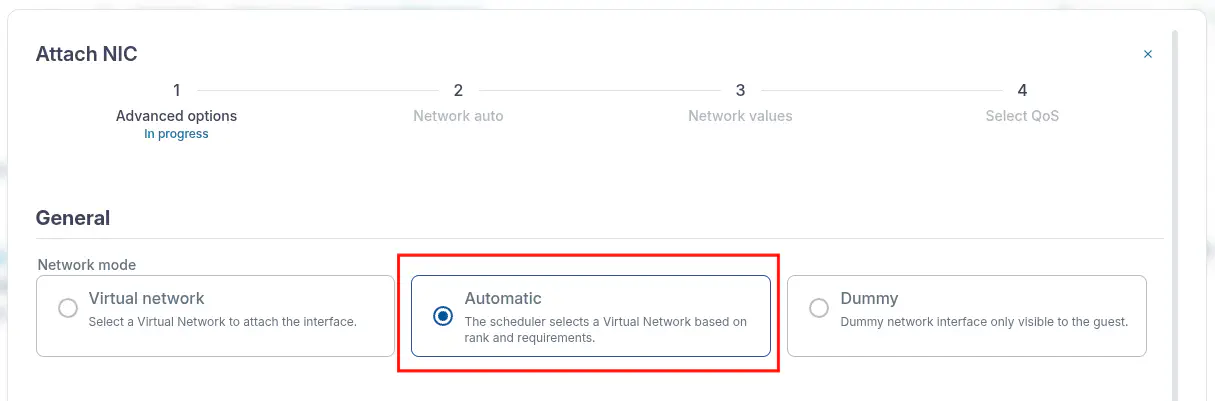
- Select Automatic and click Next in the following steps, then Finish:
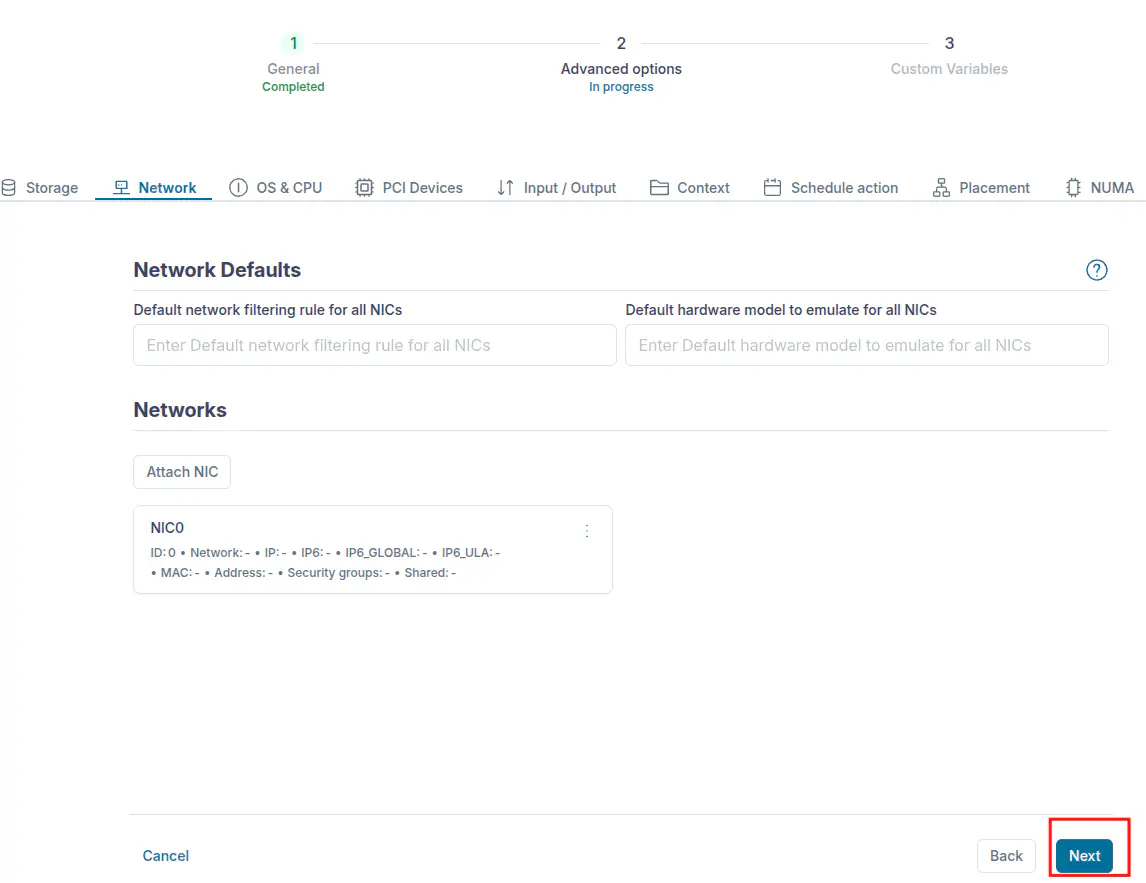
- Finish the process with Next followed by Finish:
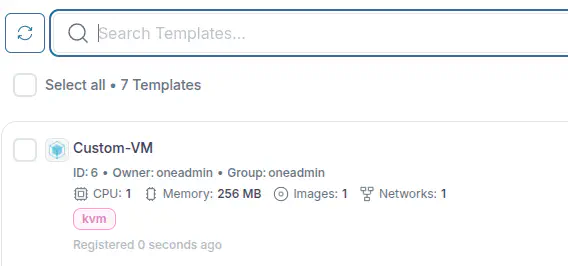
- The new template will show up in the list:
- Select the new template and click Instantiate:
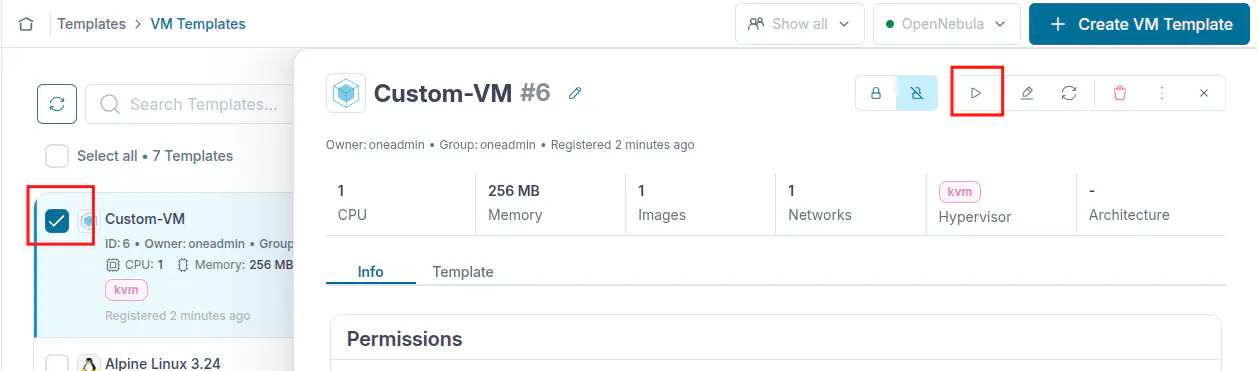
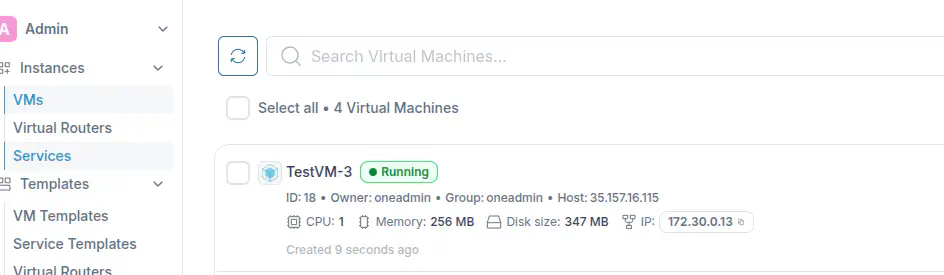
- Follow the process as described in section 3.3, points 4-9. After clicking Finish, you should see the new VM enter the RUNNING state:
Step 4. Add Another OpenNebula Node (hypervisor)
If you have another server to be used as an additional node, use same ISO and choose Install OpenNebula Node in the boot menu.
You can log into the node with the following credentials (the same as the Front-end):
User: root
Password:  0p3nN3bul4
On the Host, onehostmenu will invoke a dialog that, among other options, allows you to set up the network calling nmtui (nmtui can be invoked as well).
Once the node is installed and the network configured, complete the following steps on the Front-end command line:
- Execute
onefemenu - Select Add OpenNebula Host
- Enter the IP of the node
- Enter the user to access the node. It must have sudo permissions (root, for instance)
- The user password will be requested (not printed)
The node will be installed and configured and will appear online after a short time.
Assistance and Support
While we recommend setting up your PoC before applying any advanced configuration, the OpenNebula engineering team will be available during the PoC process if you wish to look into more advanced functionality, such as configuring Virtual Machines for outbound internet access. Simply reach out to your assigned engineering contact, and they will be happy to discuss advanced configuration options with you.
You can reach out to the OpenNebula Solution Architect team for your PoC at any time, by emailing sales@opennebula.io. Lastly, the OpenNebula Community Forum is also a great database of knowledge from OpenNebula users and developers.
Annex A1. Front-end and Node Menu
A1.1 Front-end Menu (onefemenu)
On the Front-end command line, execute onefemenu as the root user to access to the following menu:
┌────────────────────OpenNebula frontend Setup───────────────────────┐
│ Setup menu                                                         │
│ ┌────────────────────────────────────────────────────────────────┐ │
│ │          netconf             Configure network                 │ │
│ │          enable_fw           Enable firewalld                  │ │
│ │          disable_fw          Disable firewalld                 │ │
│ │          add_host            Add OpenNebula Host               │ │
│ │          proxy               Configure proxy settings          │ │
│ │          show_oneadmin_pass  Show oneadmin password            │ │
│ │          quit                Exit to Shell                     │ │
│ └────────────────────────────────────────────────────────────────┘ │
├────────────────────────────────────────────────────────────────────┤
│                   <  OK  >          <Cancel>                       │
└────────────────────────────────────────────────────────────────────┘
The onefemenu options are:
- netconf: Configures the network with
nmtui, sets up some internal variables and disables the firewall. - enable_fw / disable_fw: Enable and disable the firewall.
- add_host: Adds an OpenNebula hypervisor node. It will ask for the IP/name of the Host and the remote user with passwordless sudo permissions that will be used to add it. It will ask for the password for that user on the remote machine unless passwordless SSH access to the Host was previously configured.
- proxy: Configure the proxy. This will edit the skeleton file for setting up the proxy server and restart/reconfigure the necessary services. Please check the configuring a proxy server Annex.
- show_oneadmin_pass: Reveals OpenNebula administration password.
A1.2 Host Menu (onehostmenu)
On the Front-end command line, execute onehostmenu as the root user to access to the following menu:
┌──────────────────────OpenNebula node Setup─────────────────────────┐
│ Setup menu                                                         │
│ ┌────────────────────────────────────────────────────────────────┐ │
│ │                netconf     Configure network                   │ │
│ │                enable_fw   Enable firewalld                    │ │
│ │                disable_fw  Disable firewalld                   │ │
│ │                setup_frr   Setup FRR for BGP-EVPN              │ │
│ │                quit        Exit to Shell                       │ │
│ └────────────────────────────────────────────────────────────────┘ │
├────────────────────────────────────────────────────────────────────┤
│                   <  OK  >          <Cancel>                       │
└────────────────────────────────────────────────────────────────────┘
The onehost options are:
- netconf: Allows you to configure the network with nmtui and disables the firewall.
- enable_fw / disable_fw: Enable/Disable the firewall.
- setup_frr: Configures a skeleton for a BGP-EVPN client. It will ask for an existing BGP route reflector. Allows the user to edit the configuration before restarting FRR.
Annex A2. Configuring Network Interfaces with nmtui
nmtui is a ncurses interface to set up Network Manager devices.
If your administration interface (the one that you are using to access the PoC server) is on a tagged interface (no need to configure a VLAN on it), the steps to configure it are the following:
Select Edit a connection and press Enter
Identify the network interface (under the Ethernet category)
Select Edit (in this example we will use the interface ens3)
Default interface MTU is 1500. If you need to modify it, please show the ETHERNET section of the dialog and set it up accordingly. For instance, to set up the MTU to 9000 bytes, the dialog should look like the following example:
┌───────────────────────────┤ Edit Connection ├───────────────────────────┐
│                                                                         │
│         Profile name ens3____________________________________           │
│               Device ens3 (02:00:AC:14:00:04)________________           │
│                                                                         │
│ ╤ ETHERNET                                                    <Hide>    │
│ │ Cloned MAC address ________________________________________           │
│ │                MTU 9000______ bytes                                   │
│ └                                                                       │
│ ═ 802.1X SECURITY                                             <Show>    │
│                                                                         │
│ ═ IPv4 CONFIGURATION <Manual>                                 <Show>    │
│ ═ IPv6 CONFIGURATION <Automatic>                              <Show>    │
│                                                                         │
│ [X] Automatically connect                                               │
│ [X] Available to all users                                              │
│                                                                         │
│                                                           <Cancel> <OK> │
└─────────────────────────────────────────────────────────────────────────┘
On the IPv4 configuration section press Show. We recommend to set up the IP manually. An example of the modified fields to set the interface (IP 172.20.0.4/24, default GW 172.20.0.1, DNS 8.8.8.8) would be the following:
┌───────────────────────────┤ Edit Connection ├───────────────────────────┐
│         Profile name ens3____________________________________           │
│               Device ens3 (02:00:AC:14:00:04)________________           │
│                                                                         │
│ ═ ETHERNET                                                    <Show>    │
│ ═ 802.1X SECURITY                                             <Show>    │
│                                                                         │
│ ╤ IPv4 CONFIGURATION <Manual>                                 <Hide>    │
│ │          Addresses 172.20.0.4/24____________ <Remove>                 │
│ │                    <Add...>                                           │
│ │            Gateway 172.20.0.1_______________                          │
│ │        DNS servers 8.8.8.8__________________ <Remove>                 │
│ │                    <Add...>                                           │
│ │     Search domains <Add...>                                           │
│ │                                                                       │
│ │            Routing (No custom routes) <Edit...>                       │
│ │ [ ] Never use this network for default route                          │
│ │ [ ] Ignore automatically obtained routes                              │
│ │ [ ] Ignore automatically obtained DNS parameters                      │
│ │                                                                       │
│ │ [X] Require IPv4 addressing for this connection                       │
│ └                                                                       │
│ ═ IPv6 CONFIGURATION <Automatic>                              <Show>    │
│                                                                         │
│ [X] Automatically connect                                               │
│ [X] Available to all users                                              │
│                                                           <Cancel> <OK> │
└─────────────────────────────────────────────────────────────────────────┘
Once finished, press OK and go back and quit nmtui.
If the interface is a trunk and you need to set up a VLAN on the interface, you should previously do the following:
Choose Edit a connection, after that choose VLAN and press create:
┌──────────────────────┤ New Connection ├──────────────────────┐
│                                                              │
│ Select the type of connection you wish to create.            │
│                                                              │
│                        MACsec      ↑                         │
│                        Team        ▒                         │
│                        VLAN        ▮                         │
│                        Veth        ▒                         │
│                        WireGuard   ↓                         │
│                                                              │
│                                            <Cancel> <Create> │
│                                                              │
└──────────────────────────────────────────────────────────────┘
You will get the following dialog after it. In this case, filling up the “Device” field with the value “ens8.800” will automatically know that the parent interface is ens8 and the VLAN ID will be 800. The Profile name was set up to VLAN 800 in order to have a readable name.
┌───────────────────────────┤ Edit Connection ├───────────────────────────┐
│                                                                         │
│         Profile name VLAN 800________________________________           │
│               Device ens8.800________________________________           │
│                                                                         │
│ ╤ VLAN                                                        <Hide>    │
│ │             Parent ens8____________________________________           │
│ │            VLAN id 800_____                                           │
│ │                                                                       │
│ │ Cloned MAC address ________________________________________           │
│ │                MTU __________ (default)                               │
│ └                                                                       │
│                                                                         │
│ ═ IPv4 CONFIGURATION <Automatic>                              <Show>    │
│ ═ IPv6 CONFIGURATION <Automatic>                              <Show>    │
│                                                                         │
│ [X] Automatically connect                                               │
│ [X] Available to all users                                              │
│                                                                         │
│                                                           <Cancel> <OK> │
│                                                                         │
└─────────────────────────────────────────────────────────────────────────┘
After that, the “IPv4 CONFIGURATION” section is configured the same as a tagged interface.
Annex A3. Configuring a Proxy Server
If your network needs a proxy server to access to the internet there will be problems downloading the appliances and the images from OpenNebula marketplace. To set up the proxy server on the Front-end, please, choose the option Configure proxy settings on the Front-end menu. The following dialog will appear:
┌─────────────────────────Setup Proxy variables────────────────────────────┐
│ ┌──────────────────────────────────────────────────────────────────────┐ │
│ │HTTP proxy:                                                           │ │
│ │HTTPS proxy:                                                          │ │
│ │Exclude proxy for:                                                    │ │
│ └──────────────────────────────────────────────────────────────────────┘ │
│                                                                          │
├──────────────────────────────────────────────────────────────────────────┤
│                       <  OK  >            <Cancel>                       │
└──────────────────────────────────────────────────────────────────────────┘
After modifying the settings accordingly, the OpenNebula daemon will restart and all internet access will be via proxy.
Annex A4. Spinning up Windows Virtual Machines
A4.1 Download Installation ISO Image
Copy the Windows ISO image to the PoC Front-end /var/tmp directory. Genuine Windows images can be quickly obtained through the Microsoft downloads webpage.
A4.2 Register the Windows Image
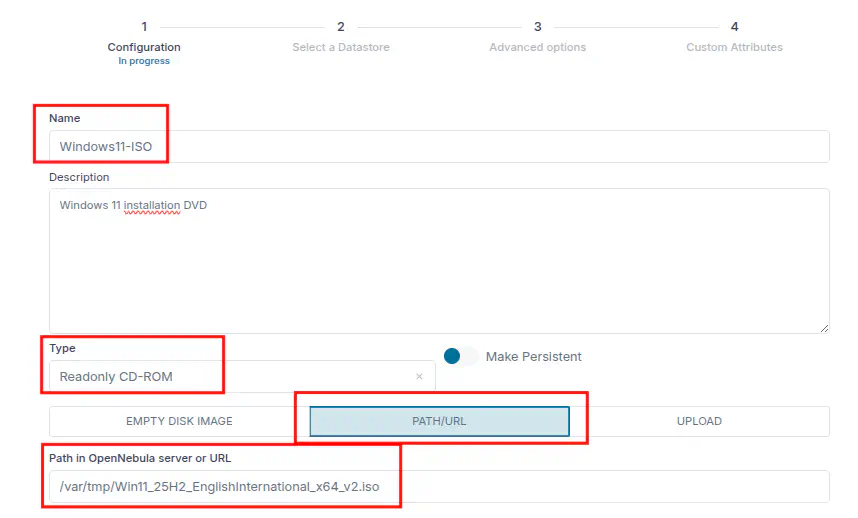
Prerequisite: Ensure the Windows ISO is available on the OpenNebula Front-end here: /var/tmp/Win11_25H2_EnglishInternational_x64_v2.iso
Navigate to Storage -> Images in the Sunstone interface, then click Create image:
Fill the Name and add an optional description for the new image. Choose CD-ROM type and use the PATH/URL option to identify the downloaded ISO location. Click Next to proceed:
Select the datastore to save your image. Check the size of the raw image to upload, and ensure there is enough space available in the target datastore. Once selected, proceed with Next and then Finish.
- As we have the file on disk already, image processing will start immediatelly (no upload). Nevertheless, the Windows ISO is large and it may take longer than the previously tested Linux image so be patient while the new image remains in the LOCKED state.
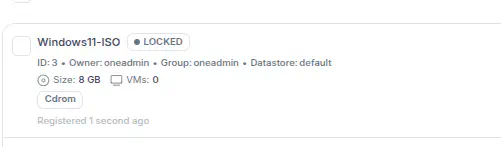
- You can proceed once Sunstone displays the new image on the Images screen as READY:
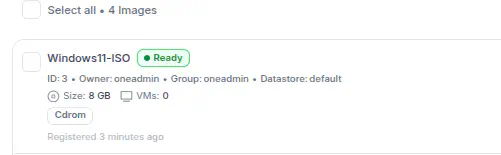
Now create an empty disk for Windows installation. Click Create image again to create a new image, but this time choose Empty disk image and set at least 64GB for the size. Toggle Make Persistent and click Next:
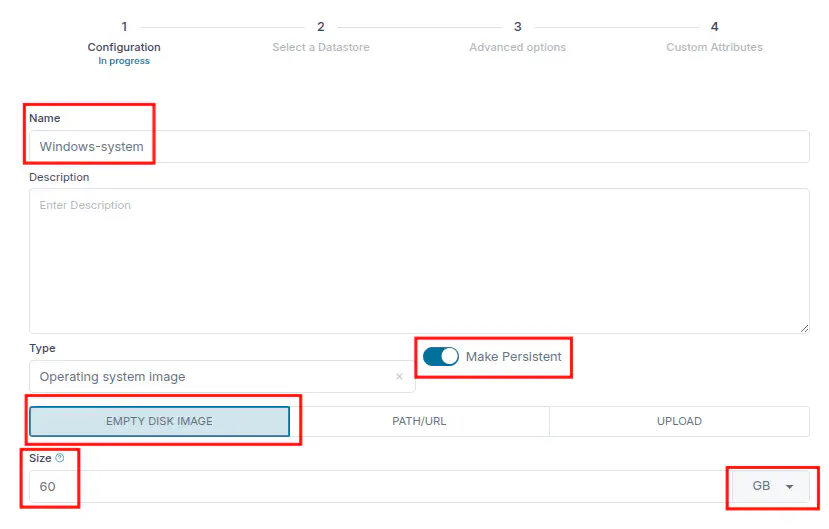
Select the datastore to save your image. Once selected, proceed with Next and then Finish.
Now you will need to create a new VM template using the registered Windows image. Navigate to Templates -> VM Templates, then click Create template to create a new VM template.
- On the template screen, select KVM for the hypervisor. Use the Profile list to load optimized defaults and set the physical/virtual CPU and memory settings for the VM template. Click Next.
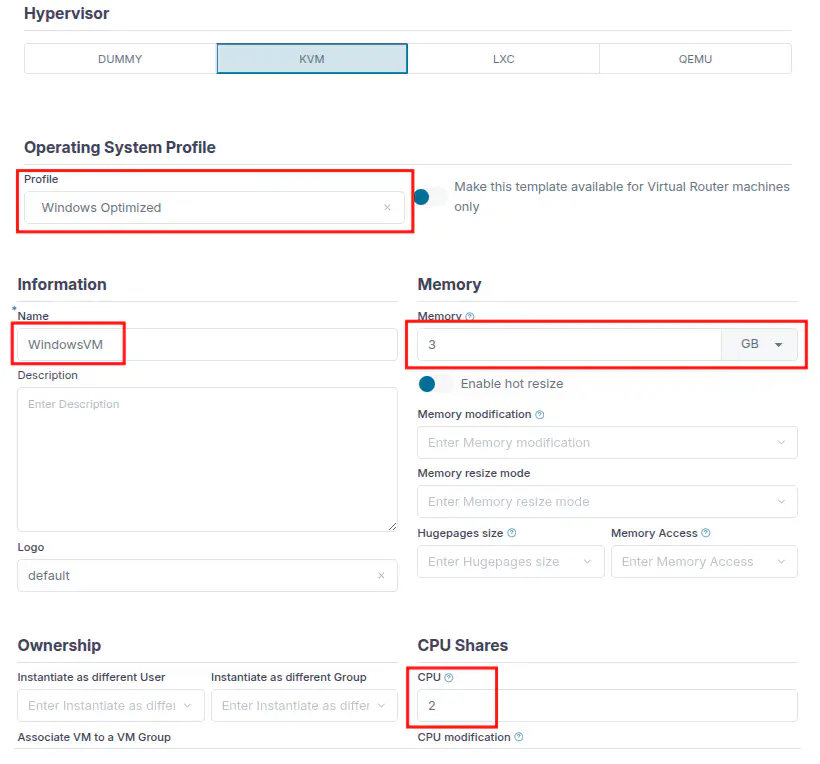
- In the Advanced Options screen, select the Storage tab, then click Attach disk:
- Select the Image option:
- Choose the Windows ISO image and click Next:
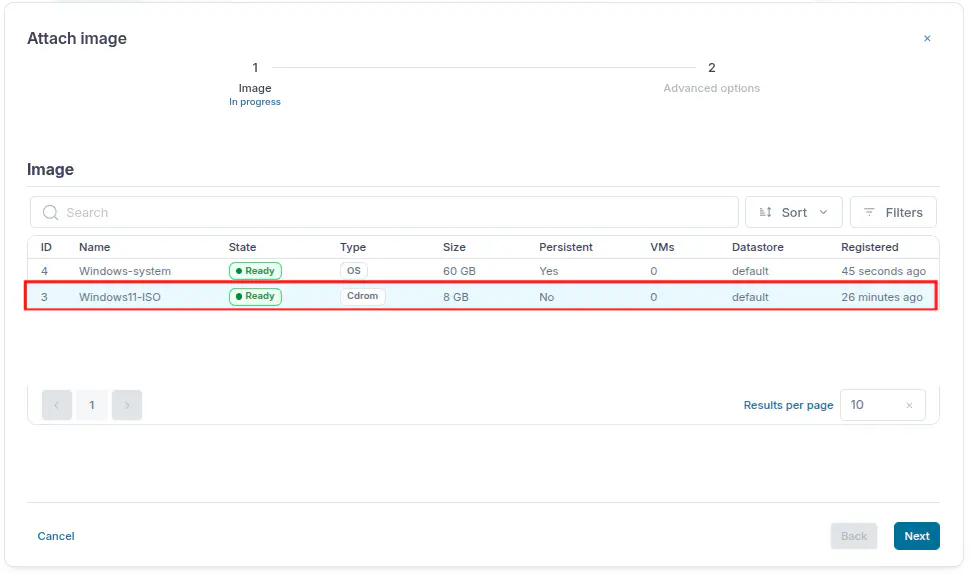
- In the Advanced tab ensure it’s in Read-only mode and choose SCSI/SATA in the BUS field.
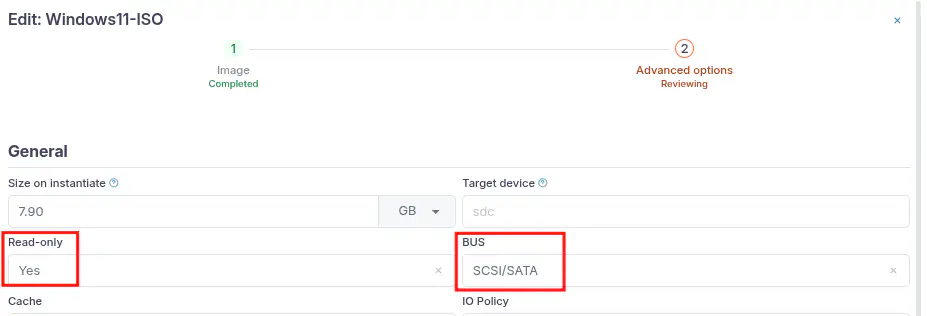
Next, attach the drivers ONE_WIN_Drivers disk bundled with the PoC ISO:

Similarily, attach the empty disk:
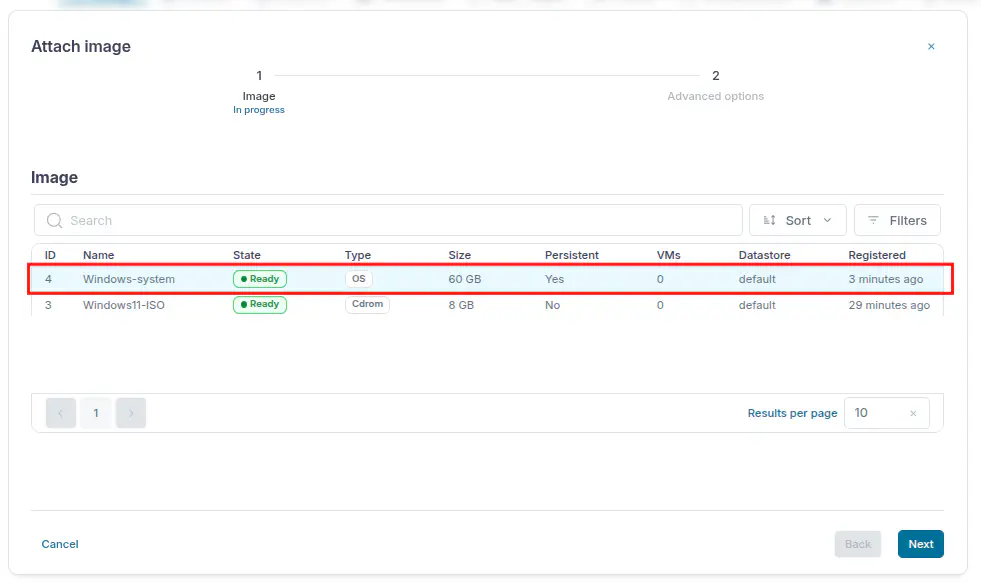
- In its “Advanced” tab ensure it’s not in Read-only mode and choose SCSI/SATA in BUS field:

- As a result, you should have three images attached now, CDROM, FILE and OS:
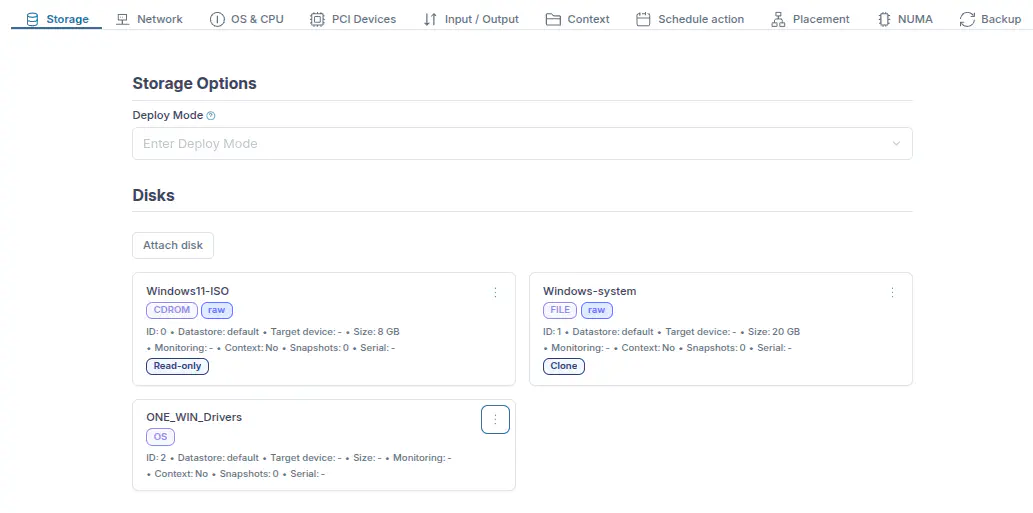
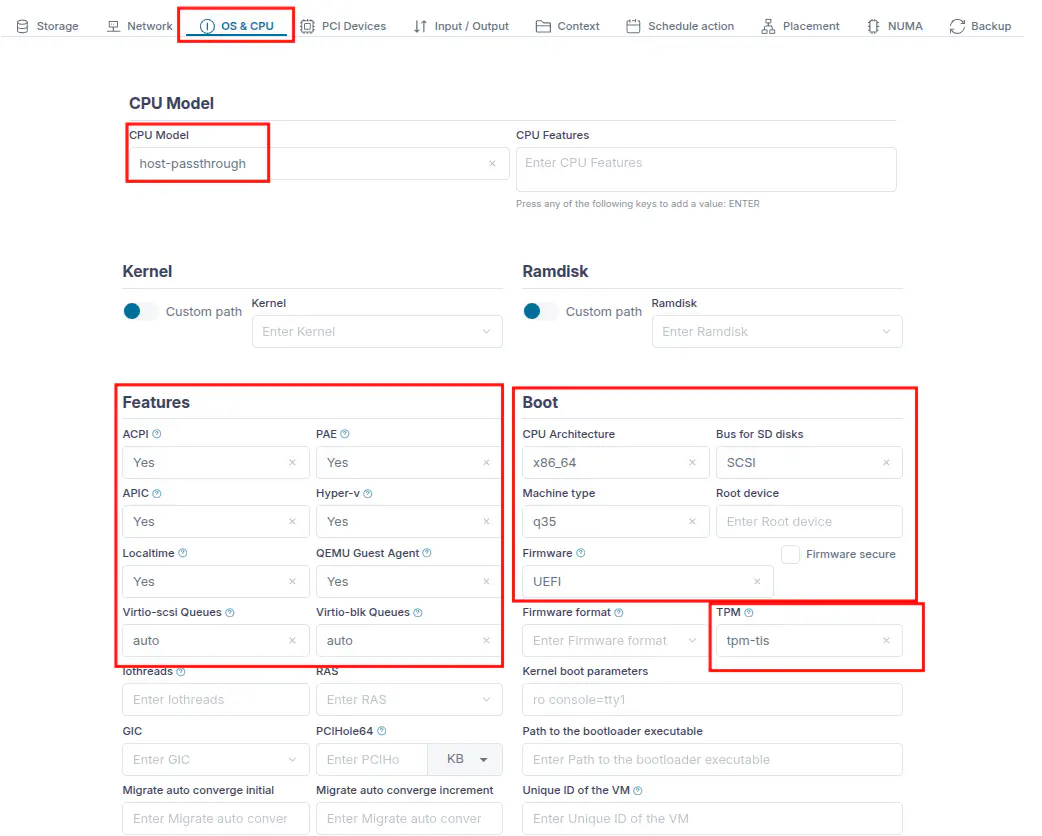
Now you are back in the Advanced options view. Switch to the OS & CPU tab. Ensure that boot order is correct and both devices selected as boot candidates:
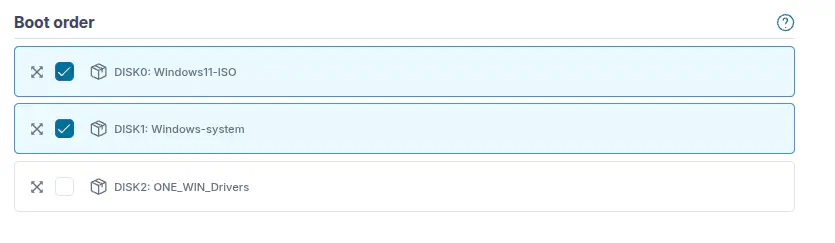
Most of the values are populated thanks to the optimized Windows profile you have chosen earlier. The only thing to decide is the TPM version, according to the model supported by your Host. The usual choice is tpm-tis.
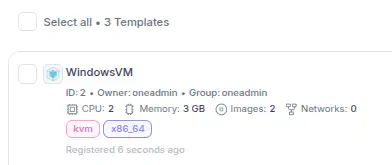
- Proceed with Next on the following steps until the last, click Finish". The new template will appear in the list:
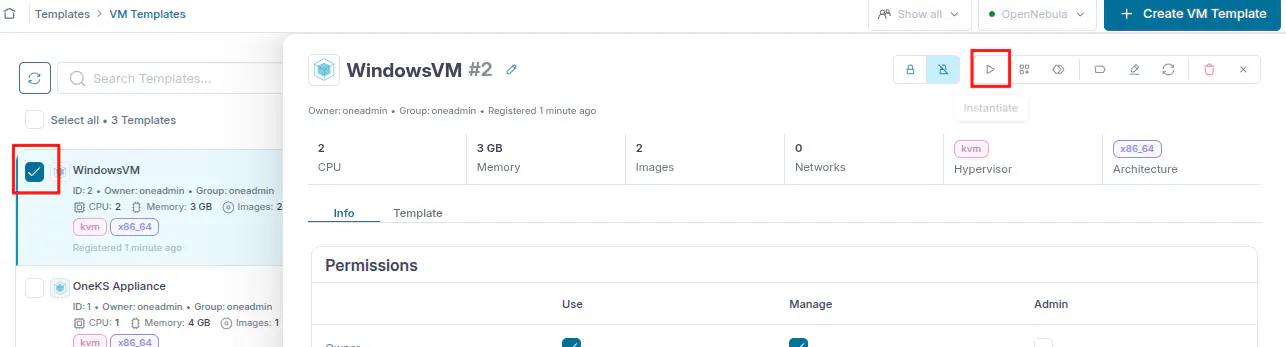
- Select the new template and click Instantiate:
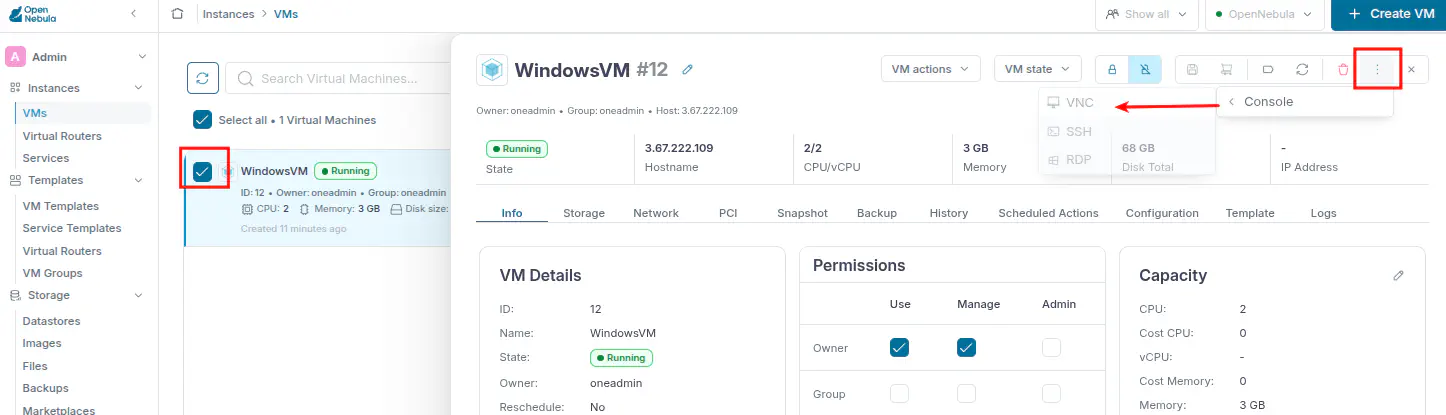
- Follow the process as described in sectiopn 3.3, points 4-9. After completion, you should see the new VM in RUNNING state. From the VMs list, select the Windows VM and click on options (ellipsis), then launch the VNC console:
- The Windows installer should boot and you can proceed with the installation:
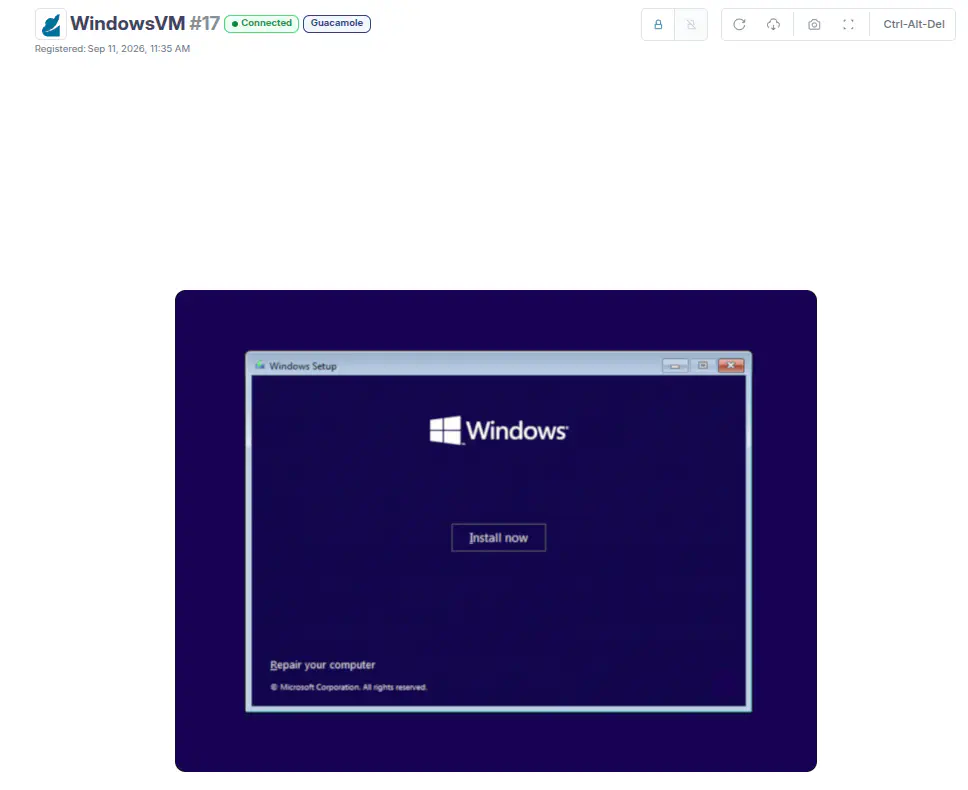
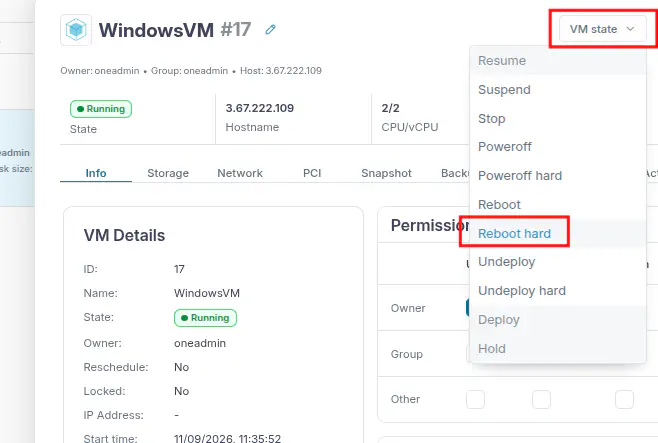
The generic Windows installation ISO has a very short timeout to confirm booting (Press any key to boot from this CD/DVD). If your VNC console shows a boot error, keep the console window open and in another browser tab and force the VM to reboot with the Reboot hard option in the Sunstone interface. Now you should be able to press any key and start the Windows installation.
Alternatively, you may use a sys-prepped Windows cloud image of your choice to save time. In such a case you just need to create a VM template with one disk (no CD) - the Windows cloud image.
- During the installation, browse the ONE_WIN_Drivers cdrom device to find appropriate virtio-scsi drivers and install them.
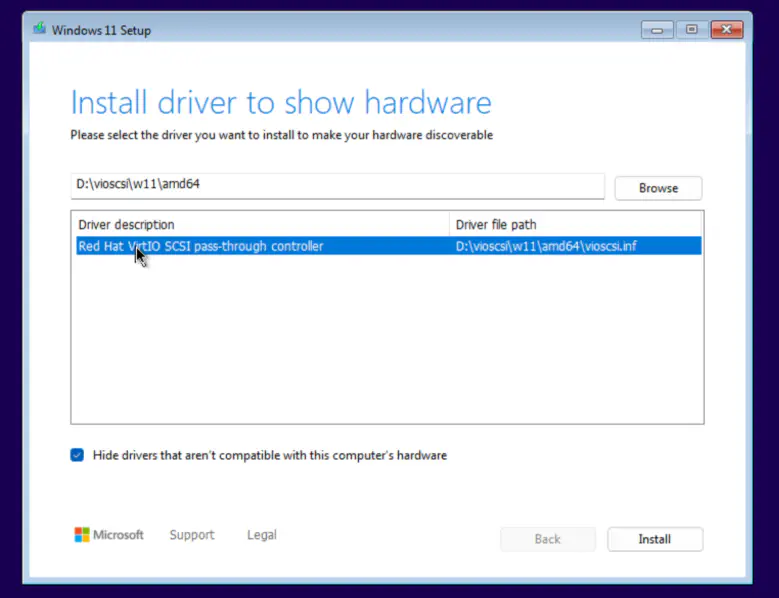
Progress through the Windows installation steps. The Virtual Machine will be rebooted a few times according to the installation procedure.
Complete the installation steps after reboot and install the next packages from the ONE_WIN_Drivers cdrom:
one-context
virtio-win-guest-tools
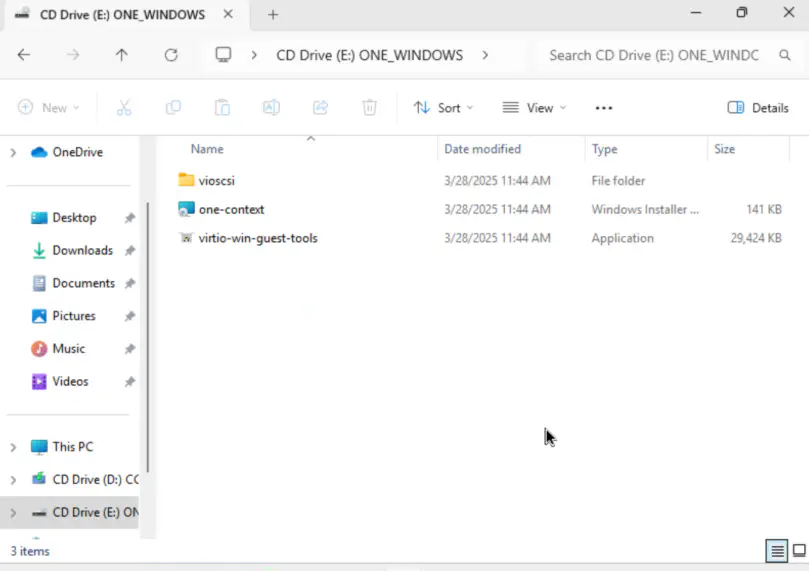
- Once the installation of Windows has been completed and all packages are installed you can perform a sysprep procedure and power off the VM. The next steps include changing the Windows 11 OS image type from persistent to non-persistent. This way you can have an ephemeral Windows instance for spawning VDIs or clone the prepared VM to distribute among users. Windows use cases differ significantly, therefore the PoC test run concludes upon successfully running the Windows machine without further customization.
GIVE FEEDBACK
Was this resource helpful?
Glad to hear it
Sorry to hear that