Disaster Recovery Architecture with Ceph
Disaster Recovery (DR) involves anticipating and designing an adequate response for any situation that prevents the correct functioning of a system in an organization. DR plays a key role in an organization’s business and operations continuity, and is a critical aspect in the planning and maintenance of cloud infrastructure.
A complete DR solution involves two main processes:
Failover, the process of moving business operations from a primary site which has suffered an outage, to a temporary site designated and preconfigured for such emergencies.
Failback, the process of moving business operations back to the primary site, after the site’s normal operation has been restored.
OpenNebula supports a complete DR solution based on Ceph RADOS Block Device (RBD) mirroring across two sites. In this configuration, Ceph asynchronously replicates Virtual Machine disk images from the source Site A to the target Site B, ensuring up-to-date data copies.
During failover, OpenNebula metadata is synchronized to enable quick deployment of Virtual Machines on Site B. In the event of a disaster at Site A, Site B can promote the mirrored volumes and start VMs with minimal downtime.
In failback, the images on Site A are configured to resume their role as primary images. VMs at Site B are stopped, resynchronized with their images in Site A, and started at Site A, preserving workload continuity.
This setup ensures data integrity and faster recovery during outages, and is an important safeguard for guaranteeing business continuity.
This guide provides the complete architecture specification, configuration settings and necessary steps to enable DR using Ceph RBD mirroring, as well as full instructions for recovery procedures (failover and failback) including example configuration files and commands.
Following this guide, you can:
- Set up the DR solution
- Design your own recovery procedures for failover and failback, based on the provided examples
- Test the DR solution
Basic Outline
Configuring the DR solution involves these high-level steps:
- Set up OpenNebula Front-ends on the source and target sites.
- Deploy an independent Ceph cluster for each site.
- Configure information for mirroring, including for VMs and authentication between clusters.
- Run the provided commands to enable mirroring.
Additional Information Resources
Architecture
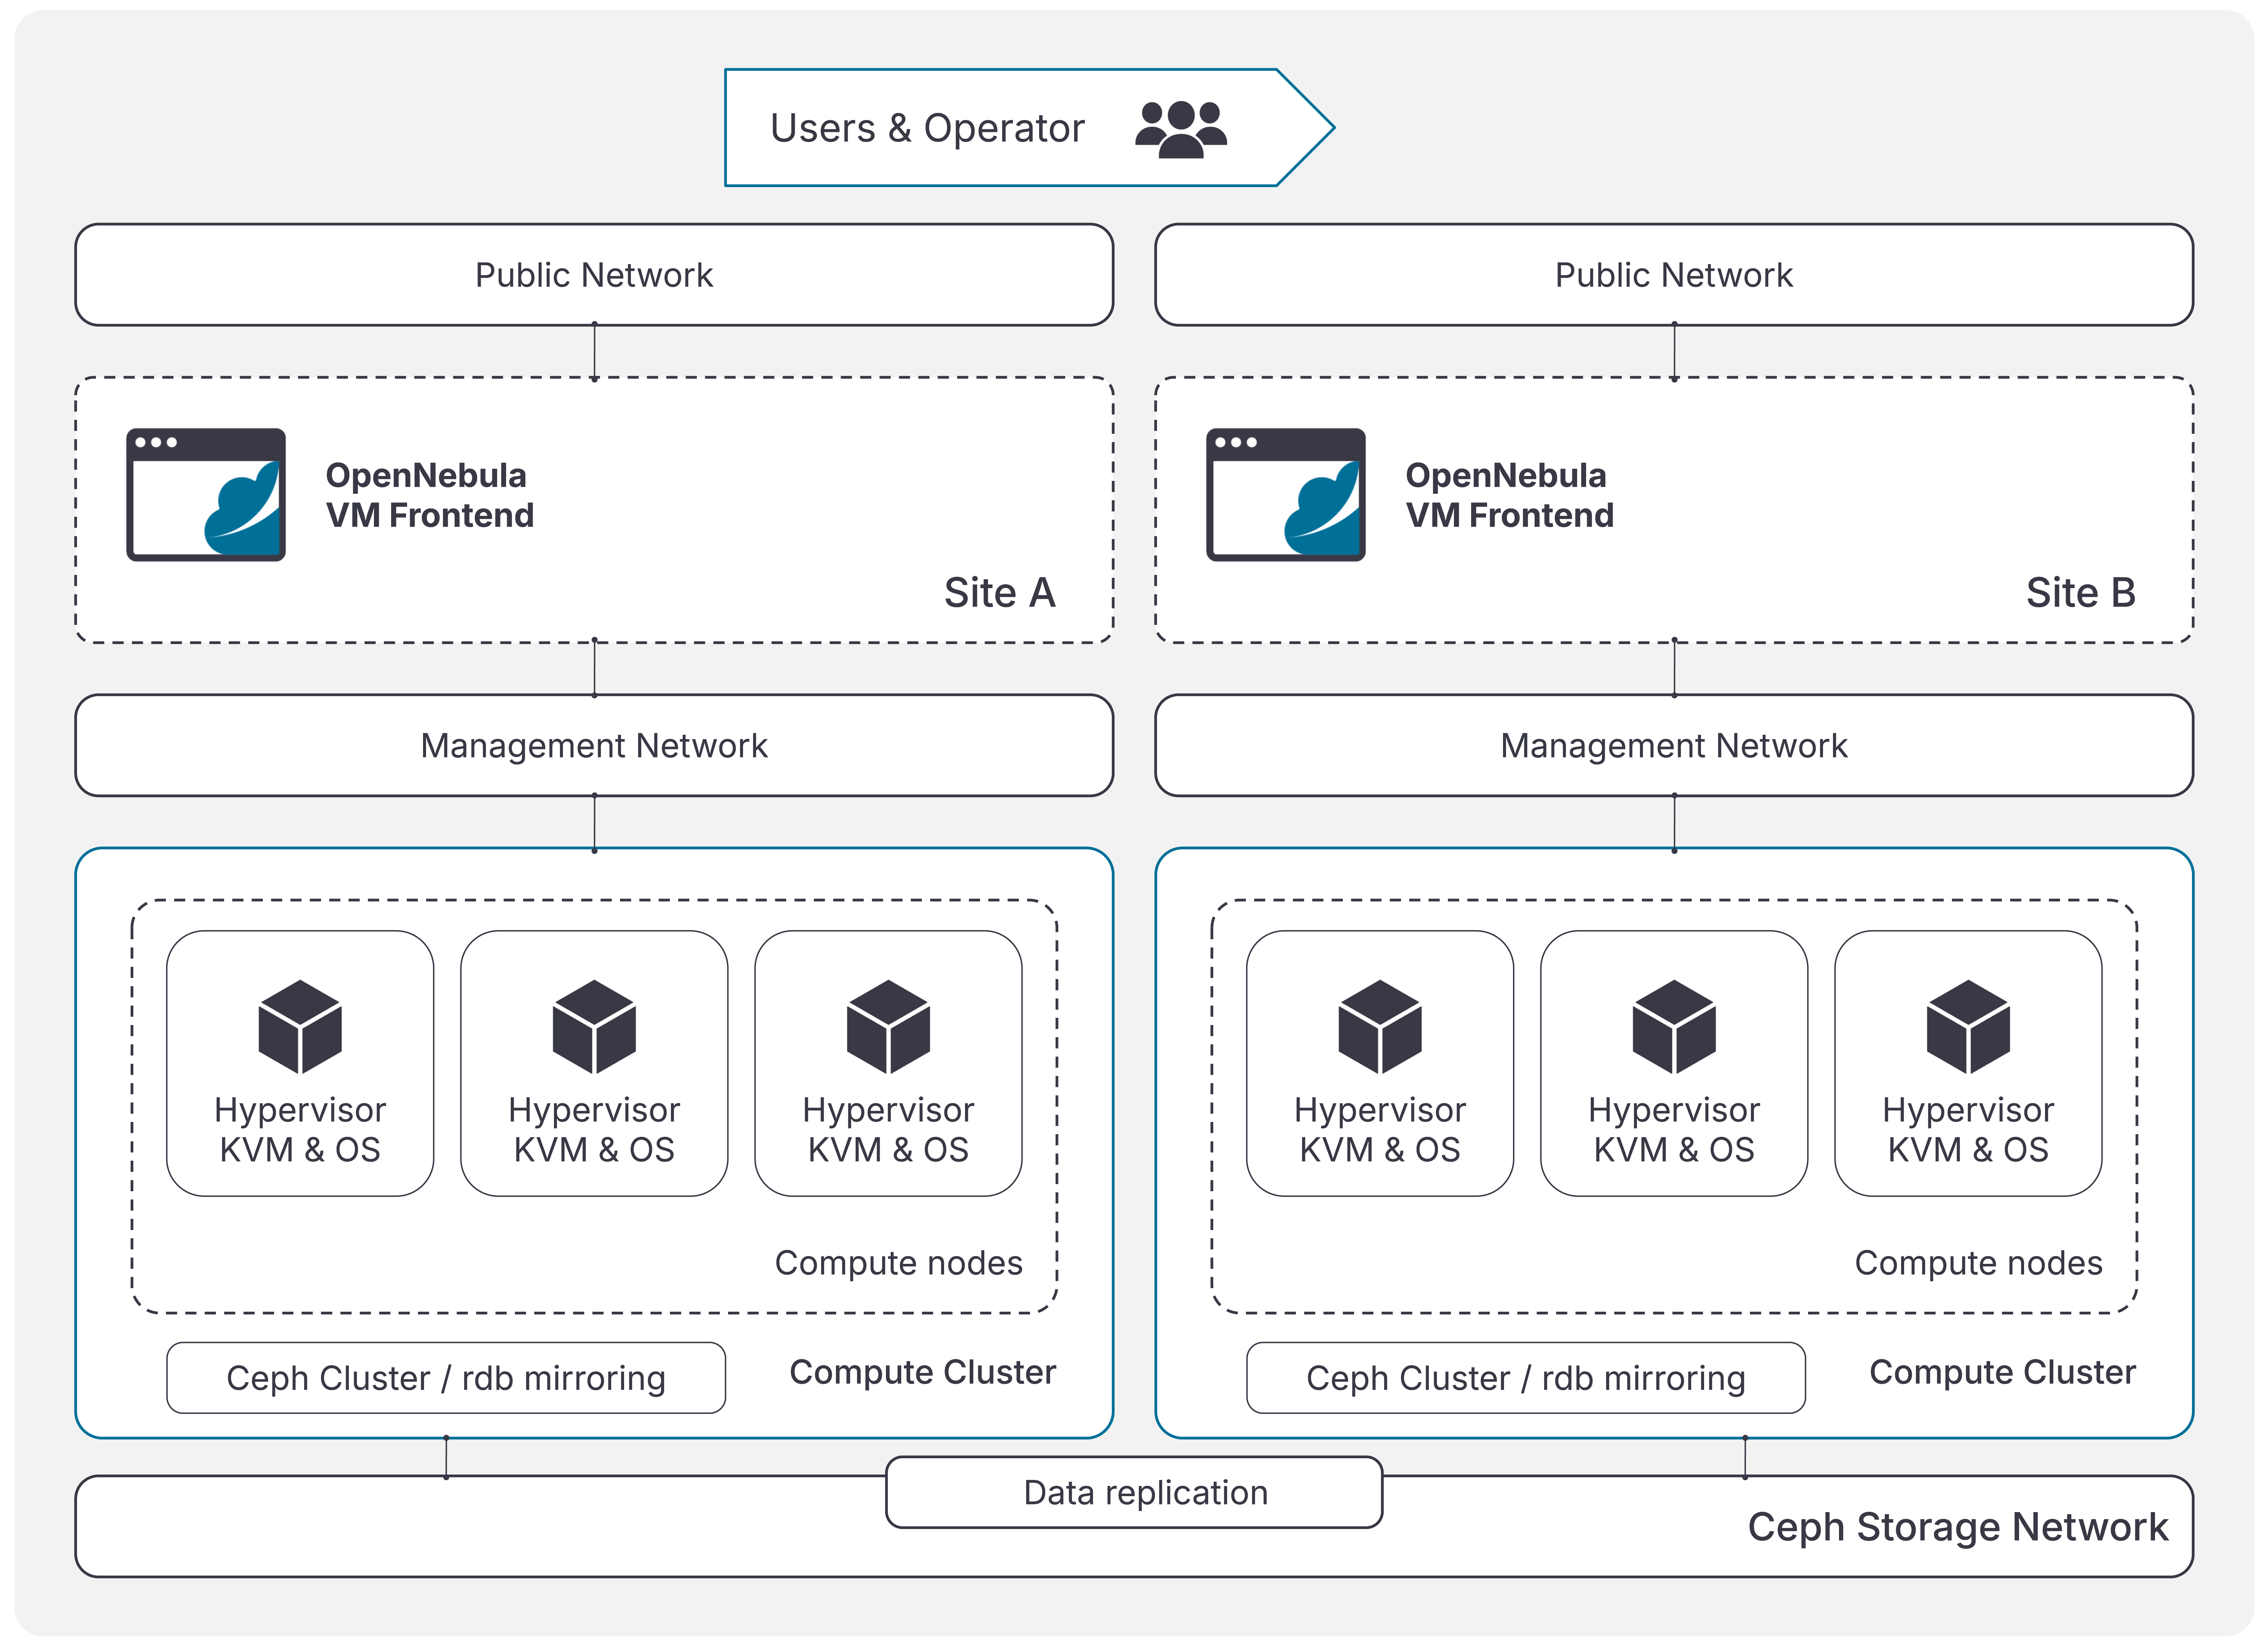
The reference architecture used in this guide consists of two OpenNebula clusters with independent Front-ends, on Site A and Site B.
Each site contains an OpenNebula Front-end, three KVM compute nodes, and an independent Ceph cluster with RDB mirroring. The Virtual Machines running production workloads reside on Site A. The Ceph clusters share the same storage network, as shown below.
Specifications
The setup tested in this reference architecture utilizes the same versions of software components, detailed below, on both sites. Note that the Ceph rbd-mirror daemon is active on both Ceph clusters.
Site A (source):
- OpenNebula controller (Front-end)
- OpenNebula 6.10.3 version
- OS: Ubuntu 22.04
- Compute KVM Nodes with ceph (x3)
- Ceph cluster (one pool)
- Squid 19.2.2 version
- VMs running production workloads
- Ceph RBD mirroring enabled (as primary)
rbd-mirrordaemon
Site B (target):
- OpenNebula controller (Front-end)
- OpenNebula 6.10.3 version
- OS: Ubuntu 22.04
- Compute KVM Nodes with ceph (x3)
- Ceph cluster (one pool)
- Squid 19.2.2 version
- Ceph receives mirrored RBD images
- Ceph RBD mirroring enabled (as replication)
rbd-mirrordaemon
Basic Configuration
To set up Ceph RBD mirroring between two OpenNebula sites, you will need to configure asynchronous block-level replication of RBD images in order to ensure that Virtual Machine disk images are synchronized.
First, you deploy two independent Ceph clusters, one per site (Site A and Site B). These clusters must use matching RBD pool names. (In this guide, we will use a pool called one). To avoid duplicate image names, Site B does not have any images in the same pool.
On Site A, you need to:
- Set the VM images as persistent in the OpenNebula database. This means that modifications you make to each image will be preserved after the VM is terminated. You can set a VM image as persistent when you create the image or later, using the
oneimagecommand. For details see Creating Images and Changing the Persistent Mode in the Images documentation.
On Site B, you need to:
- Retrieve the metadata for each VM. You can do this with
onevm show. For full details on this and other Virtual Machine operations, see Virtual Machine Instances.
Create Ceph Users
To use RBD mirroring, you will need to set up two users for the Ceph clusters: one for the rbd-mirror daemon on the source Ceph cluster (Site A) and one for the daemon on the target Ceph cluster (Site B). These users will enable the rbd-mirror daemon on each Ceph cluster to authenticate against each other.
This section lists the commands to create the Ceph user on the Ceph clusters for Site and Site B.
Throughout this guide, one is used as the pool name, and site-a and site-b as the Ceph cluster names.
Unless otherwise specified, all commands in this guide should be run as root.
On Site A
To create the user in the source Ceph cluster, run:
ceph auth get-or-create client.rbd-mirror-peer-a mon 'profile rbd' osd 'profile rbd' -o /etc/ceph/site-a.client.rbd-mirror-peer-a.keyring
This creates a secret key for the user and outputs it to the file /etc/ceph/site-a.client.rbd-mirror-peer-a.keyring. You will need to copy this file to the Ceph cluster at Site B. To copy the contents to all hosts on Site B, you can run this one-line script, (replacing the node and site names if necessary):
for host in node{0..3}-site-b; do echo $host; scp /etc/ceph/site-a.client.rbd-mirror-peer-a.keyring root@$host:/etc/ceph/site-a.client.rbd-mirror-peer-a.keyring; done
Then, on each host change the ownership of the file to user ceph:
for host in node{0..3}-site-b; do echo $host; ssh $host chown ceph:ceph /etc/ceph/site-a.client.rbd-mirror-peer-a.keyring; done
On Site B
On the target Ceph cluster (Site B), you will need to create a local user for the rbd-mirror daemon. Here we will use $(hostname) to match the unique ID to that used for other Ceph services such as monitors.
ceph auth get-or-create client.rbd-mirror.$(hostname) mon 'profile rbd-mirror' osd 'profile rbd' -o /etc/ceph/ceph.client.rbd-mirror.$(hostname).keyring
If you wish to restrict the user permissions to this specific pool, you can use profile rdb pool=one:
ceph auth get-or-create client.rbd-mirror.$(hostname) mon 'profile rbd-mirror' osd 'profile rbd pool=one' -o /etc/ceph/ceph.client.rbd-mirror.$(hostname).keyring
Enabling Daemon Access to the “Site A” Ceph Cluster
To enable the rbd-mirror daemon on Site B to access the Ceph cluster on Site A, you will need to copy the ceph.conf file from Site A to Site B, and name it site-a.conf.
On Site A, you can run the command below to copy the file to all nodes on Site B (replacing the node and site names if necessary):
for host in node{0..3}-site-b; do echo $host; scp /etc/ceph/ceph.conf root@$host:/etc/ceph/site-a.conf; done
root@site-a $ for host in node{0..3}-site-b; do echo $host; ssh $host chown ceph:ceph /etc/ceph/site-a.conf; done
Then, to change ownership of the file to system user ceph:
for host in node{0..3}-site-b; do echo $host; ssh $host chown ceph:ceph /etc/ceph/site-a.conf; done
Make sure that the name of the config file matches the name used in the keyring that stores the authentication information.
Enable Mirroring
When RBD mirroring is enabled for the entire pool, all newly-created images will inherit the journal and exclusive-lock attributes. However, only template images that do not need to be synchronized will be automatically synchronized to the opposite site, and VM images will not be synchronized even if they inherit the journal and exclusive-lock attributes, since that would require flattening the image.
Site A can be configured with mirroring in image mode, but Site B always needs to use mirroring in pool mode.
The below commands illustrate how to enable mirroring on the source and target Ceph clusters.
Enable Mirroring on Site A
On Site A, you can enable mirroring in pool or image mode. To enable it in pool mode, run:
rbd mirror pool enable one pool
If you wish to enable mirroring with image mode, skip the above command and follow the steps below, then come back to this section to enable mirroring in Site B.
Enable Mirroring on Site B
On Site B, mirroring must always use pool mode. To enable it, run:
rbd mirror pool enable one pool
To verify mirroring:
rbd mirror pool info one
Next, we need to tell the pool on site B which keyring and Ceph config file it should use to connect to the peer (Site A).
rbd mirror pool peer add one client.rbd-mirror-peer-a@site-a
You can check the settings by running:
rbd mirror pool info one
For example:
root@site-b $ rbd mirror pool info one
Mode: pool
Site Name: 16c707cc-a764-47d4-b308-eefa06ff1205
Peer Sites:
UUID: 164f8358-70a3-4f2d-a727-8729fa186b88
Name: site-a
Mirror UUID:
Direction: rx-tx
Client: client.rbd-mirror-peer-a
The Direction field should display rx-tx and the client should be set correctly to match the keyring file. The name should also be shown correctly (site-a).
Install the rbd-mirror Daemon on Site B
To install the daemon, run:
apt install rbd-mirror
Then, enable and modify the systemd unit file for rbd-mirror:
systemctl enable ceph-rbd-mirror.target
cp /usr/lib/systemd/system/ceph-rbd-mirror@.service /etc/systemd/system/ceph-rbd-mirror@.service
Create the Mirroring Service on Site B
Next, you will need to create and start the mirroring service. Ensure to give it the same name as the local user for the Site B cluster created earlier (see above), or the Site A daemon won’t be able to authenticate against the Site B cluster.
systemctl enable --now ceph-rbd-mirror@rbd-mirror.$(hostname).service
If we check the status and logs of the ceph-rbd-mirror@rbd-mirror.<hostname>.service_ service, we should see that it comes up and does not log any authentication errors.
To check service status, run:
systemctl status ceph-rbd-mirror@rbd-mirror.ubuntu2204-kvm-ceph-squid-6-10-cqyoo-0.service
For example:
root@site-b $ systemctl status ceph-rbd-mirror@rbd-mirror.ubuntu2204-kvm-ceph-squid-6-10-cqyoo-0.service
● ceph-rbd-mirror@rbd-mirror.ubuntu2204-kvm-ceph-squid-6-10-cqyoo-0.service - Ceph rbd mirror daemon
 	Loaded: loaded (/etc/systemd/system/ceph-rbd-mirror@.service; enabled; vendor preset: enabled)
 	Active: active (running) since Mon 2025-06-09 12:04:50 UTC; 6 days ago
   Main PID: 17234 (rbd-mirror)
  	Tasks: 51
 	Memory: 55.5M
    	CPU: 21min 42.097s
 	CGroup: /system.slice/system-ceph\x2drbd\x2dmirror.slice/ceph-rbd-mirror@rbd-mirror.ubuntu2204-kvm-ceph-squid-6-10-cqyoo-0.service
         	└─17234 /usr/bin/rbd-mirror -f --cluster ceph --id rbd-mirror.ubuntu2204-kvm-ceph-squid-6-10-cqyoo-0 --setuser root --setgroup root
At this point, mirroring should be configured from Site A to Site B, with direction tx-only. To verify the mirroring, see below.
Verify Mirroring
On Site A, run:
rbd mirror pool info one
Output should similar to:
root@site-a $ rbd mirror pool info one
Mode: pool
Site Name: 277ddb4b-1323-425f-bf28-fa8c58c0137e

Peer Sites:

UUID: 0ab31017-3e80-470d-b80d-1ba04d606b13
Name: 258816cf-14fb-4237-981a-e84b35c7b0b9
Mirror UUID: 5218ea1d-fcb7-404e-82f0-e48a77a05935
Direction: tx-only
To obtain detailed information about the mirroring, run:
rbd mirror pool status one --verbose
For example:
root@site-b $ rbd mirror pool status one --verbose
health: OK
daemon health: OK
image health: OK
images: 0 total

DAEMONS
service 14595:
  instance_id: 14597
  client_id: ubuntu2204-kvm-ceph-squid-6-10-cqyoo-0
  hostname: ubuntu2204-kvm-ceph-squid-6-10-cqyoo-0
  version: 19.2.2
  leader: true
  health: OK
Enable Mirroring on Site A in image mode
If you want to use image mode for Site A mirroring, you will need to define which images should be mirrored, and enable the exclusive-lock and journal features for the images.
To enable journal-based mirroring for an image (in this example, image one-0-0-0), run:
rbd mirror image enable one/one-0-0-0 exclusive-lock,journal
Then, verify the image:
rbd image 'one-0-0-0':
For example:
root@site-a $ rbd image 'one-0-0-0':
	size 256 MiB in 64 objects
	order 22 (4 MiB objects)
	snapshot_count: 0
	id: 39b66a80b833
	block_name_prefix: rbd_data.39b66a80b833
	format: 2
	features: layering, exclusive-lock, journaling
	op_features:
	flags:
	create_timestamp: Wed Jun  4 10:31:42 2025
	access_timestamp: Mon Jun  9 12:08:11 2025
	modify_timestamp: Mon Jun  9 12:08:05 2025
	parent: one/one-0@snap
	overlap: 256 MiB
	journal: 39b66a80b833
	mirroring state: enabled
	mirroring mode: journal
	mirroring global id: f0523ef9-a784-420f-8725-c3f81ff5a302
	mirroring primary: true
Next, since VM disks are just snapshots based on the image, we will need to flatten the required image:
rbd flatten one/one-0-0-0
After performing these steps, to enable mirroring on Site B go back to the section above.
Enable Two-way Mirroring for Failback
Failback is the process by which Virtual Machines are restored to the primary site, once normal operation on the site has resumed.
To failback Virtual Machines to Site A when it becomes available again after an outage, you will need to set up the rbd-mirror daemon on Site A. The daemon will connect to Site B during failback. On Site A, install the rbd-mirror daemon and enable the service by following the same steps described above for Site B:
Failover
This section covers failover, the process of moving business operations from Site A to Site B in the event of an outage at Site A.
High-level Steps for Failover
In this scenario, an outage at source Site A triggers a failover to target Site B.
To move production from Site A to Site B, the basic high-level steps are:
- On Site A, export the VM image file for each VM that will run on Site B.
- On Site B, for each VM create the VM image file from the export in the previous step.
- On Site A, export the VM template for each VM that will run on Site B.
- On Site B, promote the desired RBD images or the whole image pool.
- On Site B, for each VM create the VM from the VM template previously exported.
- On Site B, instantiate the VM.
This guide describes these steps with example commands, and provides additional steps for testing the failover procedure with both Ceph clusters active.
Failover Procedure
The first step in the failover procedure is to promote the mirrored RBD images on Site B using rbd mirror image promote. This command makes the images writable, and thus makes it possible to power on Virtual Machines on the target Ceph cluster and run them without I/O errors.
Once a Ceph image is promoted, a VM can be recreated based on its template metadata that was exported from the template on the source Ceph image.
Create Disk Images
For each VM, create a new disk image file for registering on Site B. This image file will be based on the information from the parent image at Site A and the Ceph virtual disk name. Note that the image file must be set as persistent.
For example:
NAME="alpine-0-rep"
USER="oneadmin"
GROUP="oneadmin"
DATASTORE="default"
TYPE="OS"
PERSISTENT="yes"
SOURCE="one/one-0-0-0"
FORMAT="raw"
SIZE="256"
DEV_PREFIX="vd"
To register the image on Site B, log in to the Front-end as user oneadmin, and run:
oneimage create disk -d 1
On Site B, check the mirroring status of the specific Ceph image, in this case one/one-0-0-0:
rbd mirror image status one/one-0-0-0
For example:
site-b $ rbd mirror image status one/one-0-0-0
one-0-0-0:
  global_id:   f0523ef9-a784-420f-8725-c3f81ff5a302
  state:       up+replaying
  description: replaying, {"bytes_per_second":0.0,"entries_behind_primary":0,"entries_per_second":0.0,"non_primary_position":{"entry_tid":3,"object_number":3,"tag_tid":6},"primary_position":{"entry_tid":3,"object_number":3,"tag_tid":6}}
  service:     ubuntu2204-kvm-ceph-squid-6-10-cqyoo-0 on ubuntu2204-kvm-ceph-squid-6-10-cqyoo-0
  last_update: 2025-06-09 14:28:20
Create VM Templates
Next, prepare a VM template file based on the desired VM from site A. Example information for the template:
NAME="alpine-0-rep"
USER="oneadmin"
GROUP="oneadmin"
ARCH="x86_64"
CONTEXT=[
  DISK_ID="1",
  ETH0_DNS="",
  ETH0_EXTERNAL="",
  ETH0_GATEWAY="192.168.150.1",
  ETH0_IP="192.168.150.100",
  ETH0_IP6="",
  ETH0_IP6_GATEWAY="",
  ETH0_IP6_METHOD="",
  ETH0_IP6_METRIC="",
  ETH0_IP6_PREFIX_LENGTH="",
  ETH0_IP6_ULA="",
  ETH0_MAC="02:00:c0:a8:96:64",
  ETH0_MASK="",
  ETH0_METHOD="",
  ETH0_METRIC="",
  ETH0_MTU="",
  ETH0_NETWORK="",
  ETH0_SEARCH_DOMAIN="",
  ETH0_VLAN_ID="",
  ETH0_VROUTER_IP="",
  ETH0_VROUTER_IP6="",
  ETH0_VROUTER_MANAGEMENT="",
  NETWORK="YES",
  SSH_PUBLIC_KEY="ssh-rsa AAAAB3NzaC1yc2EAAAADAQABAAABAQCYz+lkZoNyspRhrtXDKFN3cIEwN3w08mz0YGKpVDIiV0+/vgG8dAUQ70Irs3m83W9BHN+vNjKPgKcF+X+sSfxniOtavahxGCRjAhhs1IVm196C5ODbSgXVUWULdtmMHelXbLBJ8X340h/UO+eQ6eRLaRfslXUsgRqremVcvCCPz4LIuRiliGWiELAmqYcY+1zJLeg3QV2Pgn5vschM9e/A4AseKO+HnbGB/I5tnoeZT/Gc3FGfUZLNFVB2XsVGAEEzkqO8VI2msB7MCAZBHffIK6WfLIYgGP6Ha2JT1NWJU7Ncj9Xuql0ElF01VwWMDWzqc0DOiVSsTL89ugJKU6+h one",
  TARGET="hda" ]
CPU="0.1"
GRAPHICS=[
  LISTEN="0.0.0.0",
  PORT="5900",
  TYPE="vnc" ]
MEMORY="96"
NIC_DEFAULT=[
  MODEL="virtio" ]
OS=[
  UUID="417177d9-5765-44d7-9033-4f75572519a2" ]
TM_MAD_SYSTEM="ceph"
Prepare a text file with the correct information for the VM. This text file will be your VM template, which you will later use to create the Virtual Machine on Site B as explained below.
Testing Failover with Both Sites Available
If you are testing failover with both Site A and Site B available, you will need to take these additional actions:
Power Off Virtual Machines
In order to prevent data loss in VMs that will be deployed on Site B, first power them off on Site A. On the Front-end on Site, run as user oneadmin:
onevm poweroff <VM ID>
Demote Ceph Images or Pool on Site A
Before promoting the images on Site B, demote them on Site A. To demote an image, in this case one/one-0-0-0:
rbd mirror pool demote one/one-0-0-0
You can also demote all images in the pool, but note that this will take effect only for images which were previously flattened:
rbd mirror pool demote one
Then, on Site B you can proceed to promoting the Ceph images, explained below.
Promote Ceph Images
By promoting an image or an image pool, we tell Ceph that the image or pool is now primary, and should be used with precedence over non-primary images. Promoting images makes them writeable, and is a necessary step to ensure proper VM operation.
As mentioned above, if Site A is available, images on Site A should be demoted before images on Site B are promoted.
If Site A is available, to promote a specific image at Site B run:
rbd mirror image promote one/one-0-0-0
Or to promote the whole pool:
rbd mirror pool promote one
If Site A is unavailable, then to promote the image or pool you must run the command with the --force flag, for example:
rbd mirror pool promote one -–force
After promoting, check the status of the Ceph image:
rbd info <pool>/<image>
For example:
root@site-b $ rbd info one/one-0-0-0
rbd image 'one-0-0-0':
	size 256 MiB in 64 objects
	order 22 (4 MiB objects)
	snapshot_count: 0
	id: 3905d476b862
	block_name_prefix: rbd_data.3905d476b862
	format: 2
	features: layering, exclusive-lock, journaling
	op_features:
	flags:
	create_timestamp: Mon Jun  9 14:21:20 2025
	access_timestamp: Fri Jun 13 13:49:41 2025
	modify_timestamp: Fri Jun 13 13:42:41 2025
	journal: 3905d476b862
	mirroring state: enabled
	mirroring mode: journal
	mirroring global id: f0523ef9-a784-420f-8725-c3f81ff5a302
	mirroring primary: true
Create the VM at Site B
Once the Ceph images in the pool at Site B are promoted, it’s time to create the VMs that will run on Site B. To create each VM, you can use the VM template file created above.
To create a VM from a template, on the Front-end at Site B run as user oneadmin:
onevm create <VM template file>
Then, proceed to instantiate and operate the VM as normal.
Failback
This section covers failback, the process of moving business operations back to Site A, after Site A’s normal operation has been restored. This process involves resynchronizing data back to the source Ceph cluster.
High-level Steps for Failback
- On Site A, demote the image pool and flag images for resync.
- On Site B, terminate each VM and wait for its image to mirror successfully to Site A.
- On Site B, demote the images in the pool.
- On Site A, promote the images in the pool.
- On Site A, start each VM.
Failback Procedure
Demote and Flag Images on Site A
If recovering from a disaster on Site A, then most probably the images on Site A were not demoted. In this case, the first step is to demote them.
On Site A, demote the image pool with:
rbd mirror pool demote one
When the rbd-mirror daemon on Site A is up and running, the images will need to be flagged for a resync. (Until the resync operation is performed, the rbd-mirror daemon on Site A will log problems.) For each image, resync it by running, on Site A:
rbd mirror image resync one/one-0-0-0
After a short time the images should be mirrored from Site B to Site A. You can verify this by running the below command on Site A for each image, and checking the last_update line in the output:
rbd mirror image status <pool>/<image>
For example:
root@site-a $ rbd mirror image status one/one-0-0-0
one-0-0-0:
  global_id:   f0523ef9-a784-420f-8725-c3f81ff5a302
  state:   	up+replaying
  description: replaying, {"bytes_per_second":0.0,"entries_behind_primary":0,"entries_per_second":0.0,"non_primary_position":{"entry_tid":3,"object_number":3,"tag_tid":8},"primary_position":{"entry_tid":3,"object_number":3,"tag_tid":8}}
  service: 	ubuntu2204-kvm-ceph-squid-6-10-cxzjz-0 on ubuntu2204-kvm-ceph-squid-6-10-cxzjz-0
  last_update: 2025-06-17 17:26:11
Terminate Virtual Machines on Site B
After successfully checking mirroring status, terminate the VM at Site B. To terminate the VM, at Site B run as user oneadmin:
onevm terminate <VM ID>
Then, wait for the image to mirror successfully to Site A. To ensure that an image has been mirrored successfully to Site A, run rbd mirror image status for the image. Once the mirroring is complete, you can demote the image on Site B and promote it on Site A.
To demote the image on Site B:
rbd mirror image demote one/one-0-0-0
Alternatively, after all images are synced to Site A you can demote all images in the pool:
rbd mirror pool demote one
Then you will need to promote the images on Site A.
Promote Ceph Images or Pool on Site A
To promote a single image on site A:
rbd mirror image promote one/one-0-0-0
Alternatively, if all images were demoted and all of them are already synced, you can promote the whole pool:
rbd mirror pool promote one
Now the image is primary on site A:
root@site-a $ rbd mirror image status one/one-0-0-0
one-0-0-0:
  global_id:   f0523ef9-a784-420f-8725-c3f81ff5a302
  state:   	up+stopped
  description: local image is primary
  service: 	ubuntu2204-kvm-ceph-squid-6-10-cxzjz-0 on ubuntu2204-kvm-ceph-squid-6-10-cxzjz-0
  last_update: 2025-06-17 17:45:11
To check the state for a specific image, on Site A run:
rbd mirror image status one/one-0-0-0
Or to check the state for all images:
rbd mirror pool status one --verbose
Finally, we can start the VM at site A:
onevm resume <VM ID>
GIVE FEEDBACK
Was this resource helpful?
Glad to hear it
Sorry to hear that