IONOS
IONOS is an internet service provider whose offerings include cloud infrastructure, services and hosting. OpenNebula supports deploying a cloud on hosted IONOS infrastructure, and managing cloud resources through the OpenNebula control interfaces. The resulting OpenNebula hosted infrastructure has been validated as part of the OpenNebula Cloud-Ready Certification Program.
To deploy and verify an OpenNebula cloud on hosted IONOS infrastructure, OpenNebula provides Hosted Cloud IONOS, a set of Ansible playbooks that allows you to deploy and verify an OpenNebula cloud with a few simple commands.
This guide provides a complete deployment and verification path to create an OpenNebula Hosted Cloud using IONOS infrastructure. It includes an OpenNebula Architecture specifically tailored for the IONOS infrastructure, as well as the hardware specification from the IONOS offering.
Following this guide, you can:
- Request the necessary hardware resources using the IONOS interface.
- Perform a Zero-touch deployment of OpenNebula over these resources.
- Ensure the correct operation of the resulting cloud using an automated verification procedure.
Additionally, this guide includes a brief description of how to instantiate a Virtual Machine, to help you get started on your OpenNebula Hosted Cloud.
Basic Outline of the Deployment Procedure
Performing the deployment involves these high-level steps:
- Create the deployment base of networked servers on IONOS.
- Clone the dedicated OpenNebula Hosted Cloud for IONOS GitHub repository on your deployment machine.
- Modify the repository with the parameters for your IONOS infrastructure.
- Perform the automated deployment to the IONOS infrastructure.
- Verify the deployment by running the automated verification command.
Additional Information Resources
Hardware Specification and Architecture
Architecture
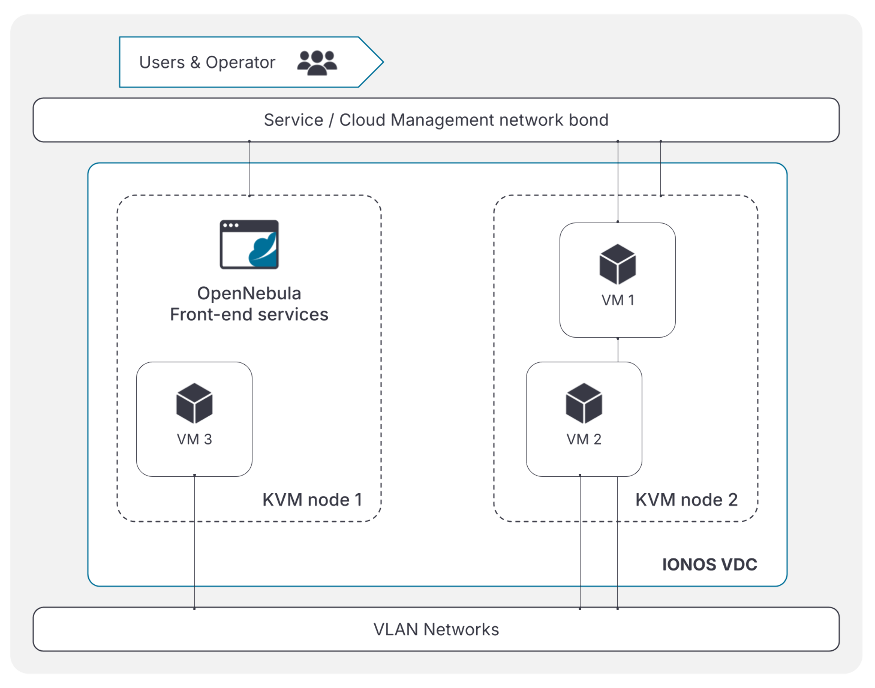
The target high-level cloud architecture overview is shown below. Two hosts are deployed: the first for hosting the OpenNebula Front-end services and VMs, the second for hosting VMs only. Both machines should have a public IP, which is used to manage the nodes. Additional public IPs are required to access running Virtual Machines. The proposed model connects VMs internally using VXLAN networks, with at least one VM assigned a public IP to act as a gateway, NATing traffic to and from the internal network.
Hardware Specification
Front-end Requirements
| FRONT-END | |
|---|---|
| Number of Zones | 1 |
| Cloud Manager | OpenNebula 7.0 |
| Server Specs | IONOS server with 2 dedicated cores and 8GB RAM (CPU model depends on the selected location) |
| Operating System | Debian 12 |
| High Availability | No (1 Front-end) |
| Authorization | Builtin |
Host Requirements
| VIRTUALIZATION HOSTS | |
|---|---|
| Number of Nodes | 1 |
| Server Specs | IONOS server with 2 dedicated cores and 8GB RAM (CPU model depends on the selected location) |
| Operating System | Debian 12 |
| Hypervisor | KVM |
| Special Devices | None |
Storage Specification
| STORAGE | |
|---|---|
| Type | SSH drivers using local disks |
| Capacity | Full size of servers local disks |
Network Requirements
| NETWORK | |
|---|---|
| Networking | VXLAN, Public routed network |
| Number of Networks | 2 networks: VXLAN Public routed network, with each host machine having a NIC and a public IP |
Automated Deployment and Configuration
Infrastructure Provisioning
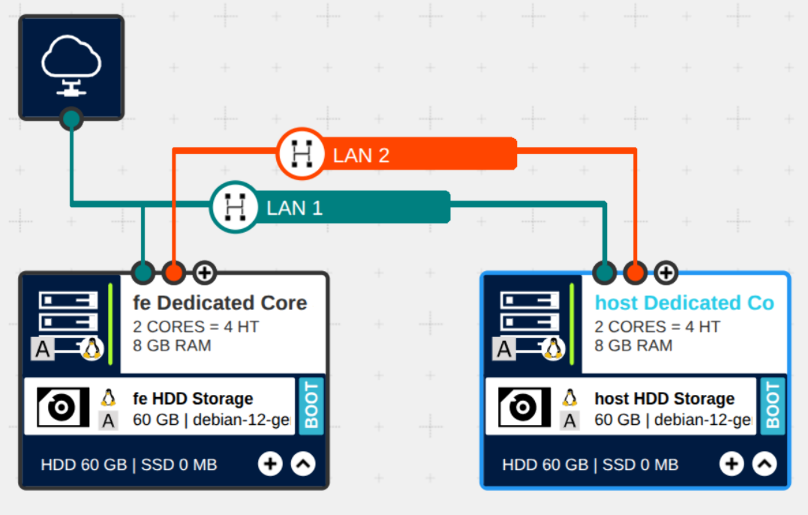
The virtual servers can be deployed through the IONOS Data Center Designer (DCD). Start by creating a new Virtual Data Center (VDC) and selecting a location. The processor models available for the servers depend on the chosen location—for example, Intel Skylake may not be available everywhere. After deploying the virtual servers, in the DCD you should see your newly-created infrastructure as shown below:
This page will guide you in building this configuration. You will need to take into account the details described in the Hardware and Software Specification section.
Build with DCD
To achieve the deployment base shown in the figure above, follow the below steps:
- Add two servers, ensuring to select the specifications as shown in Front-end for the first server and Host for the second.
- Choose a server type with dedicated cores.
- Select an available processor model for your location (for example, Intel Skylake).
- Set the number of cores to 2.
- Set the RAM to 8 GB.
- Select Debian 12 as the operating system.
- Ensure that both servers are in the same data center.
- Add internet access from the toolbar.
- Connect all servers to internet access. Ensure to consistently use the first NIC in each server.
- Connect each server’s second NIC to the private LAN between the servers. Ensure to consistently use each server’s second NIC.
- Add HDD instances and specify the base image for the operating systems:
- Add the SSH key of the host from which the access is needed.
- Specify an administrative password for each VM so you can access it via the remote console if SSH becomes unavailable. Make sure to save this password; it cannot be retrieved later.
- Set it as a boot device.
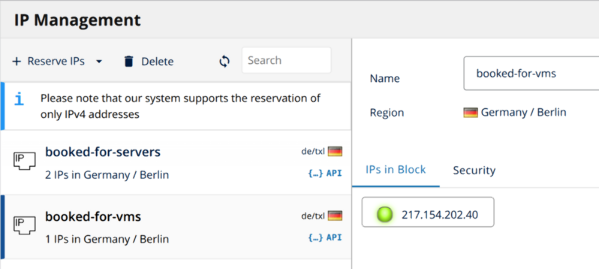
Then, book the following two IP ranges, as shown below.
- booked-for-servers: These are the management IPs for each server. Book an IP block with enough addresses for the servers, assigning one IP address per server.
- booked-for-vms: These are the traffic IPs for the public-facing VMs that will be deployed using OpenNebula. Book a block big enough for the VMs.
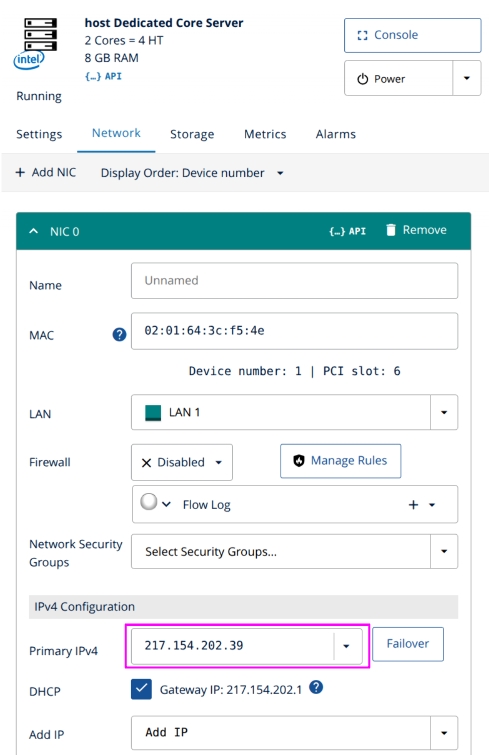
Assign the booked IP addresses to the servers, as shown below. Note that, without assigning any booked public IP addresses, IONOS will automatically assign new addresses at server startup.
To effect the changes, click the Provision changes button in the DCD. Implementing the changes should take a few minutes; the result is reported in the DCD.
These steps can also be automated using the IONOS Cloud API, SDKs, or the Terraform provider.
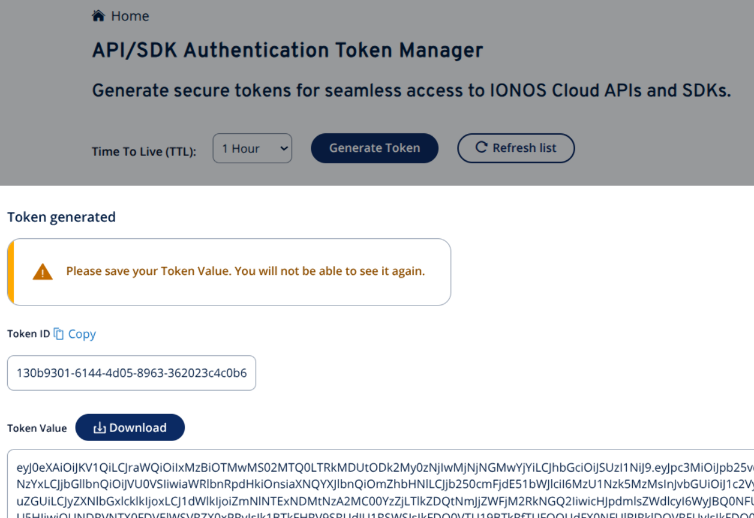
Generate IONOS Token
Access the IONOS Token Manager, generate a new token, and save the token’s value. As indicated in the screenshot below, you will not be able to access this value later, so make sure you save it securely.
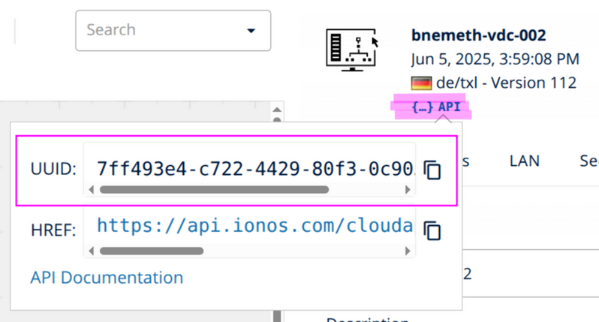
Retrieve Data Center UUID
At the IONOS Data Center Designer web UI, open the canvas where the infrastructure was designed. Copy and save the virtual data center’s UUID by clicking the API icon, as shown below.
Save Required Parameters
At this point, all required infrastructure components should be deployed and configured in the IONOS DCD. To proceed with OpenNebula deployment, we need to extract and save some required parameters that the deployment automation relies on.
| Description | How to obtain the parameter |
|---|---|
| Front-end Host IP | From the booked-for-servers IP range, choose an IP for the OpenNebula Front-end. |
| KVM Host IPs | From the other IPs in the booked-for-servers IP range, choose the IPs for the OpenNebula Hosts that will run the Virtual Machines. |
| KVM Host Gateway | For each KVM Host IP, you can find the IONOS assigned gateway IP in the DCD, as shown in this screenshot. |
VXLAN PHYDEV | Interface name of the private LAN on all servers. To find out the name of the interface, run ip address in each server’s command line. |
pubridge PHYDEV | Interface name of the NIC connected to the Internet gateway on all servers. To find out the name of the interface, run the ip address command on each server’s command line. |
| VMs Public IP Range | All the IPs that are contained in the IP range booked-for-vms, as shown in this screenshot. |
GUI password for user oneadmin | Specified by the administrator performing the deployment steps. |
| IONOSCTL Token | The IONOS API/SDK token value that was generated and saved previously, as shown in this screenshot. |
| IONOS Data Center UUID | The virtual data center’s UUID, as shown in this screenshot. |
To find the value of the PHYDEV parameter for the VXLAN and the public bridge, access the Linux CLI of a deployed server and find the interface name of the first and second NICs that were connected to the Internet gateway and the private LAN respectively. To do this, run the ip address command and inspect the output, matching the NICs to their Linux system names, by comparing the assigned IP and MAC addresses as shown in the IONOS DCD.
If the first and second NICs were consistently used to connect the servers to the internet and the LAN respectively, the names of the interfaces should be the same on all servers – that is, the output of ip address should display the same names for the first and second NICs. Verify that this is indeed the case, by accessing multiple servers and inspecting the output of the ip address command.
Deployment and Verification
The complete OpenNebula deployment procedure and all of the required resources are available in the OpenNebula hosted IONOS repo, also referred to as the deployment repository. For instructions on how to use the required parameters extracted from the provisioned IONOS infrastructure, please check the README file in the repo.
The deployment procedure consists of the following high-level steps:
- Clone the deployment repository.
- Update the deployment repository with the required parameters gathered above.
- Customize the networking configuration of the provisioned servers.
- Launch the deployment automation commands.
- Launch the verification automation command.
 Note
Note
For detailed information about how to use the required parameters and which configuration files to modify, please refer to the README of the OpenNebula hosted IONOS repo.Extending with a New Host
During the operation of the hosted OpenNebula cloud, the deployment can be flexibly extended by adding new hosts. The extension procedure consists of these high-level steps:
- Provision the new host using the IONOS Data Center Designer as described in Infrastructure Provisioning,
- Save the required parameters of the new host, as shown in Save Required Parameters,
- Re-execute the deployment and verification commands, as described in the Deployment and Verification section.
We value your feedback
Was this information helpful?
Glad to hear it
Sorry to hear that