OneFlow Services Management
OneFlow allows users and administrators to define, execute, and manage multi-tiered applications, which we call Services, composed of interconnected Virtual Machines with deployment dependencies between them. Each group of Virtual Machines is deployed and managed as a single entity and is completely integrated with the advanced OpenNebula user and group management.
What Is a Service
The following diagram represents a multi-tier application. Each node represents a Role and its cardinality (the number of VMs that will be deployed). The arrows indicate the deployment dependencies: each Role’s VMs are deployed only when all its parent’s VMs are running.

This Service can be represented with the following JSON template:
{
  "name": "my_service",
  "deployment": "straight",
  "roles": [
    {
      "name": "frontend",
      "cardinality": 1,
      "template_id": 0,
      "type": "vm"
    },
    {
      "name": "db_master",
      "cardinality": 1,
      "template_id": 1,
      "type": "vm",
      "parents": [
        "frontend"
      ]
    },
    {
      "name": "db_slave",
      "cardinality": 3,
      "template_id": 2,
      "type": "vm",
      "parents": [
        "frontend"
      ]
    },
    {
      "name": "worker",
      "cardinality": 10,
      "template_id": 3,
      "type": "vm",
      "parents": [
        "db_master",
        "db_slave"
      ]
    }
  ]
}
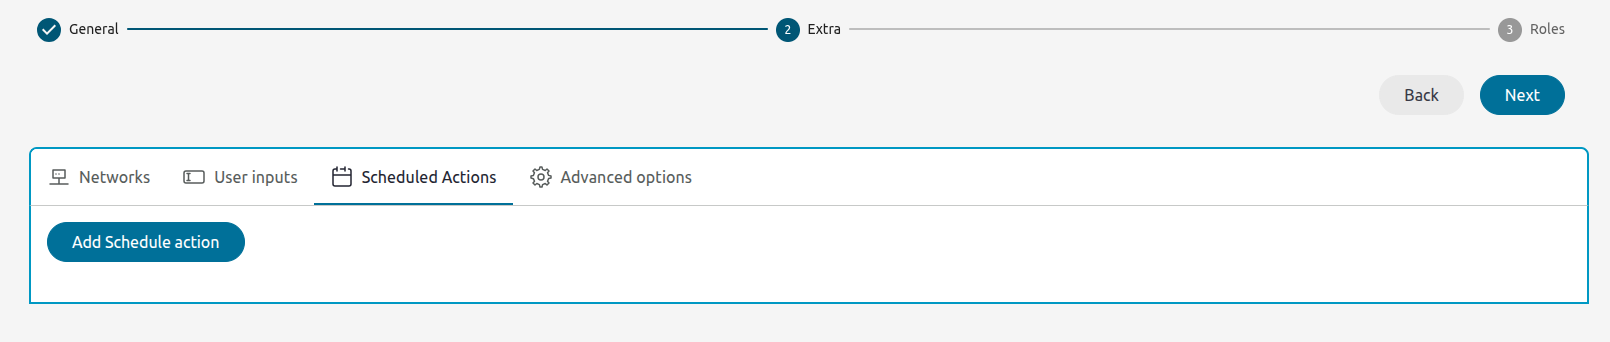
Service Templates
OneFlow allows OpenNebula administrators and users to register Service templates in OpenNebula, to be instantiated later as Services. These templates can be instantiated several times and also shared with other users.
Below are all the attributes that can appear within a Service, which will be covered in detail throughout this guide:
| Attribute | Type | Mandatory | Description |
|---|---|---|---|
name | string | Yes | The name of the service. |
deployment | string | No | The type of deployment. Can be none or straight. Defaults to none. |
description | string | No | A description of the service. Defaults to an empty string. |
shutdown_action | string | No | Action to take on shutdown. Can be terminate, terminate-hard, shutdown,or shutdown-hard. |
roles | array | Yes | An array of roles within the service. |
user_inputs | object | No | A set of user inputs defined by properties. |
user_inputs_values | object | No | Values for the user inputs. |
ready_status_gate | boolean | No | Indicates if the service should wait until it is fully ready. |
automatic_deletion | boolean | No | Whether the service should be deleted automatically after use. |
networks | object | No | Networks associated with the service. |
networks_values | array | No | Values for the networks, represented as an array of objects. |
on_hold | boolean | No | If true, the service will be held and not deployed automatically. |
 Note
Note
The table shown above is just a summary of the main Service template attributes. For a full information on the Service representation, please check the API data model guideDefining the Roles of a Service
A Role defines a set of virtual resources that are part of a Service. These resources can either be Virtual Machines (VMs) or Virtual Routers (VRs), depending on the type of Role. Each Role describes attributes like the number of instances (cardinality), the template to be used, and various scaling policies, among others.
Roles are used to orchestrate and manage these resources according to attributes set in their respective templates. There are two main types of Roles:
- VM Role: this Role defines a Virtual Machine Role within the Service. It is primarily used to manage a group of Virtual Machines that are part of the Service. This Role includes attributes like
template_id, which specifies the VM template to be used, as well as options for scaling and elasticity policies.
Attribute Type Mandatory Description namestring Yes The name of the VM Role. typestring Yes Must be vmto define a Virtual Machine Role.cardinalityinteger No The number of VMs in this Role. Defaults to 0. template_idinteger Yes The ID of the template used to create VMs for this Role. template_contentsobject No Additional template contents to be merged with the template. user_inputsobject No User-defined inputs that can be used in the Role configuration. user_inputs_valuesobject No Values for the user inputs. parentsarray No An array of parent Role names. shutdown_actionstring No The action to take when shutting down VMs (e.g., terminate,shutdown).min_vmsinteger No The minimum number of VMs allowed for this Role. max_vmsinteger No The maximum number of VMs allowed for this Role. cooldowninteger No The cooldown period after scaling operations. on_holdboolean No If true, the Role will be held and not deployed automatically. elasticity_policiesarray No A list of elasticity policies to automatically adjust the number of VMs in the Role. scheduled_policiesarray No A list of scheduled policies to adjust the number of VMs based on a schedule.
Note
Some defaults values like cooldown and shutdown_action can be customized in the OneFlow server configuration, located by default at /etc/one/oneflow-server.conf.- VR Role: this Role defines a Virtual Router Role, which is responsible for managing Virtual Routers within the Service. Similar to the VM Role, it includes attributes like
template_idandcardinality, but is specifically designed to handle network routing services. Please note that in this casetemplate_idmust refer to a Virtual Router template.
Attribute Type Mandatory Description namestring Yes The name of the VR Role. typestring Yes Must be vrto define a Virtual Router Role.template_idinteger Yes The ID of the template used to create Virtual Routers for this Role. cardinalityinteger No The number of Virtual Routers in this Role. Defaults to 0. template_contentsobject No Additional template contents to be merged with the template. user_inputsobject No User-defined inputs that can be used in the Role configuration. user_inputs_valuesobject No Values for the user inputs. on_holdboolean No If true, the Role will be held and not deployed automatically. parentsarray No An array of parent Role names.
 Warning
Keep in mind that Auto-scaling and Elasticity options for Virtual Router Roles are not supported, as these operations are not natively supported by Virtual Routers.Create and List Existing Service Templates
Users can manage the Service templates using the command oneflow-template or Sunstone. For each user, the actual list of Service templates available is determined by the ownership and permissions of the templates.
The command oneflow-template create registers a JSON template file. For example, if the previous example template is saved in /tmp/my_service.json, you can execute:
$ oneflow-template create /tmp/my_service.json
ID: 0
To list the available Service templates, use oneflow-template list:
$ oneflow-template list
ID USER            GROUP           NAME         REGTIME
 0 oneadmin        oneadmin        my_service   10/28 17:42:46
To check details about a Service template, use oneflow-template show:
$ oneflow-template show 0
SERVICE TEMPLATE 0 INFORMATION
ID                  : 0
NAME                : my_service
USER                : oneadmin
GROUP               : oneadmin
REGISTRATION_TIME   : 10/28 17:42:46

PERMISSIONS
OWNER               : um-
GROUP               : ---
OTHER               : ---

TEMPLATE CONTENTS
{
  "name": "my_service",
  "roles": [
    {

....
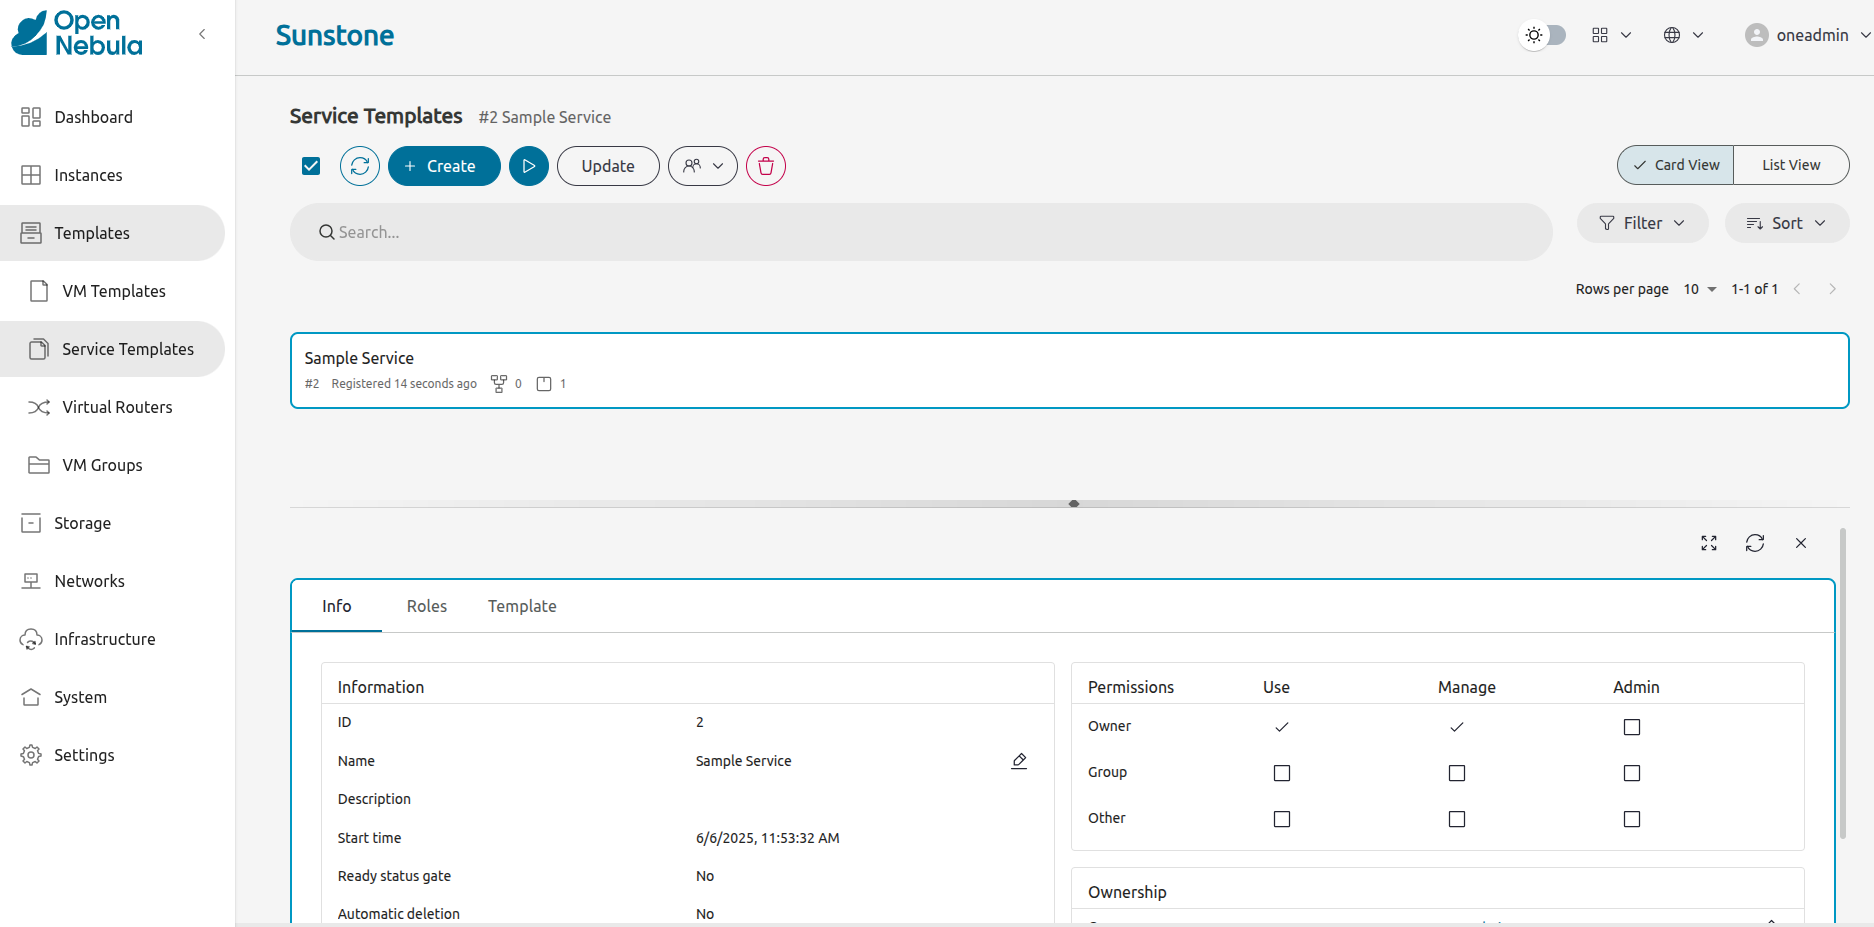
As shown in the image below, you can also create and list Service templates from Sunstone from Templates > Service Templates.
Updating a Service Template
To update an existing Service template, use the following command, replacing <ID> with the Service template’s ID. This will open an editor where you can manually add new attributes:
oneflow-template update <ID>
Alternatively, if you already have the new attributes defined in a file like the following:
{
    "description": "new description for the service",
    "roles": [
        {
            "name": "frontend",
            "cardinality": 3
        }
    ]
}
You can update the Service Template by specifying the file in the command, as shown below:
oneflow-template update <ID> <file>
The above example will update the description of the Service template and the cardinality of the frontend role after merging both files.
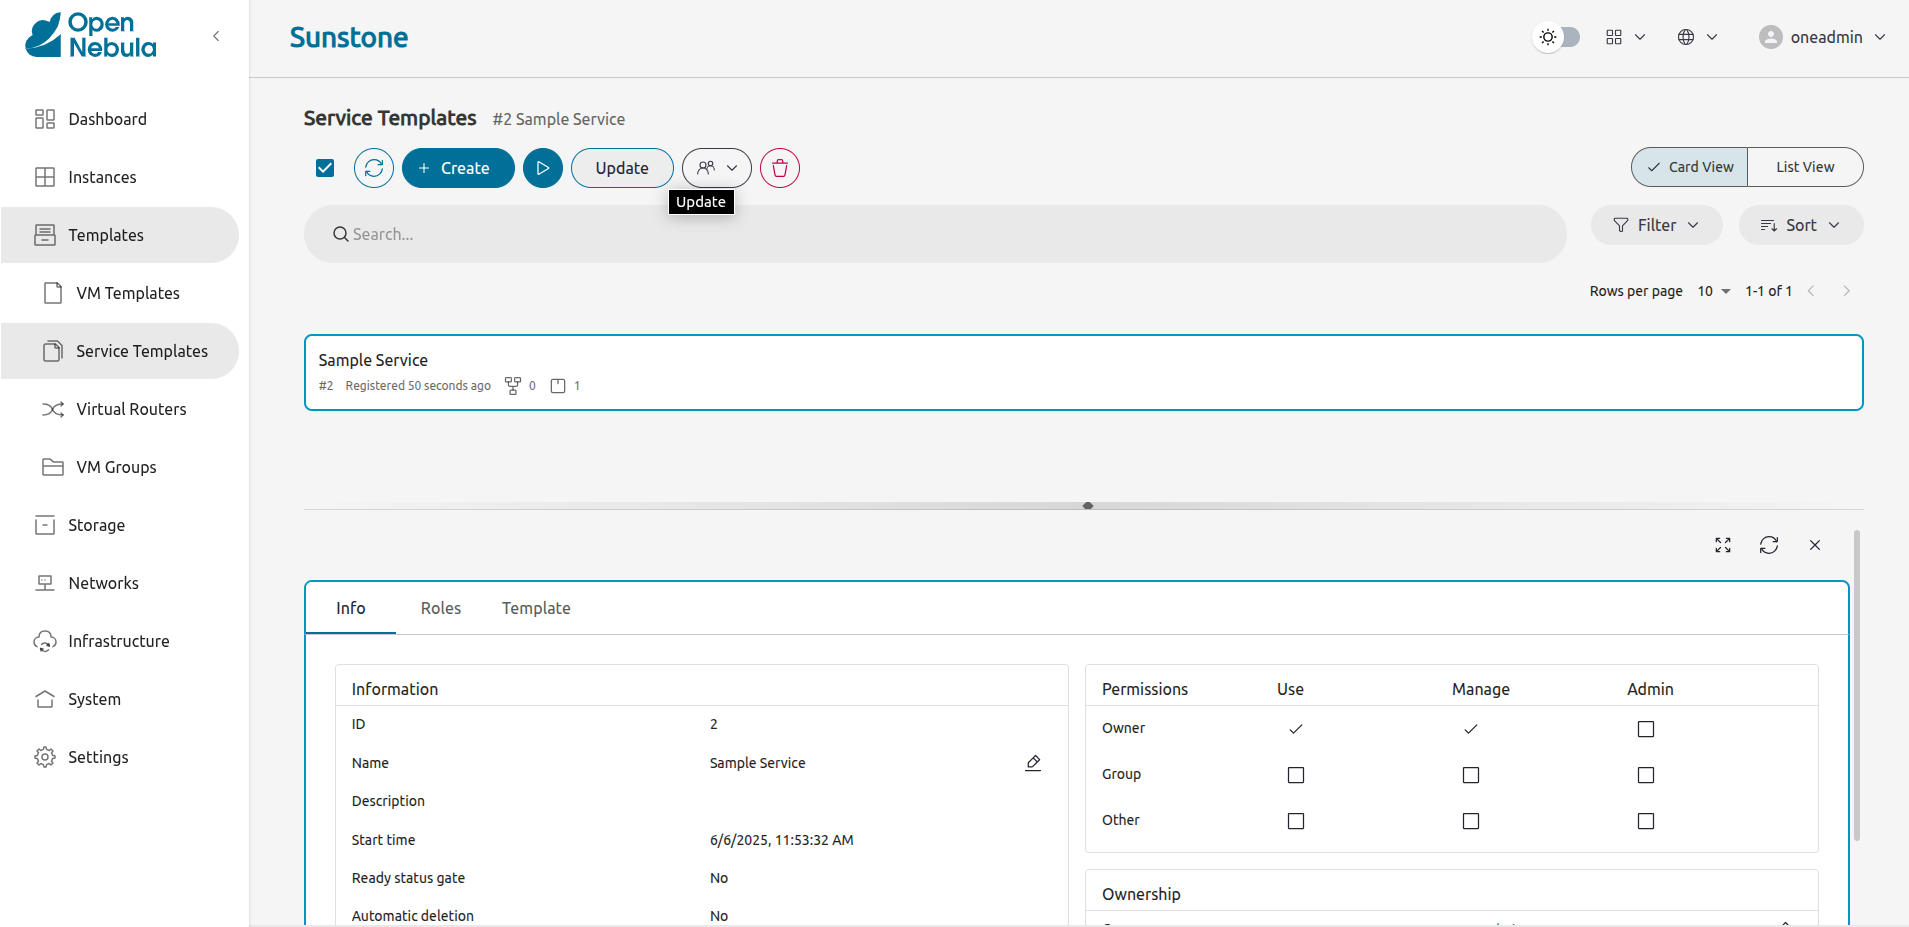
Updating Service templates can also be done through Sunstone. Simply select the desired Service template, making the changes through the graphical interface selecting the Update button in the toolbar:
Deleting a Service Templates
Templates can be deleted with oneflow-template delete.
In case you need it, you can also delete VM templates associated to the Service template:
--delete-vm-templates: this will delete all the VM templates associated and the Service template.--delete-images: this will delete all the VM templates and images associated, and the Service template.
You can delete Service templates in Sunstone as well by clicking on the trash can icon once the desired Service template is selected.

Clone a Service Template
A Service template can be cloned to produce a copy, ready to be instantiated under another name. This copy can be recursive, so all the VM templates forming the service will be cloned as well, and referenced from the cloned service.
The oneflow-template clone (with the optional --recursive flag) can be used to achieve this, as well as from the Sunstone service template tab.
If the name of the VM template + Service template exceeds 128 chars, VM template name will be cropped.
Note
Scheduled Actions cannot be defined in VM templates if they are intended to be used as part of Service templates. Please remove them prior to instantiate a service to avoid indeterministic behavior.Adding or Overwriting Information in Service Templates
To enhance or modify the functionality implemented by a Virtual Machine (VM) template or a Virtual Role (VR) template of a Role, you can use the template_contents attribute to add or overwrite information from the original template:
For example, you can use the template_contents to set custom attributes to the template or modify the capacity of the original VM, as shown below:
{
  "name": "Sample Service",
  "description": "Overwriting original template example",
  "deployment": "straight",
  "roles": [
    {
      "name": "master",
      "type": "vm",
      "template_id": 0,
      "cardinality": 1
    },
    {
      "name": "worker",
      "type": "vm",
      "template_id": 1,
      "cardinality": 2,
      "template_contents": {
        "CPU": 2,
        "MY_ATT": "Some fancy value"
      }
    }
  ]
}
You can also parameterize the content of the template_contents using the User Inputs feature. This functionality, as it appears in the usual Virtual Machines, allows the user to provide attributes and values during instantiation time. You can add User Inputs to the Service template in the following way:
{
  "name": "Sample Service",
  "description": "Overwriting original template example",
  "deployment": "straight",
  "roles": [
    {
      "name": "master",
      "type": "vm",
      "template_id": 0,
      "cardinality": 1
    },
    {
      "name": "worker",
      "type": "vm",
      "template_id": 1,
      "cardinality": 2,
      "template_contents": {
        "CPU": 2,
        "MY_ATT": "Some fancy value"
      }
    }
  ],
  "user_inputs": {
    "ATT_A": "O|fixed|| |2",
    "ATT_B": "M|list||0.5,1,2,4|1",
    "ATT_C": "M|range||512..8192|2048"
  }
}
This field follows the same syntactic convention as the User Entries for Virtual Machines to describe the attributes to be asked to the user, so we recommend reviewing the corresponding section for more information.
Note
All User Inputs will be automatically added to template_contents by OneFlow once the relevant attributes have been requested from the user. There is no need to manually include or reference them within template_contents. Additionally, OneFlow will also add all User Inputs to the CONTEXT of the Role’s machines, similar to how User Inputs are handled in standard Virtual Machines.
As a result, all values provided by the user will be accessible from within the Role’s machines via OpenNebula’s context packages.User Inputs Scope
To enhance the flexibility of User Inputs in Service templates, they can be configured at both the Service template level and the Role level. This allows for greater customization and adaptability based on the specific needs of each Role within the Service.
Service level: User Inputs are applied to all Roles in the service. You can define User Inputs at the Service level as follows:
{
  "name": "Sample Service",
  "description": "User Inputs at Service level example",
  "deployment": "straight",
  "roles": [
    {
      "name": "master",
      "type": "vm",
      "template_id": 0,
      "cardinality": 1
    },
    ...
  ],
  "user_inputs": {
    "ATT_A": "O|fixed|| |2",
    "ATT_B": "M|list||0.5,1,2,4|1",
    "ATT_C": "M|range||512..8192|2048"
  }
}
Role level: User Inputs are applied to a single Role within the service. User Inputs can be combined at Role and Service level, where User Role Inputs will take precedence. Below you can see an example of a Service with User Inputs at different levels:
{
  "name": "Sample Service",
  "description": "User Inputs at Service level example",
  "deployment": "straight",
  "roles": [
    {
      "name": "master",
      "type": "vm",
      "template_id": 0,
      "cardinality": 1,
      "user_inputs": {
        "ATT_B": "M|list||1,2,3,4|2",
      }
    },
    ...
  ],
  "user_inputs": {
    "ATT_A": "O|fixed|| |2",
    "ATT_B": "M|list||0.5,1,2,4|1",
    "ATT_C": "M|range||512..8192|2048"
  }
}
In case you use User Inputs at both levels, the User Inputs at the Role level will take precedence over the User Inputs at the Service level. Note
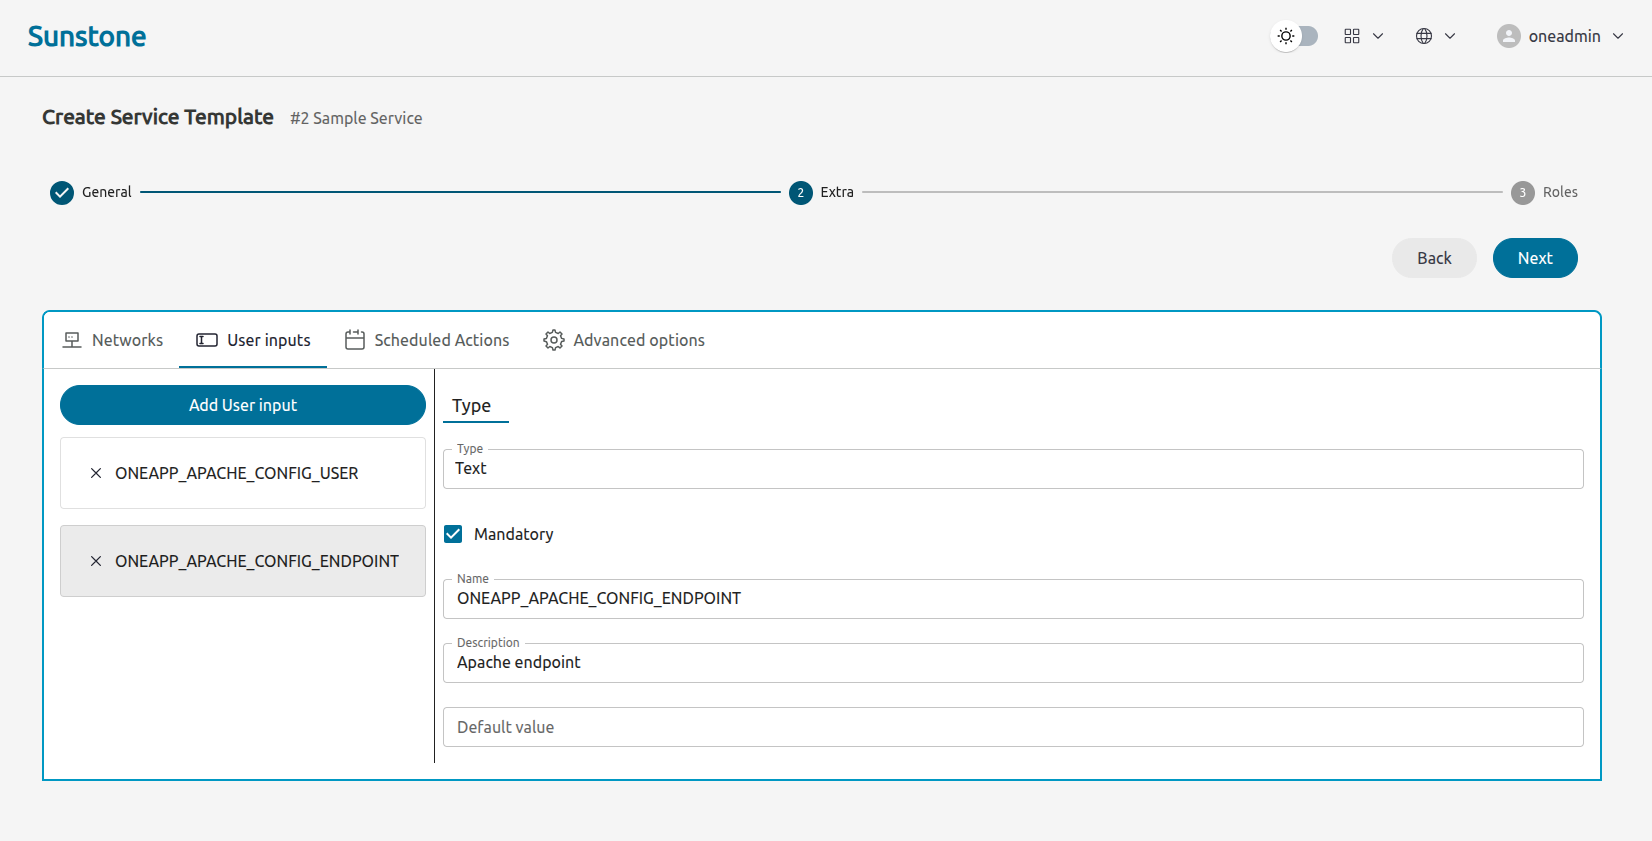
From Sunstone, you can add User Inputs as fields during the creation of the OneFlow Service template or update an already existing one in the following form:
In the same way as in the CLI, Sunstone will prompt the user for the User Inputs declared in the Service template during instantiation.
Render User Inputs in Sunstone
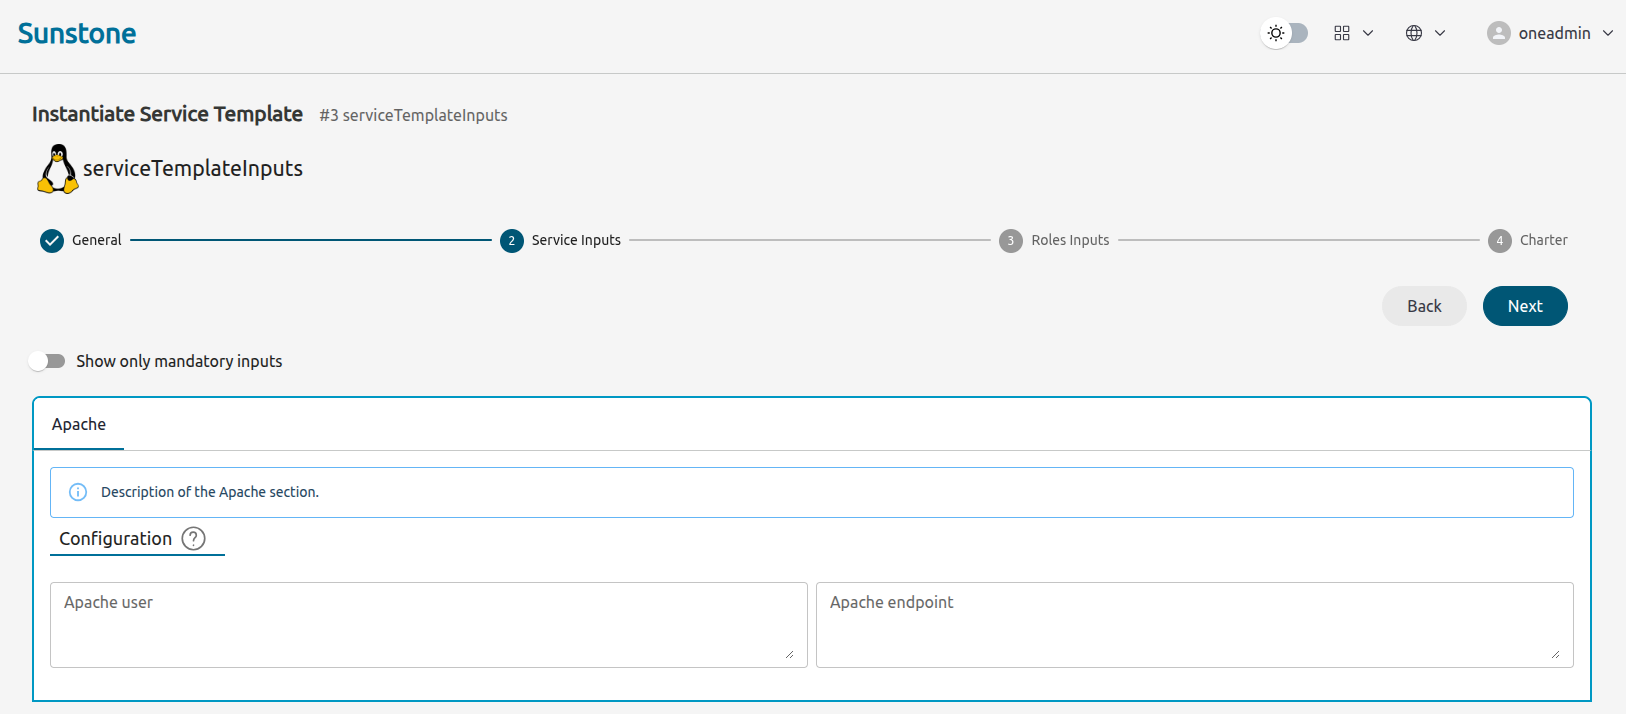
When a Service template is instantiated using Sunstone, the user will be asked to fill the user inputs that the Service template has defined. So, using the following User Inputs:
"user_inputs": {
  "APACHE_USER": "O|text|Apache user||",
  "APACHE_ENDPOINT": "O|text|Apache endpoint||"
},
A step called Service Inputs will render the User Inputs for the service:

In order to improve the user experience, Sunstone can render these user inputs in a different way, easier to understand for the Sunstone user. To do that, Sunstone uses rules based on the name of the User Inputs. These rules are the same as the ones used in Virtual Machines templates.
So, if the previous template is modified as follows:
"user_inputs": {
  "ONEAPP_APACHE_CONFIG_USER": "O|text|Apache user||",
  "ONEAPP_APACHE_CONFIG_ENDPOINT": "O|text|Apache endpoint||"
},
The user inputs will be grouped in a tab called APACHE with a group called CONFIG:

If the service has a Role with a Virtual Machine template that has User Inputs that do not exist on the Service template, these User Inputs that belong to the Virtual Machine template will be rendered in a different step called Roles Inputs.
So, if the Service template references to the virtual machine template defined in Sunstone look like this:
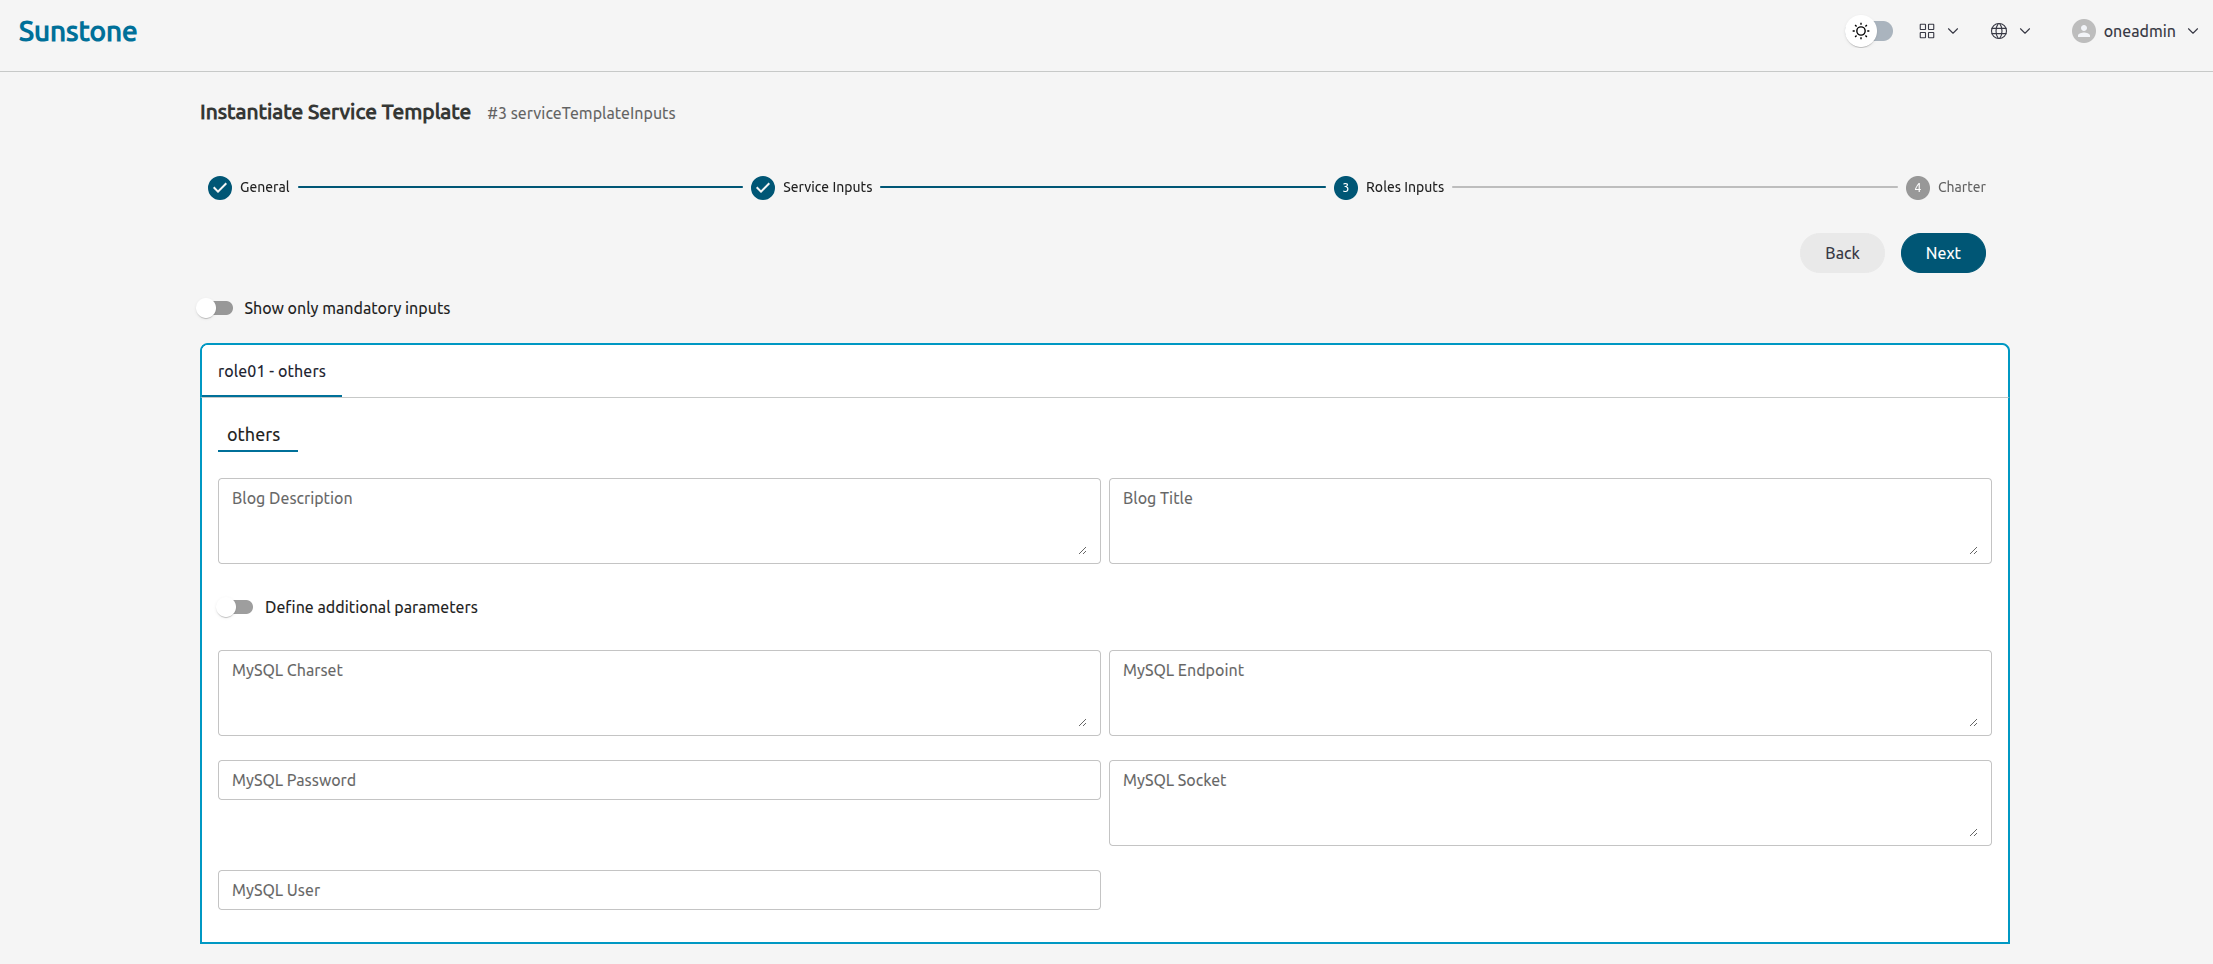
All the user inputs that belong to the Virtual Machine template and are not in the Service template are grouped in a tab with the name of the Role.
Additional Data to Render User Inputs in Sunstone
In order to help the Sunstone user, the Service templates can be extended with an attribute called user_inputs_metadata that will be adding some info to the APPS and GROUPS.
Note
The attribute user_inputs_metadata can only be used in Sunstone, not in other components of OpenNebula.So, if we use the previous template and add the following information:
"user_inputs_metadata": [
  {
    "type": "APP",
    "name": "APACHE",
    "title": "Apache",
    "description": "Description of the Apache section."
  },
  {
    "type": "GROUP",
    "name": "CONFIG",
    "title": "Configuration",
    "description": "Description of the Configuration section."
  }
],
"logo": "data:image/png;base64,<BASE64_IMAGE>"
Where BASE64_IMAGE is an image in base64 format, Sunstone will render the following:
Using logo attribute we can add a logo to the Service template in base64. Also, we can add info objects with metadata (please see User Inputs metadata to get info about the object structure).
Note
Remember that any User Input that doesn’t meet convention name will be place on the Others tab or Others group. If all User Inputs don’t meet convention name, no tabs or groups will be rendered.Configuring Dynamic Networks in a Service Template
Each Service Role is assigned either a Virtual Machine Template or a Virtual Router Template, depending on whether its type is vm or vr, through the template_id attribute of each Role. This template defines the capacity and other characteristics of the instance, including network interfaces configuration. In addition to specifying Virtual Networks in the template, the Service template can also define a set of dynamic networks.
A Service template can define three different dynamic network modes, determining how the networks will be used, and these must be declared in the template body under the network_values field. These three types are explained below:
- Existing Virtual Network: VMs in the Role will take a lease from an existing network. You’ll likely use this method for networks with a predefined address set (e.g., public IPs).
{
  ...
  "networks_values": [
    { "Public": { "id": "<vnet_id>" }
  }
  ]
  ...
}
- Network reservation: The system will create a reservation from an existing network for the Service. Specify the name of the reservation and its size. This method is useful when you need to allocate a pool of IPs for your Service.
{
  ...
  "networks_values": [
    { "Public": {
        "reserve_from": "<vnet_id>",
        "extra": "NAME=RESERVATION\nSIZE=5"
      }
    }
  ]
  ...
}
- Instantiate a network template: A network template is instantiated, and depending on the selected template, you might need to specify the address range to create (e.g., a private VLAN for internal Service communication).
{
  ...
  "networks_values": [
    { "Public": {
        template_id": "$<vnet_template_id>",
        "extra": "AR=[ IP=192.168.122.10, SIZE=10, TYPE=IP4 ]"
      }
    }
  ]
  ...
}
This allows you to create more generic Service templates. For example, the same Service template can be used by users of different groups that may have access to different Virtual Networks.
Note
When the service is deleted, all the networks that have been created are automatically deleted.In addition to specifying Virtual Networks in the template, the Service template also needs to indicate which Roles will be connected to the dynamic networks, which can be achieved using the template_contents field. As stated in previous sections, this field is used to override the original template of the Virtual Machine or Virtual Router. For example, to attach a network to the Role, you can specify the following configuration:
{
  ...
  "roles": [
    ...
    {
      "name": "worker",
      "type": "vm",
      "template_id": 1,
      "cardinality": 3,
      "template_contents": {
        "NIC": [
          {
            "NETWORK_ID": "$Public",
            "NAME": "NIC_0"
          }
        ]
      }
    },
    ...
  ],
  "networks_values": [
    { "Public": {
        reserve_from": "<vnet_id>",
        "extra": "NAME=RESERVATION\nSIZE=5"
      }
    }
  ],
...
}
In this example, the worker Role has a network interface attached described by the network Public defined in the network_values attribute. As described above, this Public network is a dynamic reservation of the Virtual Network indicated in reserve_from attribute. You can define multiple interfaces in the NIC array depending on how many networks need to be attached to the Role.
All these functionalities are also available through the Sunstone portal, allowing you to quickly create dynamic networks with ease.
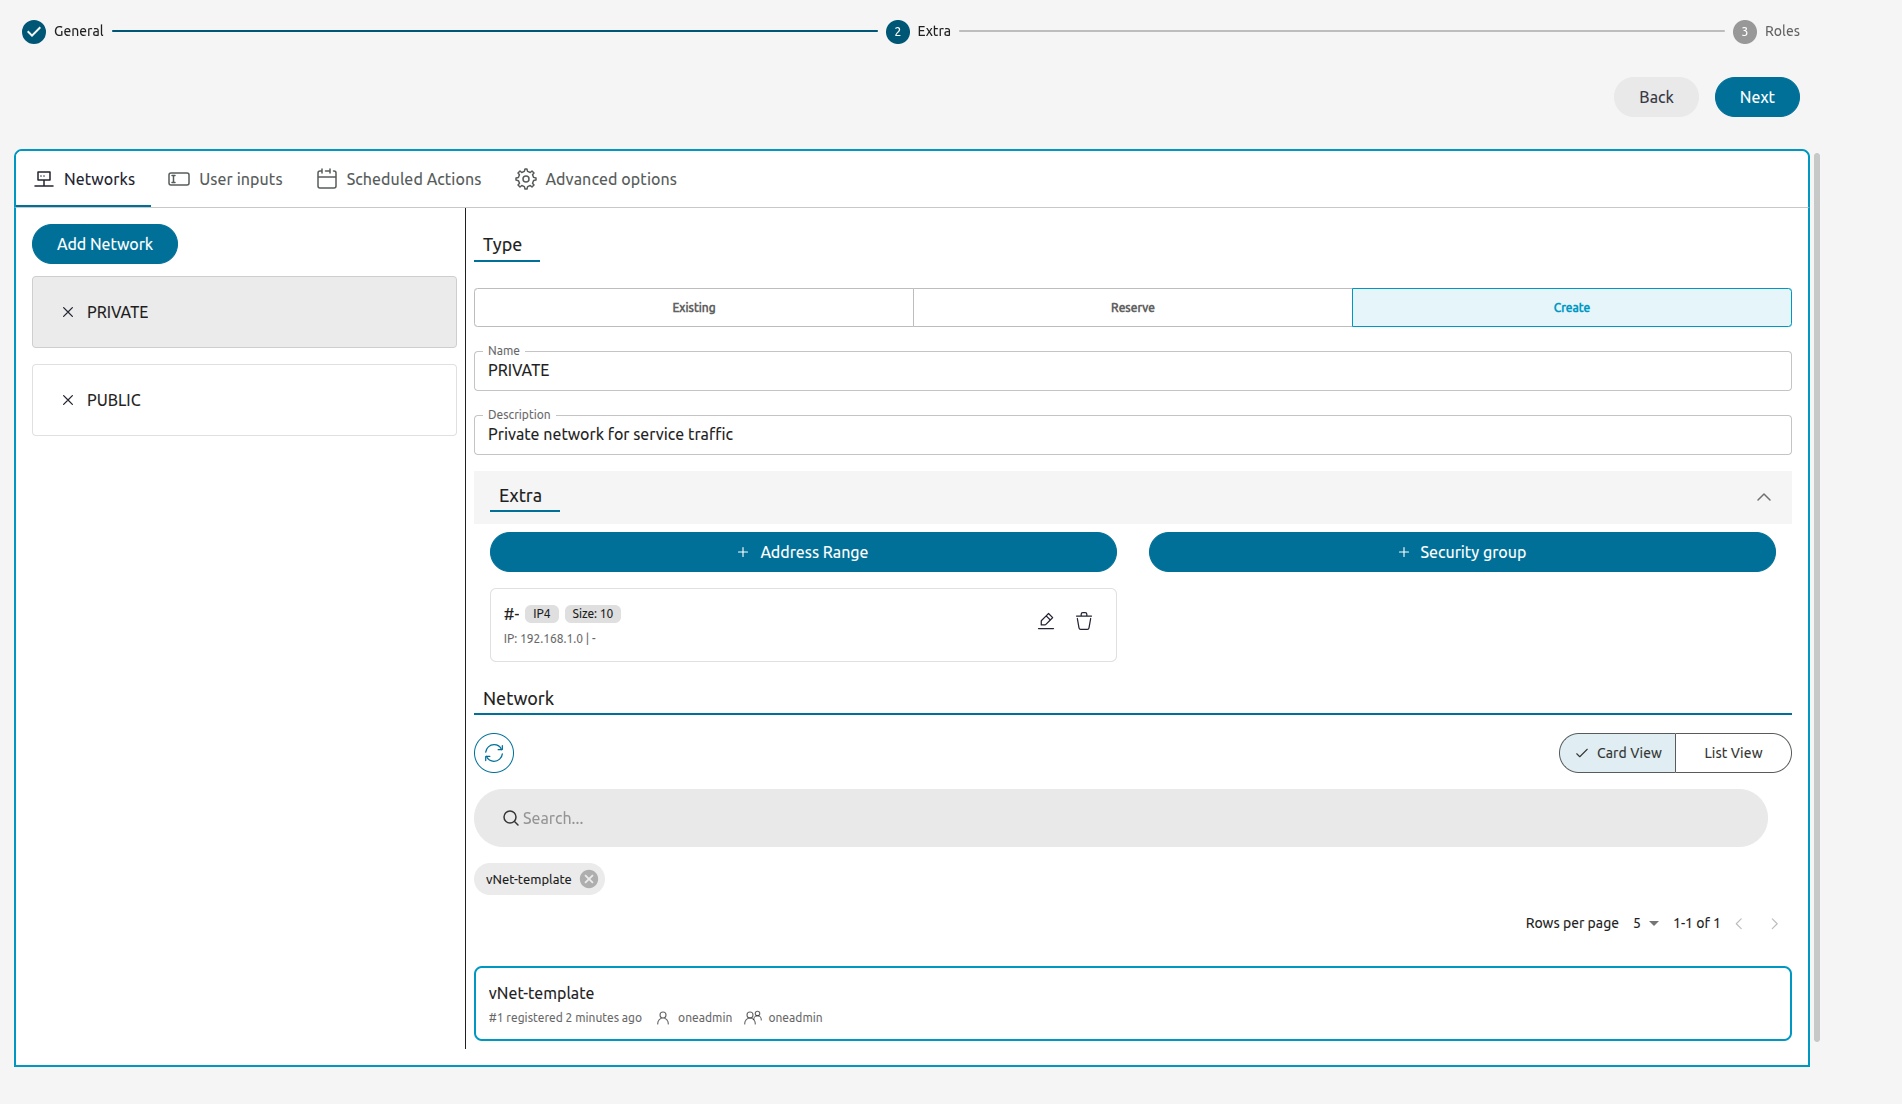
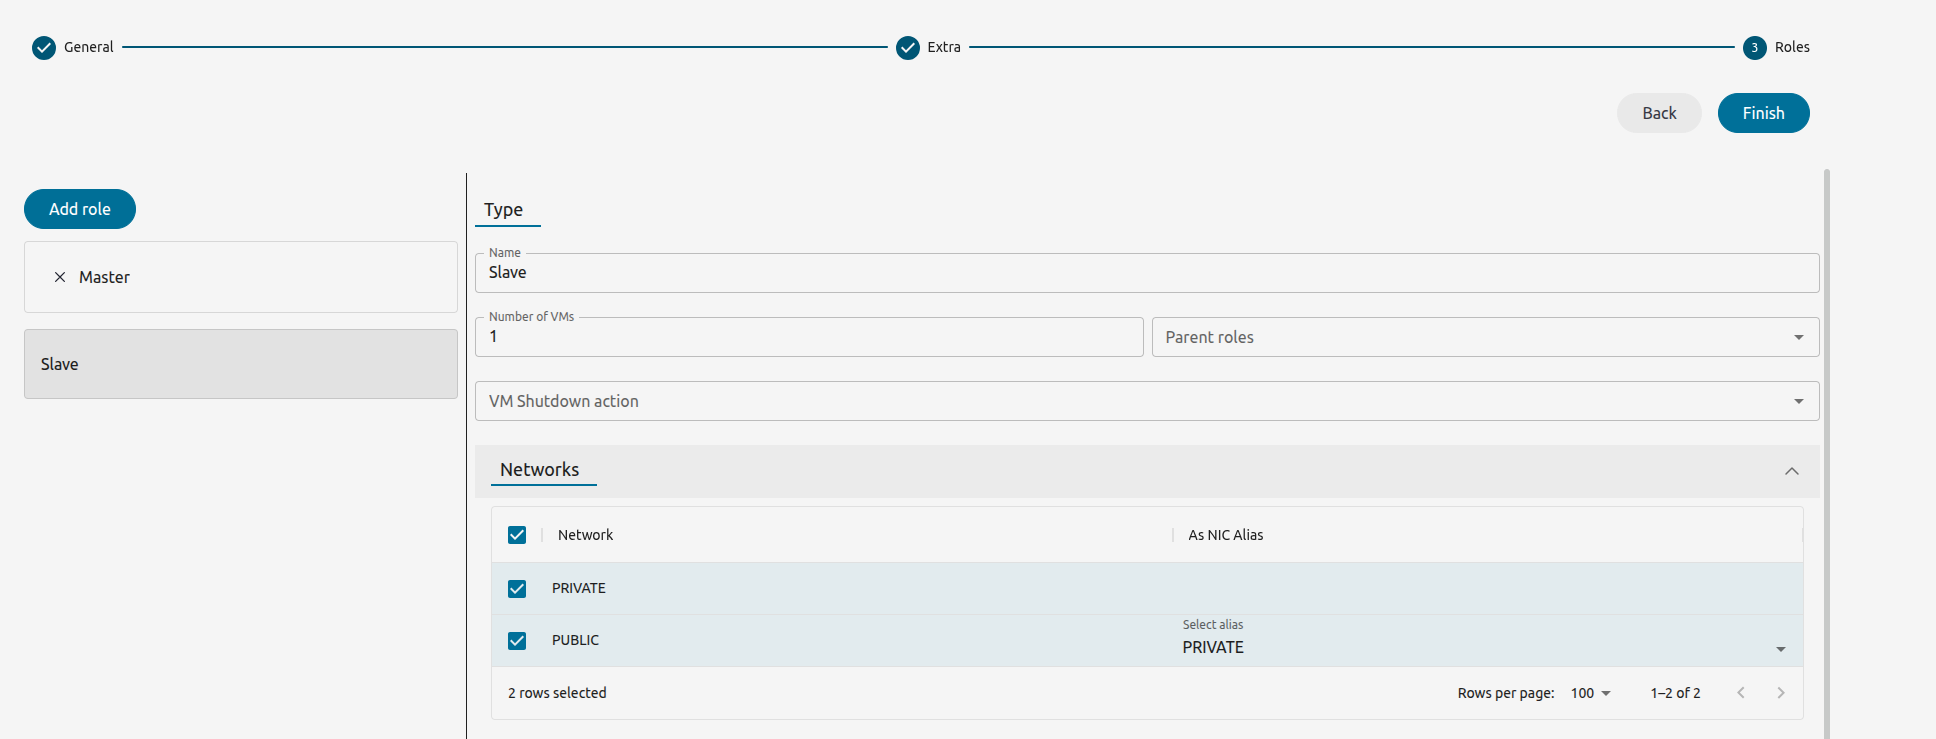
As you can see in the picture above, each Role of the service can be attached to one or more dynamic networks individually. The network can be attached to the Role as an alias. In this case, you need to specify the interface to add the alias by selecting the Virtual Network it will be attached to. For example, the Role slave in the next picture will have one physical interface attached to the PRIVATE network. This interface will also have an IP alias configured from network PUBLIC. Additionally you can set whether the VMs in the Role expose an RDP endpoint. Additionally, you need to specify the IP of the VM for the RDP connection by selecting the Virtual Network the interface is attached to.
Service
A Service template can be instantiated as a Service. Each newly created Service will be deployed by OneFlow following its deployment strategy.
Each Service Role creates Virtual Machines in OpenNebula from VM Templates, that must be created beforehand.
Understanding a Service Body
The JSON body of a Service in OneFlow provides a detailed configuration of the Service, including its roles, network settings, user inputs, etc. The following is an example of what a standard Service body looks like in OneFlow:
  {
    "name": "Sample Service",
    "description": "Test service with two roles",
    "state": 2,
    "deployment": "none",
    "roles": [
      {
        "name": "Frontend",
        "state": 2,
        "type": "vm",
        "cardinality": 1,
        "template_id": 0,
        "on_hold": false,
        "min_vms": 1,
        "max_vms": 5,
        "elasticity_policies": [],
        "scheduled_policies": [],
        "template_contents": {},
        "nodes": [
          {
            "deploy_id": 8,
            "vm_info": {
              "VM": {
                "ID": "8",
                "UID": "0",
                "GID": "0",
                "UNAME": "oneadmin",
                "GNAME": "oneadmin",
                "NAME": "MASTER_0_(service_5)"
              }
            }
          }
        ],
        "last_vmname": 1
      },
      {
        "name": "VNF",
        "state": 2,
        "type": "vr",
        "cardinality": 3,
        "template_id": 1,
        "on_hold": false,
        "vrouter_id": 2,
        "template_contents": {
          "NIC": [
            {
              "NETWORK_ID": "$Public",
              "NAME": "NIC_0"
            },
            {
              "NETWORK_ID": "$Private",
              "NAME": "NIC_1"
            }
          ]
        },
        "nodes": [
          {
            "deploy_id": 10,
            "vm_info": {
              "VM": {
                "ID": "10",
                "UID": "0",
                "GID": "0",
                "UNAME": "oneadmin",
                "GNAME": "oneadmin",
                "NAME": "VR_ROLE_1_0_(service_5)"
              }
            }
          },
          {
            "deploy_id": 11,
            "vm_info": {
              "VM": {
                "ID": "11",
                "UID": "0",
                "GID": "0",
                "UNAME": "oneadmin",
                "GNAME": "oneadmin",
                "NAME": "VR_ROLE_1_1_(service_5)"
              }
            }
          },
          {
            "deploy_id": 12,
            "vm_info": {
              "VM": {
                "ID": "12",
                "UID": "0",
                "GID": "0",
                "UNAME": "oneadmin",
                "GNAME": "oneadmin",
                "NAME": "VR_ROLE_1_2_(service_5)"
              }
            }
          }
        ],
        "last_vmname": 0
      }
    ],
    "shutdown_action": "terminate-hard",
    "on_hold": false,
    "ready_status_gate": false,
    "automatic_deletion": false,
    "registration_time": 1728498178,
    "start_time": 1728498179,
    "networks_values": [
      { "Public": {
          "id": "0"
        },
        "Private": {
          "reserve_from": 2,
          "extra": "NAME=MY_RESERVATION\nSIZE=5"
        }
      }
    ],
    "log": [
      {
        "timestamp": 1728498179,
        "severity": "I",
        "message": "New state: DEPLOYING_NETS"
      },
      {
        "timestamp": 1728498179,
        "severity": "I",
        "message": "New state: DEPLOYING"
      },
      {
        "timestamp": 1728498185,
        "severity": "I",
        "message": "New state: RUNNING"
      }
    ]
  }
}
It’s important to note the existence of some new attributes that have been added by OneFlow in the root of the Service body that didn’t exist in the Service Template:
| Attribute | Type | Description |
|---|---|---|
state | integer | Represents the current state of the Service. For state values reference, see the life cycle section below. |
log | array | Contains a log of important events, such as state changes, with a timestamp and severity. Example: {“timestamp”: 1728498179, “severity”: “I”, “message”: “New state: RUNNING”}. |
start_time | integer | The Unix timestamp of when the Service was started. Can be used for tracking up time. |
New attributes have also been added within each Role that show information relevant to each type of role.
| Attribute | Type | Role type | Description |
|---|---|---|---|
state | integer | VM, VR | Current state of the Role. For state values reference, see the life cycle section below. |
nodes | array | VM, VR | Array of the instances deployed for the Role, including VM/VR IDs (deploy_id) |
last_vmname | integer | VM, VR | Tracks the last assigned VM identifier number in the Role. |
vrouter_id | integer | VR | ID of the Virtual Router instance created by the Role. |
Life-cycle
The deployment attribute defines the deployment strategy that the Life-cycle Manager (part of the oneflow-server) will use. These two values can be used:
- none: all Roles are deployed at the same time.
- straight: each Role is deployed when all its parent Roles are
RUNNING.
Regardless of the strategy used, the Service will be RUNNING when all of the Roles are also RUNNING.
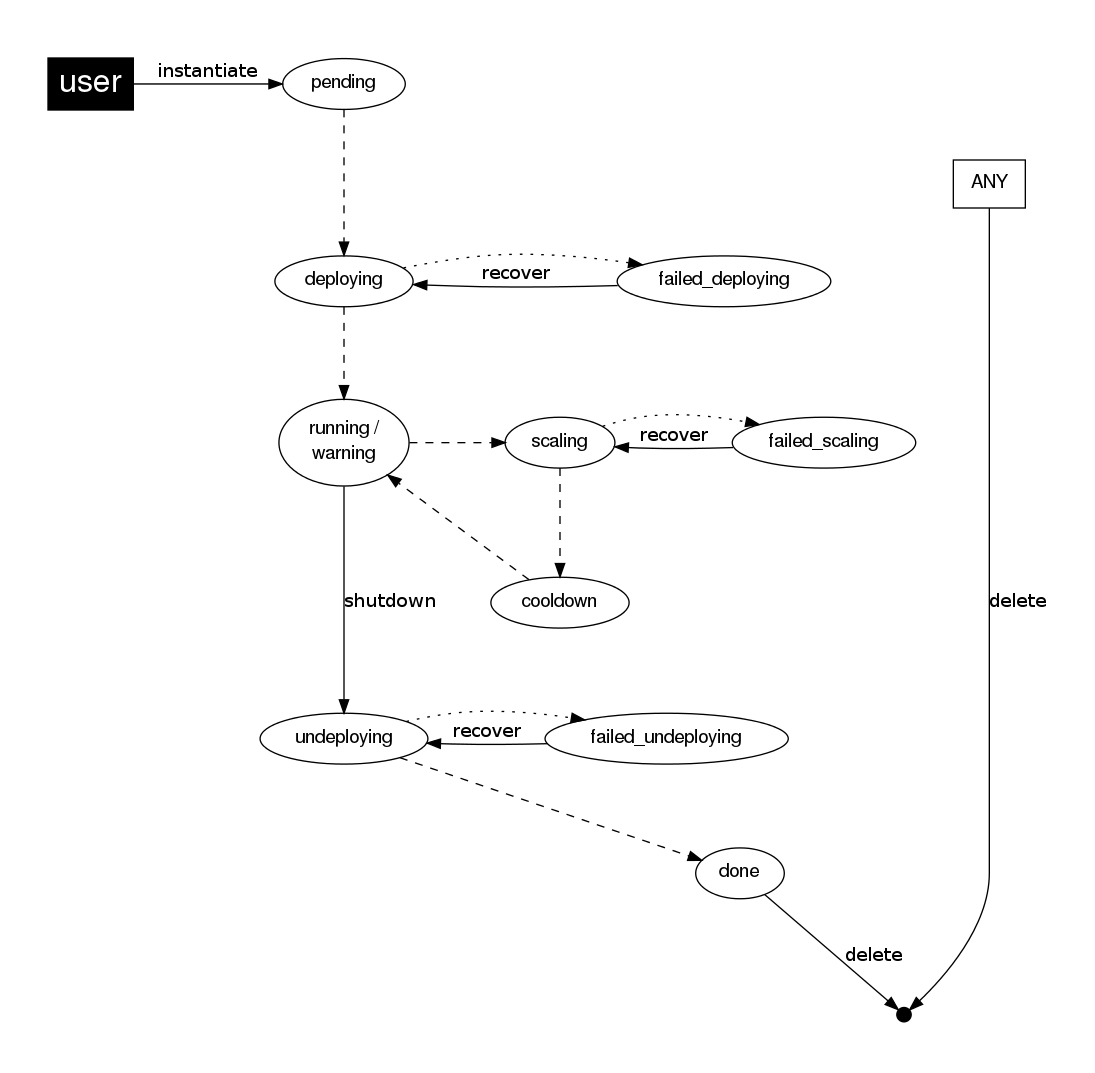
This table describes the Service states:
| Service State | Value | Meaning |
|---|---|---|
PENDING | 0 | The Service starts in this state, and will stay in it until the LCM decides to deploy it. |
DEPLOYING | 1 | Some Roles of the Service are being deployed. |
RUNNING | 2 | All Roles of the Service are deployed successfully. |
UNDEPLOYING | 3 | Some Roles of the Service are being undeployed. |
WARNING | 4 | A VM was found in a failure state. |
DONE | 5 | The Service has finished all actions and is marked as complete. |
FAILED_UNDEPLOYING | 6 | An error occurred while undeploying the Service. |
FAILED_DEPLOYING | 7 | An error occurred while deploying the Service. |
SCALING | 8 | A Role of the Service is scaling up or down. |
FAILED_SCALING | 9 | An error occurred while scaling the Service. |
COOLDOWN | 10 | A Role of the Service is in the cooldown period after a scaling operation. |
DEPLOYING_NETS | 11 | Service networks are being deployed, they are in LOCK state. |
UNDEPLOYING_NETS | 12 | Service networks are being undeployed, they are in LOCK state. |
FAILED_DEPLOYING_NETS | 13 | An error occurred while deploying the Service networks. |
FAILED_UNDEPLOYING_NETS | 14 | An error occurred while undeploying the Service networks. |
HOLD | 15 | All Roles of the Service are in hold state. |
Each Role has an individual state, described in the following table:
| Role State | Value | Meaning |
|---|---|---|
PENDING | 0 | The Role is waiting to be deployed. |
DEPLOYING | 1 | The VMs of the Role are being created, and will be monitored until all of them are RUNNING. |
RUNNING | 2 | All the VMs of the Role are RUNNING. |
UNDEPLOYING | 3 | The VMs of the Role are being shutdown. The Role will stay in this state until all VMs are DONE. |
WARNING | 4 | A VM of the Role was found in a failure state. |
DONE | 5 | The Role has finished all actions and is marked as complete. |
FAILED_UNDEPLOYING | 6 | An error occurred while undeploying the VMs of the Role. |
FAILED_DEPLOYING | 7 | An error occurred while deploying the VMs of the Role. |
SCALING | 8 | The Role is waiting for VMs to be deployed or to be shutdown. |
FAILED_SCALING | 9 | An error occurred while scaling the Role. |
COOLDOWN | 10 | The Role is in the cooldown period after a scaling operation. |
HOLD | 11 | The VMs of the Role are HOLD and will not be scheduled until they are released. |
Determining When a VM Is READY (RUNNING)
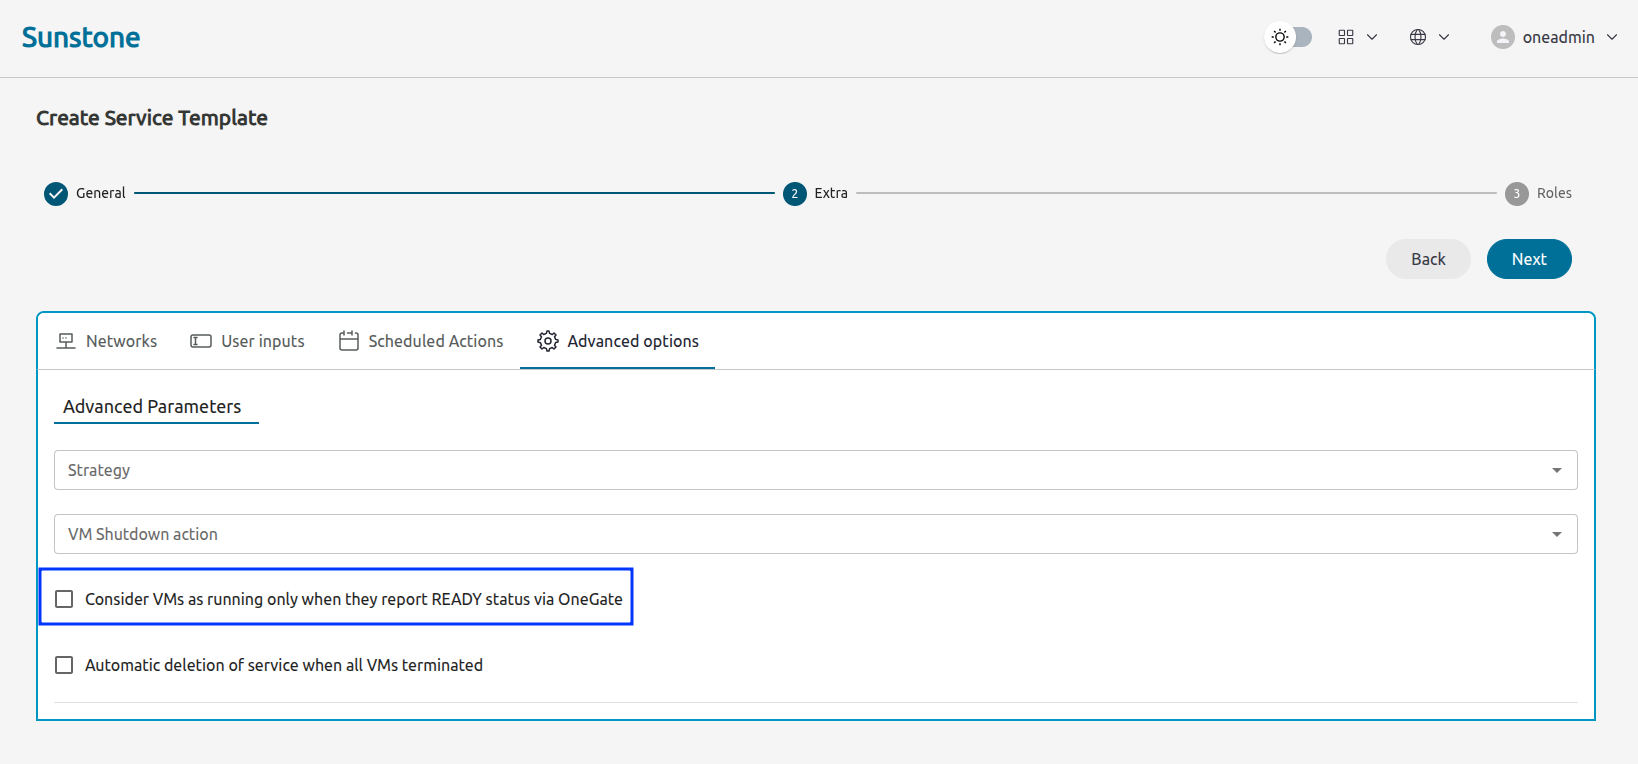
Depending on the deployment strategy, OneFlow will wait until all the VMs in a specific Role are all in RUNNING state before deploying VMs that belong to a child Role. How OneFlow determines the running state of the VMs can be specified with the checkbox Consider VMs as running only when they report READY status via OneGate available in the Service creation dialog in Sunstone, or the attribute in ready_status_gate in the top level of the Service Template JSON.
If ready_status_gate is set to true, a VM will only be considered to be in running state if the following points are true:
- VM is in
RUNNINGstate for OpenNebula, which specifically means thatLCM_STATE==3andSTATE>=3 - The VM has
READY=YESin the user template. For more information about this scenario, we recommend to take a look at the OneGate server guide.
If ready_status_gate is set to false, a VM will be considered to be in running state when it’s in running state for OpenNebula (LCM_STATE==3 and STATE>=3). Take into account that the VM will be considered RUNNING the very same moment the hypervisor boots the VM (before it loads the OS).
Create and List Existing Services
New Services are created from Service templates, using the oneflow-template instantiate command:
$ oneflow-template instantiate 0
ID: 1
To list the available Services, use oneflow list/top:
$ oneflow list
ID USER            GROUP           NAME          STARTTIME          STATE
 1 oneadmin        oneadmin        my_service    10/28 17:42:46     PENDING
The Service will eventually change to DEPLOYING. You can see information for each Role by using oneflow show.
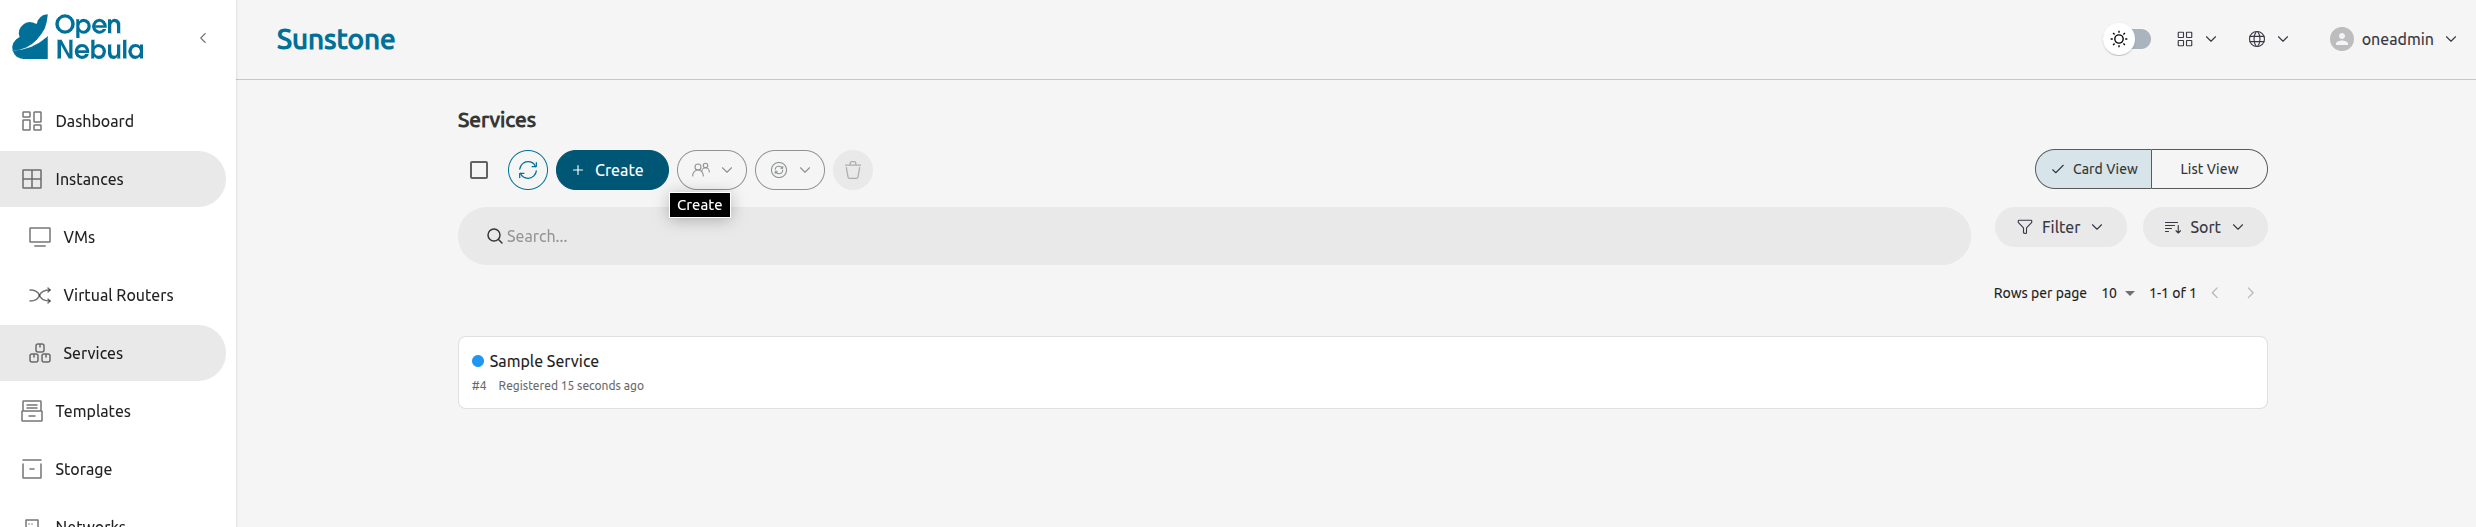
From Sunstone, you can instantiate a new Service from the tab Instances > Services, clicking in the Create button located in the toolbar.
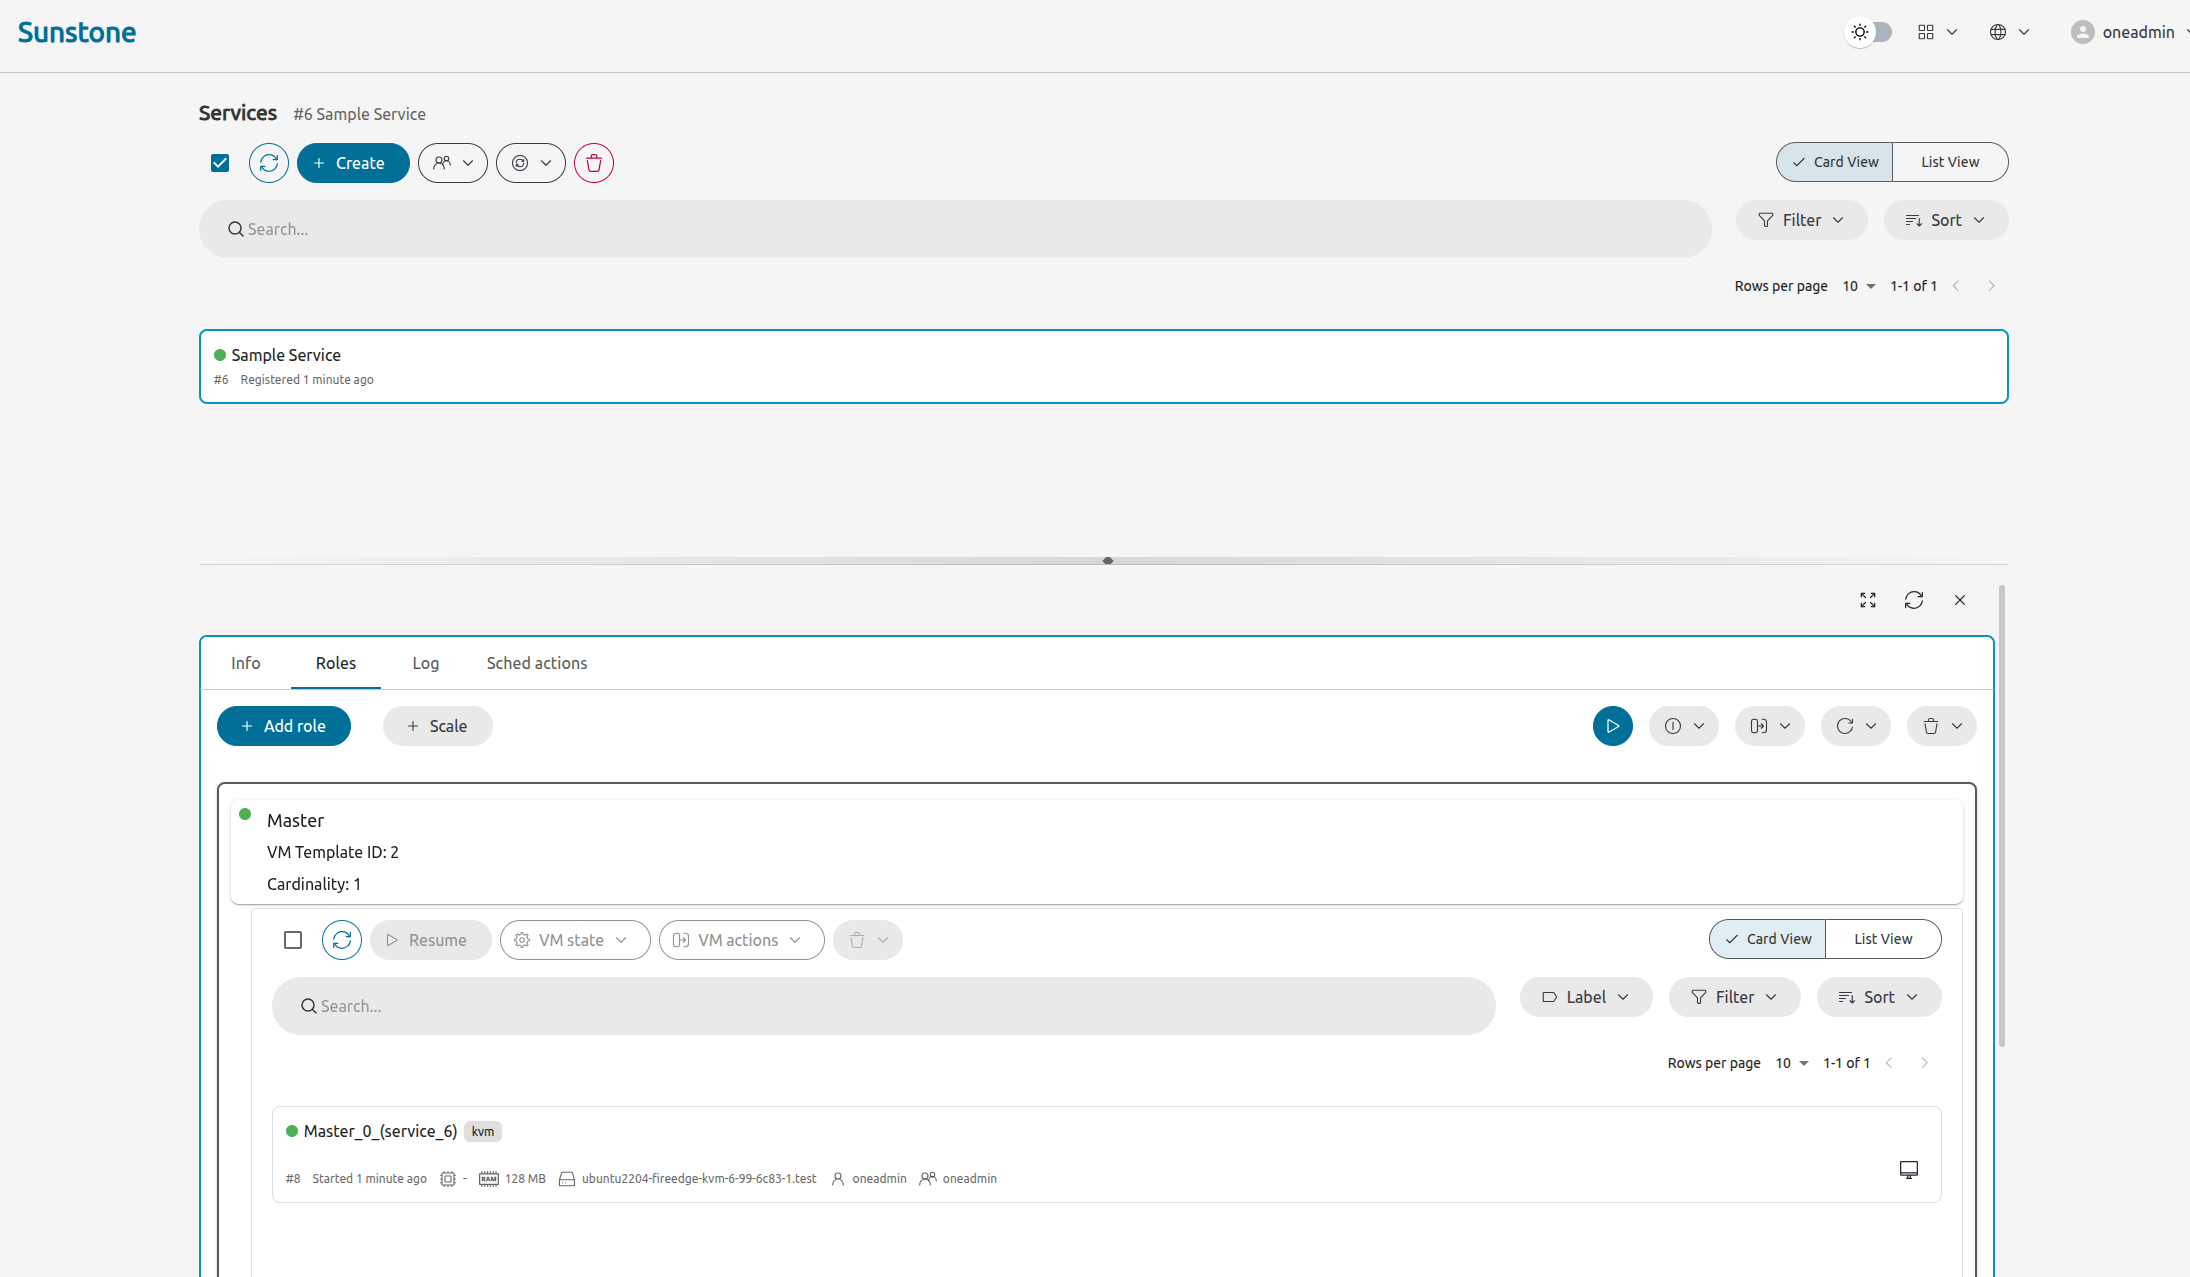
By selecting the Role tab once you have selected a Service, you can see the deployment state of each Role:
Instantiation of Roles with VMs on Hold
VMs of a Service can be instances on hold with the on_hold parameter set to true in the Service template.
{
  "name": "my_service",
  "deployment": "straight",
  "type": "vm",
  "template_id": 0,
  "on_hold": true|false,
  "roles": [
    {
      ...
    }
  ]
}
Adding or Removing Roles from a Running Service
Important
Roles can be only added/removed when the service is in RUNNING state.In order to add a Role to a running service you can use the command oneflow add-role. You need to provide a valid JSON with the Role description, for example:
$ cat role.tmpl
{
    "name": "MASTER",
    "cardinality": 1,
    "template_id": 0,
    "type": "vm",
    "min_vms": 1,
    "max_vms": 2,
    "elasticity_policies": [],
    "scheduled_policies": []
}
$ oneflow add-role 0 role.tmpl
After adding the Role, the service will go to DEPLOYING state and when the VMs are created, it will go to RUNNING.
Note
Networks and User Inputs are supported, so if the new Role has some of them they will be evaluated. Note
Before adding the Role, the JSON is checked, to see that it follows the schema.In order to remove a Role from a running service you can use the command oneflow remove-role, for example:
$ oneflow remove-role 0 MASTER
After removing the Role, the service will go to UNDEPLOYING state and when the VMs are removed, it will go to RUNNING.
Update Service
You can update a service in RUNNING state. To do this you need to use the command oneflow update <service_id>. You can update all the values, except the following ones:
Service
- user_inputs: it only makes sense when deploying, not in running.
- user_inputs_values: it only makes sense when deploying, not in running.
- deployment: changing this changes the undeploy operation.
- log: this is just internal information, it makes no sense to change it.
- name: this has to be changed by using the rename operation.
- networks: it only makes sense when deploying, not in running.
- networks_values: it only makes sense when deploying, not in running.
- ready_status_gate: it only makes sense when deploying, not in running.
- state: this is internal information managed by OneFlow server.
Role
- user_inputs: it only makes sense when deploying, not in running.
- user_inputs_values: it only makes sense when deploying, not in running.
- cardinality: this is internal information managed by OneFlow server.
- last_vmname: this is internal information managed by OneFlow server.
- nodes: this is internal information managed by OneFlow server.
- parents: this only makes sense in deploy operation.
- state: this is internal information managed by OneFlow server.
- template_id: this will affect scale operation.
Warning
If you try to change one of these values above, you will get an error. The server will also check the schema in case there is another error. Note
If you change the value of min_vms, the OneFlow server will adjust the cardinality automatically. Also, if you add or edit elasticity rules they will be automatically evaluated. Note
You can use the flag --append to append new information to the service.Recovering Services from Failures
Some common failures can be resolved without manual intervention by using the oneflow recover command. This command has different effects depending on the Service state:
| State | New State | Recover action |
|---|---|---|
FAILED_DEPLOYING | DEPLOYING | VMs in DONE or FAILED are terminated.VMs in UNKNOWN are booted. |
FAILED_UNDEPLOYING | UNDEPLOYING | The undeployment is resumed. |
FAILED_SCALING | SCALING | VMs in DONE or FAILED are terminated.VMs in UNKNOWN are booted.For a scale-down, the shutdown actions are retried. |
COOLDOWN | RUNNING | The Service is simply set to running before the cooldown period is over. |
From Sunstone, this can be achieved by selecting the Recover button from the toolbar in the Instances > Services section.
Deleting Services
Services are deployed automatically by the Life Cycle Manager. To undeploy a running Service, users can use the command oneflow delete.
The command oneflow delete will perform a graceful terminate on all the running VMs (see onevm terminate). If the straight deployment strategy is used, the Roles will be shut down in the reverse order of the deployment.
If any of the VM terminate operations can’t be performed, the Service state will show FAILED state, indicating that manual intervention is required to complete the cleanup. In any case, the Service can be completely removed using the command oneflow recover --delete.
When a Service fails during a deployment, undeployment, or scaling operation, the command oneflow recover can be used to retry the previous action once the problem has been solved.
In order to delete all the services in DONE state, to free some space in your database you can use the command oneflow purge-done.
Automatic Delete Service If All Roles Are Terminated
Service VMs can be terminated using scheduled actions or VM charters. This can lead to a situation where you have a running service with no VMs associated to it. To avoid this you can use automatic deletion feature.
To enable it, you need to add the following attribute to the Service template:
"automatic_deletion": true
This option can also be set at the Role level, where only one specific Role is instantiated in HOLD, instead of the whole service. For example:
{
  "name": "my_service",
  "deployment": "straight",
  "type": "vm",
  "roles": [
    {
      "name": "frontend",
      "template_id": 0,
      "on_hold": true|false
      ...
    },
    ...
  ]
  ...
}
Once you want to release the Roles, you can use the oneflow release command to release the Service:
$ oneflow release <SERVICE_ID>
Managing Service Permissions
Both Services and Template resources are completely integrated with the OpenNebula user and group management. This means that each resource has an owner and group, and permissions. The VMs created by a Service are owned by the Service owner, so the owner can list and manage them.
To change the owner and group of the Service, we can use oneflow chown/chgrp.
Note
The Service’s VM ownership is also changed.All Services and Templates have associated permissions for the owner, the users in its group, and others. These permissions can be modified with the command chmod.
Please refer to the OpenNebula documentation for more information about users & groups, and resource permissions.
Scheduling Actions on the Virtual Machines of a Role
You can use the action command to perform a VM action on all the Virtual Machines belonging to a Role.
These are the actions that can be performed:
terminateterminate-hardundeployundeploy-hardholdreleasestopsuspendresumerebootreboot-hardpoweroffpoweroff-hardsnapshot-createsnapshot-revertsnapshot-deletedisk-snapshot-createdisk-snapshot-revertdisk-snapshot-delete
Instead of performing the action immediately on all the VMs, you can perform it on small groups of VMs with these options:
-p, --period x: seconds between each group of actions.-n, --number x: number of VMs to apply the action to each period.
Let’s say you need to reboot all the VMs of a Role, but you also need to avoid downtime. This command will reboot two VMs each five minutes:
$ oneflow action my-service my-role reboot --period 300 --number 2
The /etc/one/oneflow-server.conf file contains default values for period and number that are used if you omit one of them.
Note
You can also perform an operation in the whole service using the command service action. All the above operations and options are supported. Warning
Schedule actions are only supported by VM-type Roles.Advanced Usage
Elasticity
Please refer to elasticity documentation guide.
Sharing Information Between VMs
The Virtual Machines of a Service can share information with each other using the OneGate server.
From any VM, use the PUT ${ONEGATE_ENDPOINT}/vm action to store any information in the VM user template. This information will be in the form of attribute=vale, e.g., ACTIVE_TASK = 13. Other VMs in the Service can request that information by using the GET ${ONEGATE_ENDPOINT}/service action.
You can read more details in the OneGate API documentation.
Network Mapping and Floating IPs
Network mapping in OneFlow is facilitated through the use of Virtual Router Roles, which enable efficient management of network resources and floating IPs within your cloud environment.

Configuring the Service Template
To establish network mapping, you need to define a Service template that includes a Virtual Router Role. Below is an example configuration for a Virtual Router Role in JSON format:
{
  "roles": [
    ...
    {
      "name": "VNF",
      "type": "vr",
      "template_id": 1,
      "cardinality": 3,
      "template_contents": {
        "NIC": [
          {
            "NETWORK_ID": "$Public",
            "FLOATING_IP": "yes"
          }
        ]
      }
    },
  ]
  "networks_values": [
    {
        "Public": {
            "template_id": 1,
            "extra": "AR=[ IP=1.1.1.1,SIZE=10,TYPE=IP4]"
        }
    }
  ]
  ...
}
Let’s highlight some elements of the previous template:
- type: Specifies that this is a Virtual Router Role with the value
vr. - template_id: Refers to the ID of the template associated with this Role. Since we are creating a VR Role, this must be a Virtual Router template.
- cardinality: Indicates the number of Virtual Routers that will be instantiated for this Role. In the case of more than one, we will be creating a router in HA mode automatically.
- template_contents: Contains the configuration for the Network Interfaces. Here, the NETWORK_ID is set to $Public, denoting the use of a public network, and FLOATING_IP is set to “yes,” indicating that floating IPs will be allocated automatically by OneFlow.
Additionally, as described in the Dynamic Network Configuration section, the networks_values attribute provides configuration details for the public network, specifying the Virtual Network template ID and other parameters.
Instantiating the Service
When the Service is instantiated, the Virtual Router Role will look like the following:
{
  ...
  "roles": [
    ...
    {
      "name": "VR_EXAMPLE",
      "type": "vr",
      "template_id": 1,
      "state": 2,
      "cardinality": 3,
      "template_contents": {
        "NIC": [
          {
            "NETWORK_ID": "0",
            "FLOATING_IP": "yes"
          }
        ],
        "NAME": "VR_EXAMPLE(service_5)"
      },
      "nodes": [
        ...
      ],
      "on_hold": false,
      "last_vmname": 0,
      "vrouter_id": 2,
      "vrouter_ips": [
        {
          "NETWORK_ID": 0,
          "VROUTER_IP": "1.1.1.1"
        }
      ]
    }
    ...
  ]
  ...
}
In this instantiation:
- vrouter_id: Represents the ID of the Virtual Router created by OneFlow.
- vrouter_ips: Contains an array of all the floating IPs that have been allocated. In this example, the IP 1.1.1.1 is associated with the NETWORK_ID 0.
Communicating with the Virtual Router from Other Roles
In many cases, the networks and the IP of the router are dynamically assigned. There are two different methods for other Roles to obtain the Virtual Router’s IP address:
- Direct Access via Parent Role: If a Role has a Virtual Router Role as its parent, it can access the attributes of the parent Role directly.
- Using OneGate: If the Role does not inherit from a Virtual Router Role, you can utilize the OneGate server within the Virtual Machines of the Roles to retrieve this information. Ensure that the “Add OneGate token” option is checked when configuring the templates used in the Service Template. This enables the VMs to securely access the necessary data from the OneFlow environment.
Service Charters
This functionality automatically adds scheduling actions in VM when the service is instantiated; for more information about this, please check the VM Charter
Accessing Parent’s Role Attributes from Children
You can define attributes that refer to a parent’s attribute, for example, the parent can push an attribute through OneGate and its children can use it on their template.
In order to do this, you need to use the following syntax: ${<PARENT_ROLE_NAME>.<XPATH>}:
- Parent Role Name: is the parent role that will have the attribute. It’s important to note that the name must be exactly the same as that of the parent role.
- XPATH: XPATH expression to find the value. It must be separated by
., for example: if the XPATH isTEMPLATE/CONTEXT/TEST, the expression should be${<PARENT_ROLE_NAME>.template.context.test}.
These expressions can be placed inside template_contents attribute, which is the final piece of information that the VM will have. For example:
template_contents": {
  "DB_NAME": "${DATABASE.template.context.db_name"
}
Important
This will only work when using STRAIGHT strategy and when there is a parent relationship. So the attributes must be in the children not in the parent.Service Template Reference
For more information on the resource representation, please check the API guide
We value your feedback
Was this information helpful?
Glad to hear it
Sorry to hear that