WHMCS Integration (EE)
WHMCS Tenants Module Install/Update
 Warning
You must use PHP 7.4; currently PHP 8.x will cause an error when creating the user.The install and update process are essentially identical. The module files can be found in /usr/share/one/whmcs after you have installed the opennebula-whmcs-tenants package via your package manager. You will just need to merge the modules directory to the main WHMCS directory on the server hosting WHMCS. When updating the module just copy the files on top of the existing files and overwrite them. An example command for copying the files is here:
cp -rf /usr/share/one/whmcs/modules /path/to/web/root/whmcs/.
 Note
Note
Make sure you download the updated package from the EE repository before doing either an install or an update.WHMCS Tenants Module Configuration
In this Chapter we will go over adding a server, creating the group for it, and configuring a product.
Adding a Server
To configure your WHMCS Tenants Module, first log in to your WHMCS admin area and navigate to System Settings -> Servers and click on the button Add New Server.
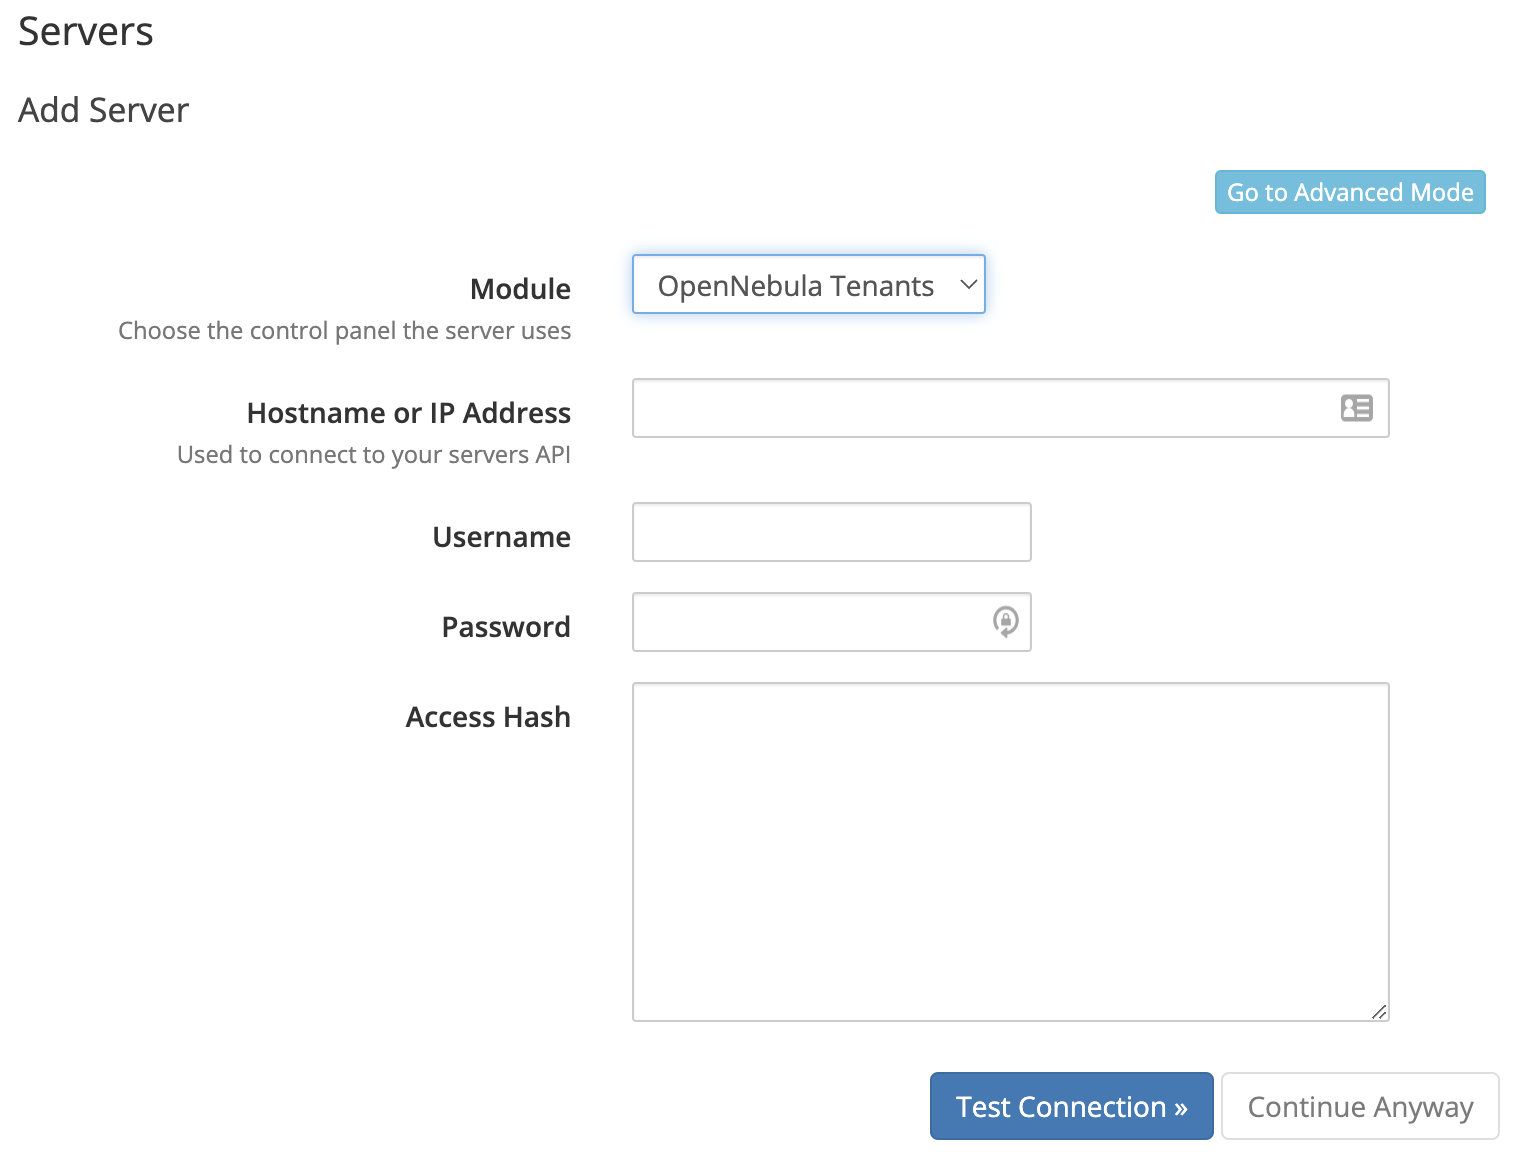
Fill in the Hostname for your OpenNebula Server. Under the Server Details section select OpenNebula Tenants as the module and fill in the Username and Password with a user in the oneadmin group in your OpenNebula installation.
Now click the button on top labeled Go to Advanced Mode. This will open a larger form. Fill in a name for the server and scroll down to the bottom to verify that the port and SSL settings are correct. By default, the XML-RPC traffic is not encrypted with SSL so you may need to disable that unless you’ve set up SSL for XML-RPC.
Once these are filled out, click the Test Connection button to verify the module can authenticate with your OpenNebula server.
Don’t forget to hit the Save Changes button once this is verified in order to complete adding the server.
Creating a Server Group
After the server is added it should return you to the list of servers. Here you can click the Create New Group button to make a server group to contain your OpenNebula Server(s).
Fill in the Name of your Server Group, then highlight your OpenNebula Server and click Add to add it to your new group. Once this is done, click Save Changes.
WHMCS Admin Usage
Creating a Product Group
Before creating products you should create groups to better organize your offerings. To create a new product group, navigate to System Settings -> Products/Services, then click on the Create a New Group button there. Fill in the Product Group Name and any other pieces of this form, such as Template and Payment Gateways, then click Save Changes once you’re done.
Creating a Product
Navigate to System Settings -> Products/Services.
From the Products/Services page, click on Create a New Product. Select the Product Type, Product Group, and a Product Name. The Module should be OpenNebula Tenants. Once this is call done, click the Continue button.
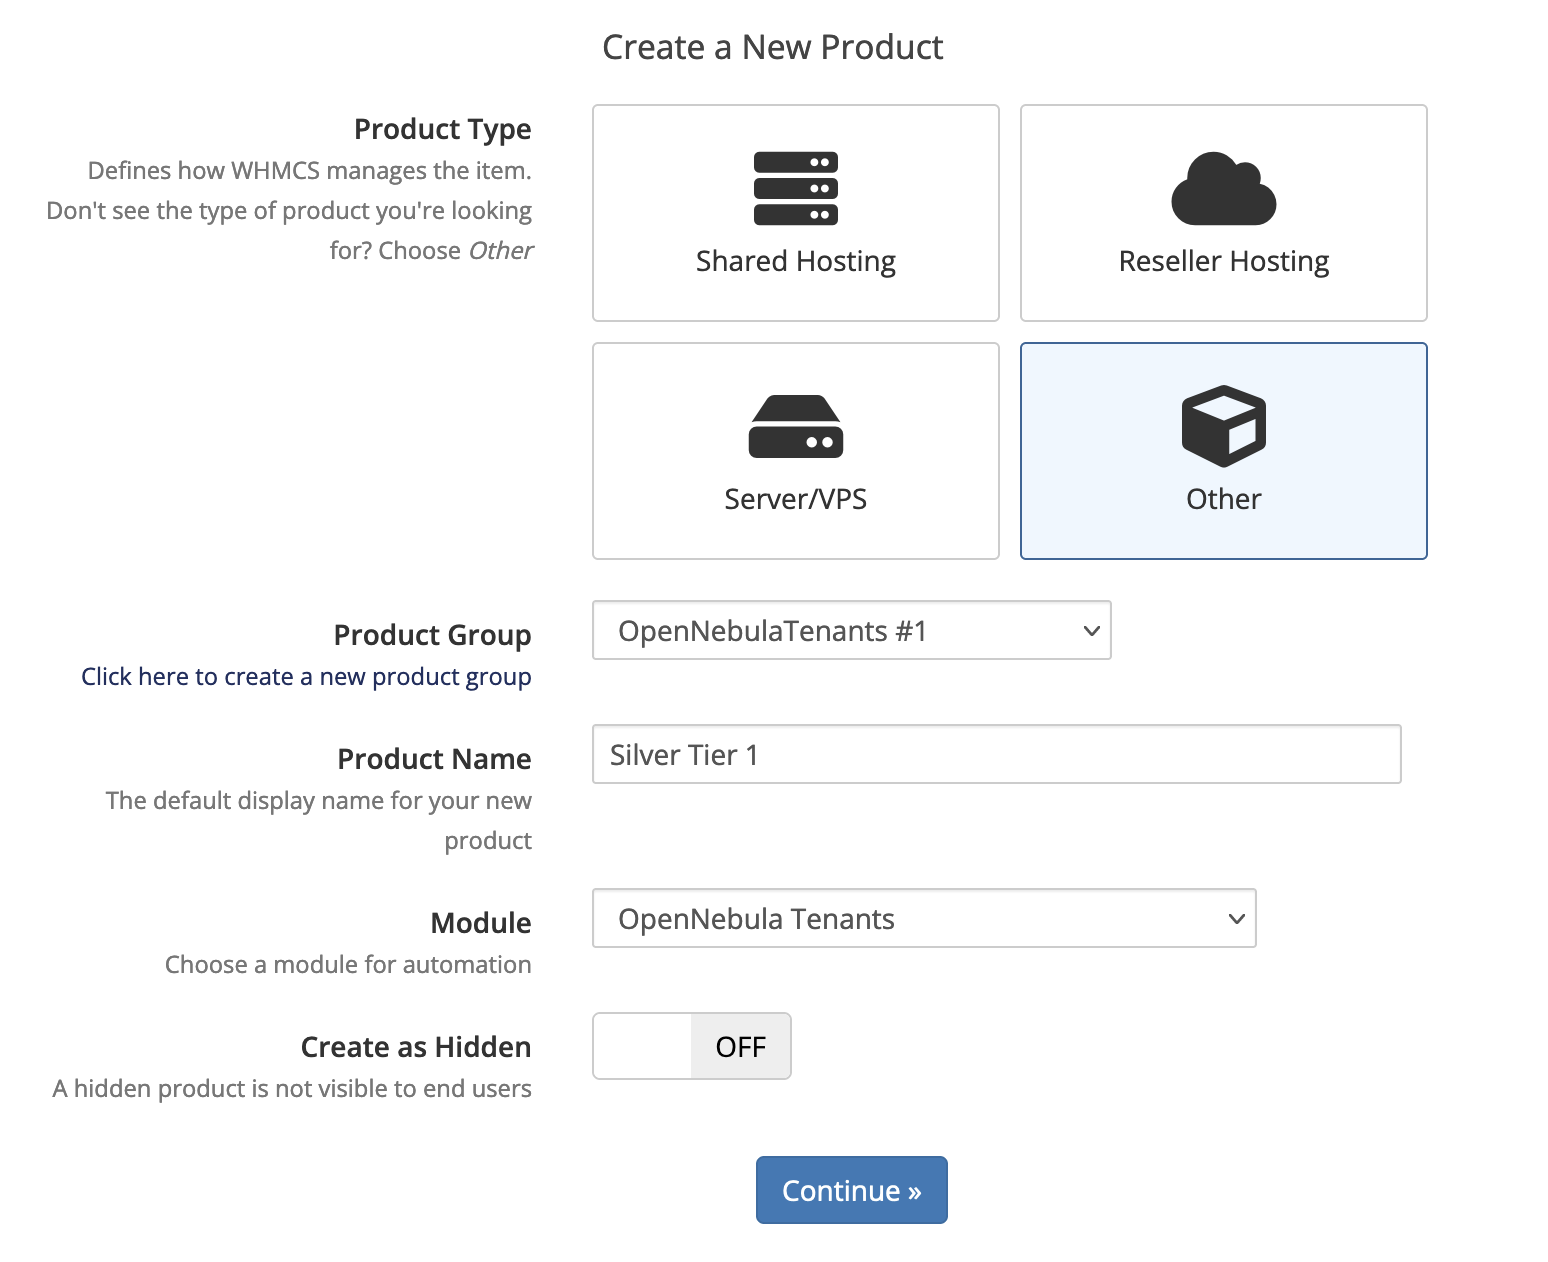
On this page, click on the Module Settings tab then select OpenNebula Tenants for the Module Name, then select your recently created Server Group. Here, you can fill in the maximum resources usable by this product. You can also set the ACL parameters which will be created in OpenNebula for this product.
These resource limits correlate to the Quota for the Group in OpenNebula, so this will limit the amount of resources used in OpenNebula for each product. You can also enable Metric Billing and set pricing for each of these metrics:
- IP Addresses
- RAM
- CPU cores
- Supporting Multiple VDCs
- Datastore Images
- Datastore Size
- NETRX
- NETTX
Below the resources you can determine if the User should be automatically set up or if the system should wait for the Administrator to accept the order.

Note
For more information about managing VDCs refer to the Managing VDCs page.The Upgrades tab can also be a useful feature to make use of. If you create multiple products with different resource quotas, you can select the products here which your users can upgrade to. You can select multiple products by holding the Shift or Ctrl key.
Managing Orders
To view the orders waiting to be accepted navigate to Orders -> Pending Orders on the top bar. On this page you can view the information about the client and the service they are ordering. Here you can accept, cancel, set as fraud, or delete the orders.
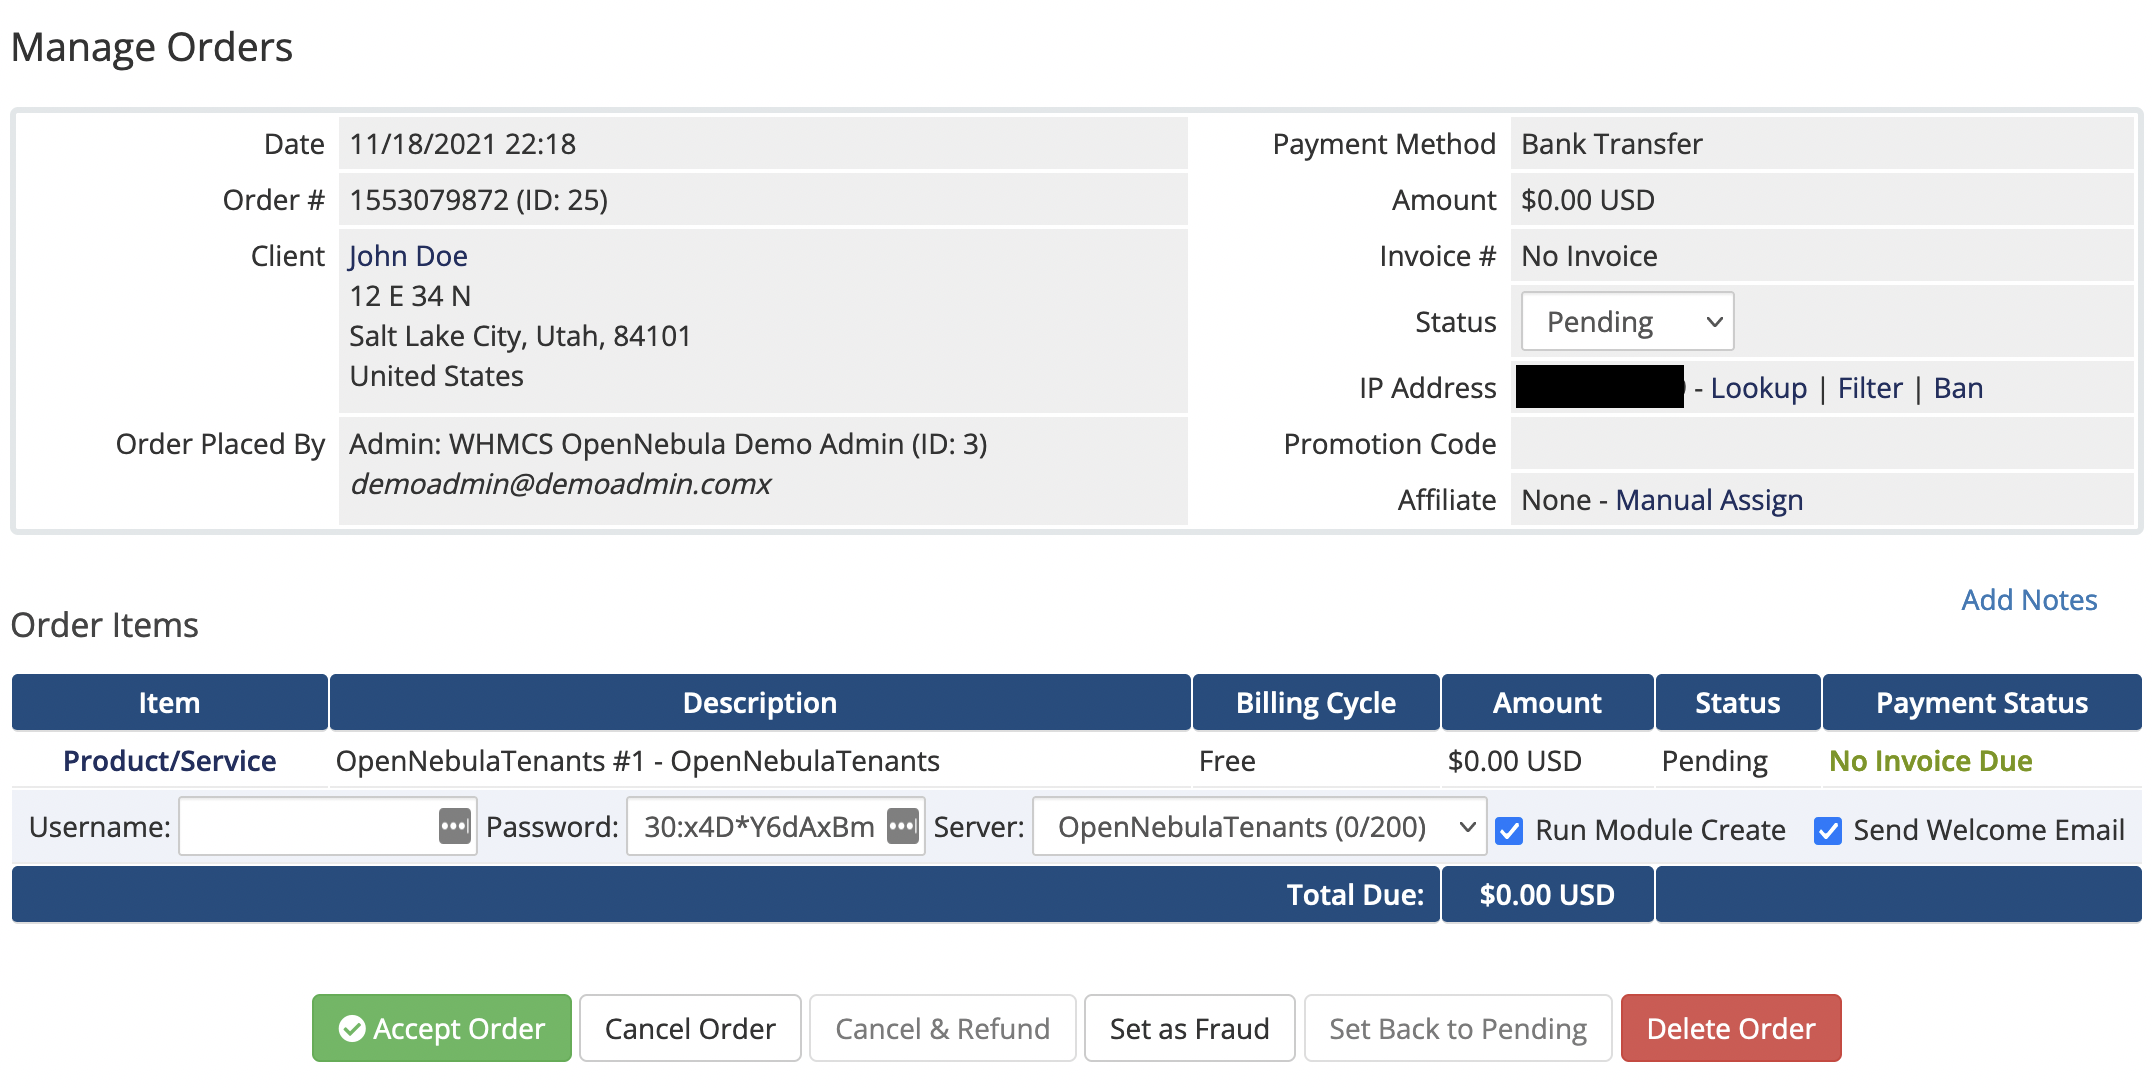
If your product is configured to be set up after manually accepting the order, you will need to accept the order created before any changes are made in OpenNebula. This is also true for package upgrades your users might request.
Once orders are set up there is a User, Group, and ACL created which correspond to the Service in WHMCS. Then, the Quota will be created for the Group linked to this order. On the service page for the customer, they will have a Login link.
Note
If there are issues when upgrading products, the user and group may need to be recreated. Any existing VMs can be assigned to the admin user temporarily while this is done. This will be fixed in a future release.Checking Metrics
To view metrics for your customers, navigate to View/Search Clients and click on the ID of any user. Click on the Products/Services tab, there should be a Metric Statistics section with a table. You can click Refresh Now to update the information manually.
WHMCS Tenants Module User Guide
Registering an Account
To register a new account, navigate to the client area of your WHMCS install and then go to Account -> Register. Fill out the following form and proceed with user creation. After it’s completed you should be able to log in as that new user.
Ordering a New Service
To view the available products, navigate to Services -> Order New Services. This page will display all available services which can be purchased. These can be added to the cart by clicking the corresponding Order Now button. After checking out, the new order will be created.
Upgrading a Service
To upgrade a product, navigate to the product’s page. On the left side there should be a button to Upgrade Product, which should show you a list of available packages to upgrade to. Simply add to the cart and check out much like when ordering a new service, and a new order will be created to upgrade your product.
Managing Services
When viewing a Product/Service, there should be an action Login which should redirect users to the OpenNebula interface where they should be able to manage their Virtual Machines within the limits that the product allows.
We value your feedback
Was this information helpful?
Glad to hear it
Sorry to hear that