SAML Authentication
The SAML Authentication driver allows users to access OpenNebula by logging in into a trusted SAML Identity Provider, effectively centralizing authentication and allowing Single Sign-On. Enabling it allows OpenNebula to be used as a SAML Service Provider.
Requirements
You need to manage your own SAML Identity Provider. OpenNebula doesn’t contain or configure any SAML Identity Provider, it only receives SAML responses and validates those.
Configuration
This authentication mechanism is enabled by default. If it doesn’t work, make sure you have the authentication method saml enabled in the AUTH_MAD section of your /etc/one/oned.conf. For example:
AUTH_MAD = [
    EXECUTABLE = "one_auth_mad",
    AUTHN = "ssh,x509,ldap,server_cipher,server_x509,saml"
]
The AUTH_MAD_CONFsection relative to saml should also be present in /etc/one/oned.conf:
AUTH_MAD_CONF = [
    NAME = "saml",
    PASSWORD_CHANGE = "YES",
    PASSWORD_REQUIRED = "NO",
    DRIVER_MANAGED_GROUPS = "YES",
    DRIVER_MANAGED_GROUP_ADMIN = "YES",
    MAX_TOKEN_TIME = "86400"
]
The saml authentication driver can be configured in /etc/one/auth/saml_auth.conf.
Each one of the configuration parameters is explained in the file itself through comments. The SAML authentication driver supports the definition of several trusted Identity Providers through the :identity_providers hash.
OpenNebula can be also configured to enable external SAML authentication for all new users by adding this line in /etc/one/oned.conf:
DEFAULT_AUTH = "saml"
This will avoid cloud admins having to manually create users with the SAML authentication driver. If DEFAULT_AUTH is set to “saml”, successfully authenticated users that are not present in the OpenNebula database will be automatically provisioned.
Group Mapping
SAML Identity Providers can usually be configured to report group membership to the Service Provider (see below for configuration samples with Keycloak and Okta). The name of the attribute included in the SAML assertion to report group membership is not defined in the SAML standard and is usually something configurable (typical values are member and memberOf). OpenNebula will expect group membership to be reported as the attribute defined in :group_field.
The groups reported by the Identity Provider are mapped to OpenNebula groups through a mapping file. The name of this mapping file is specified by the :mapping_filename parameter and resides in the OpenNebula var directory. The mapping file can be generated automatically using data in the OpenNebula group template. For example, we can add this line in the OpenNebula group template:
SAML_GROUP="technicians"
and in the SAML configuration file we set the :mapping_key to SAML_GROUP. This tells the driver to look for the SAML group specified in that template parameter. This mapping expires after the number of seconds specified by :mapping_timeout. This is done so that the authentication driver is not continuously querying OpenNebula.
The automatic generation of this mapping file can also be disabled through the :mapping_generate configuration parameter. In this case, the group mapping will need to be defined manually. The mapping file is in YAML format and contains a hash where the key is the name of the group reported by the IdP and the value is the ID of the OpenNebula group. For example:
---
technicians: '100'
users: '101'
When several Identity Providers are configured, you should have different :mapping_key and :mapping_filename values for each one so they don’t collide. For example:
keycloak:
    :mapping_filename: keycloak_group_mapping.yaml
    :mapping_key: KEYCLOAK_GROUP

okta:
    :mapping_filename: okta_group_mapping.yaml
    :mapping_key: OKTA_GROUP
and in the OpenNebula group template you can define two mappings, one for each Identity Provider:
KEYCLOAK_GROUP="one-users"
OKTA_GROUP="group1"
 Note
Note
If a user has successfully authenticated towards a trusted Identity Provider but no group mapping can be performed, the SAML authentication driver will automatically add that user to the OpenNebula group defined in :mapping_default. Note
Note that user groups are defined on login. This means that, if a user is already logged in and the group map is updated, the user groups will be updated the next time the user is authenticated. Also note that a user may be using a login token that needs to expire for this change to take effect. The maximum lifetime of a token can be set in oned.conf for each driver. If you want groups to be fully managed from OpenNebula (not from the Identity Provider), update DRIVER_MANAGED_GROUPS in the saml AUTH_MAD_CONF configuration attribute.Group Admin. Mapping
Each group in OpenNebula can have its admins, special group members that have administrative privileges for the group. Also, this attribute can be controlled through the Identity Provider. For this purpose there is an option: :group_admin_name. This needs to be set to the name of a group in the Identity Provider. If a user is a member of that group, this user will be a group admin of ALL mapped groups in ONE.
Assertion Consumer Service (ACS)
The Assertion Consumer Service (ACS) is a crucial component of the SAML authentication flow. It is the endpoint where clients POST the SAML assertion obtained from the Identity Provider. This happens after a successful authentication towards the Identity Provider.
In OpenNebula, this functionality is handled by the FireEdge component, which exposes a dedicated ACS endpoint: https://<your-fireedge-domain>/fireedge/api/auth/acs.
Sample Identity Provider Configurations
This section includes configuration guides for some common SAML Identity Providers.
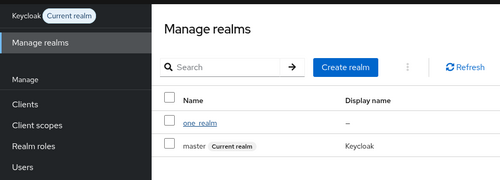
Keycloak
In order to configure Keycloak as an Identity Provider for OpenNebula, your will need to create a SAML client. Navigate to your Keycloak realm (or create a new one for OpenNebula)
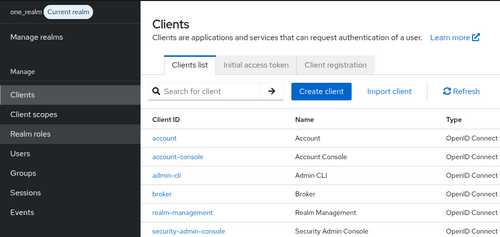
Now go to the Clients section and create a new client by clicking on Create client.
Set the following general settings:
- Client type -
SAML - Client ID - Service provider entity ID, i.e.
opennebula-sp. This value will be the:sp_entity_idattribute defined in/etc/one/auth/saml_auth.conf. - The name and the description are not compulsory.
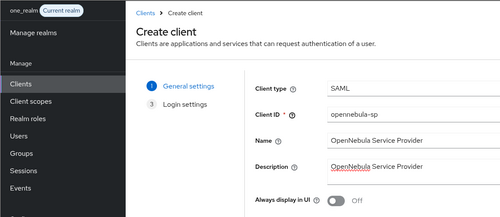
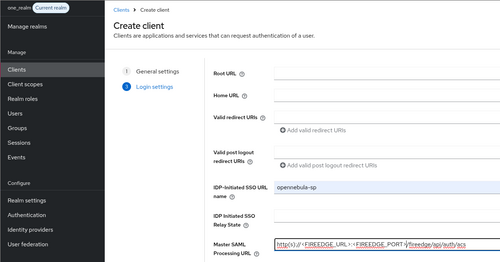
Click Next and set the following Login settings:
- IDP-Initiated SSO URL name - Same value as
Client ID. - Master SAML Processing URL - Refers to the ACS URL. Must match the value of the
:acs_urlfield in the OpenNebula SAML configuration file. E.g.:https://<FIREEDGE.DOMAIN.COM>/fireedge/api/auth/acs
Save the client configuration. Once the client has been successfully created, you can configure Keycloak to report group membership to OpenNebula:
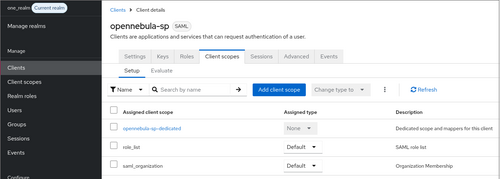
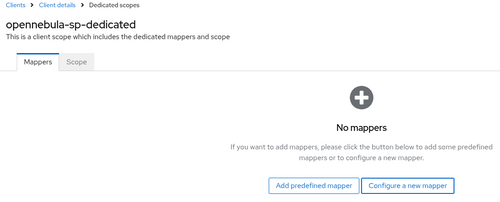
- Navigate to the new Client, select the Client scopes tab and select the scope with the
-dedicatedtermination
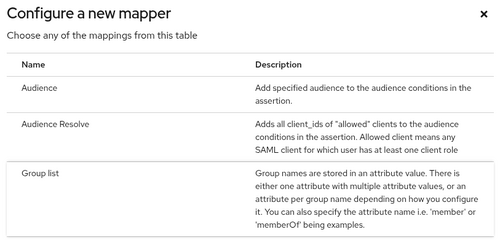
- On the Mappers tab, click on Configure new mapper.
- Choose Group list from the list of possible mappers.
- Use the following settings:
- Name:
group_mapper - Group attribute name: Must match the
:group_fieldattribute defined in/etc/one/auth/saml_auth.conffor the Identity Provider. Typical values arememberandmemberOf - SAML Attribute NameFormat:
Basic - Single Group Attribute:
On - Full group path:
On - For additional settings not specified here, use the default value.
- Name:
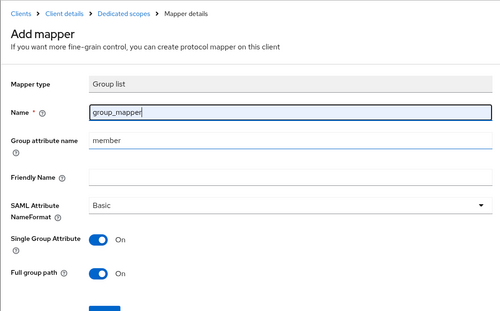
- Click Save.
Once group membership reporting has been configured in Keycloak, you can proceed with the OpenNebula SAML auth driver configuration (/etc/one/auth/saml_auth.conf):
:sp_entity_id- must match your Keycloak Client ID, i.e.opennebula-sp:acs_url- must match the URL configured in Keycloak as Master SAML Processing URL (i.e.https://<FIREEDGE.DOMAIN.COM>/fireedge/api/auth/acs):issuer- defaults tohttp(s)://<keycloak_ip>:<keycloak_port>/realms/<keycloak_realm_name>.- Can be obtained from the Keycloak web interface via the SAML Identity Provider metadata XML: Realm Settings => Endpoints => SAML 2.0 Identity Provider Metadata =>
entityIDparameter. Ifxpathis installed it can be obtained directly with the following command
- Can be obtained from the Keycloak web interface via the SAML Identity Provider metadata XML: Realm Settings => Endpoints => SAML 2.0 Identity Provider Metadata =>
curl http://<keycloak_ip>:<keycloak_port>/realms/one_realm/protocol/saml/descriptor 2>/dev/null \
| xpath -e '/md:EntityDescriptor/@entityID' 2>/dev/null | cut -d= -f2
:idp_cert- can be obtained from the Keycloak web interface or from the SAML IDP metadata XML- Realm Settings => Keys => Look for the RSA key used for signing (SIG) => Certificate.
- Realm Settings => Endpoints => SAML 2.0 Identity Provider Metadata =>
X509Certificate. Ifxpathis installed it can be obtained directly with the following command
curl http://<keycloak_ip>:<keycloak_port>/realms/<keycloak_realm_name>/protocol/saml/descriptor 2>/dev/null \
| xpath -e '/md:EntityDescriptor/md:IDPSSODescriptor/md:KeyDescriptor/ds:KeyInfo/ds:X509Data/ds:X509Certificate/text()' 2>/dev/null
:group_field- Must match the Group attribute name defined in the Keycloak group mapper (i.e.member):mapping_mode-keycloak. This mode includes special logic to handle Keycloak group nesting.
All other IdP-specific configuration settings for the driver should be set up the same way as for any other Identity Provider.
Note
Be aware that, with this configuration, group nesting is enabled. This means that a user member of the Keycloak group /group1/subgroup1 is considered both a member of group1 and a member of subgroup1. In case of having mappings configured for both the group and the subgroup, the user will be considered a member of both OpenNebula groups. To disable this behavior you can set the :mapping_mode configuration attribute to strict and turn off Full group path in your Keycloak Group Mapper.Okta
In order to configure Okta as an Identity Provider for OpenNebula, your will need to create an App Integration:
- Access your Okta admin console and navigate to Applications => Applications.
- Click on Create App Integration and select
SAML 2.0. - Write a name for your application and click Next.
- Use the following SAML settings:
- Single sign-on URL: Refers to the ACS URL. Must match the value of the :acs_url field in the OpenNebula SAML configuration file. E.g.:
https://your-fireedge-domain.com/fireedge/api/auth/acs - Audience URI: Refers to the :sp_entity_id defined in
/etc/one/auth/saml_auth.conf. - Group Attribute Statements: Add a group attribute statement with:
- Name: Must match the :group_field attribute defined in
/etc/one/auth/saml_auth.conffor the Identity Provider. Typical values arememberandmemberOf - Name format:
Unspecified - Filter: This option is used to filter the groups that are allowed to be reported to the Service Provider (OpenNebula). If all groups can be reported, select Matches regex and use the regular expression
.*
- Name: Must match the :group_field attribute defined in
- For additional settings not specified here, use the default value.
- Single sign-on URL: Refers to the ACS URL. Must match the value of the :acs_url field in the OpenNebula SAML configuration file. E.g.:
- Click Save.
You can proceed with the OpenNebula SAML auth driver configuration (/etc/one/auth/saml_auth.conf):
- :sp_entity_id - must match your Okta Audience URI.
- :acs_url - must match the URL configured in Okta as Single sign-on URL
- :issuer - can be obtained from the Okta web interface: Applications => Applications => Click on the newly created application => Sign On => Metadata details => More details => Issuer
- :idp_cert - can be obtained from the Okta web interface: Applications => Applications => Click on the newly created application => Sign On => Metadata details => More details => Signing Certificate
- :group_field - Must match the Name defined in the Group Attribute Statements section when creating the Okta application.
- :mapping_mode -
strict. Group nesting is not supported for Okta.
All other IdP-specific configuration settings for the driver should be set up the same way as for any other Identity Provider.
Microsoft Entra ID
Microsoft Entra ID SAML is compatible with OpenNebula SAML authentication but has some peculiarities:
- An enterprise application must be created in order to work. The application has a login URL that is the one that must be set up in FireEdge.
- Groups are equivalent to roles. The free tiers of Entra do not allow the creation of roles, but groups can be retrieved with the same claim
- Groups, roles and tenants are identified by a UUID (i.e.
94d6138b-d446-4236-9d37-934fead2033f) instead of a name
Creating the OpenNebula Entra ID application
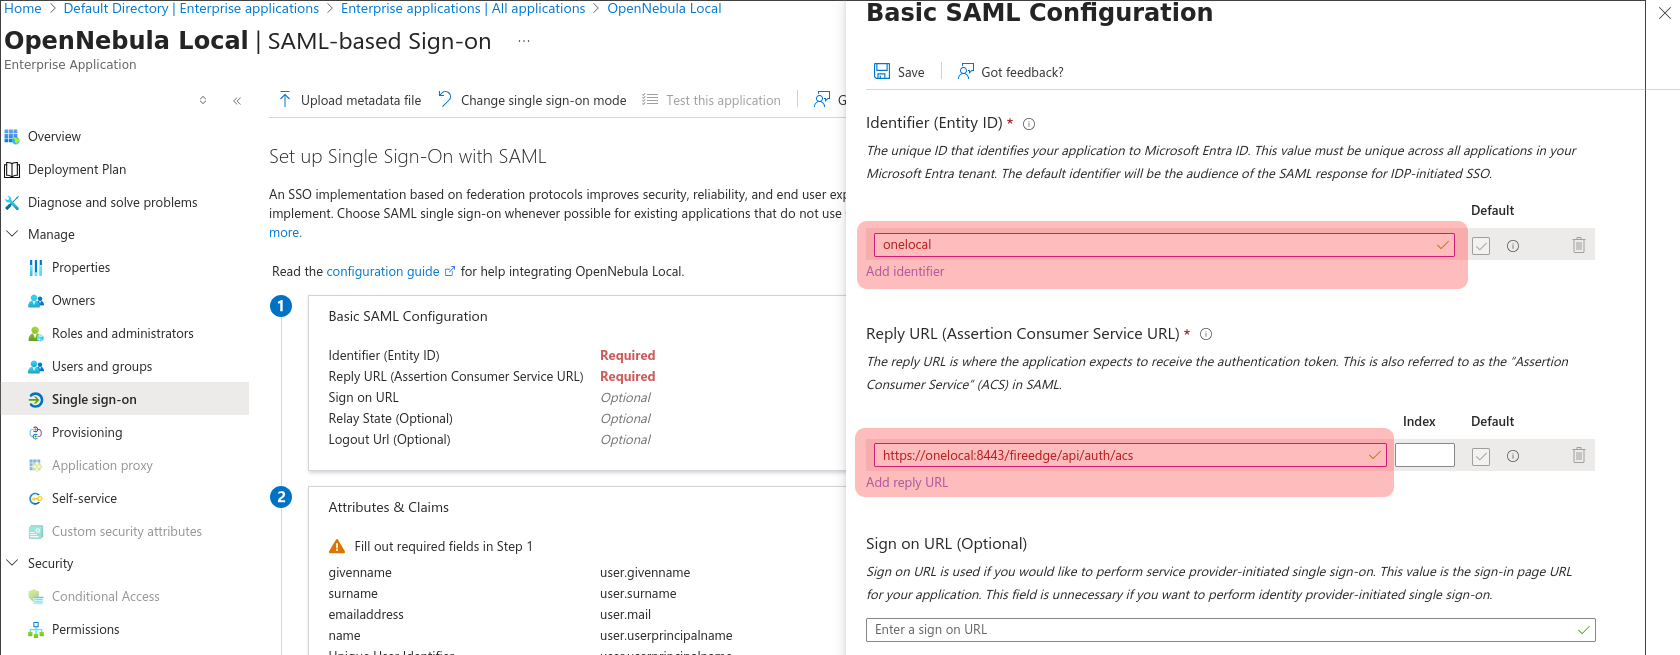
OpenNebula Service provider name :sp_entity_id and the Assertion consumer service URL :acs_url must be set up. The following base configuration will be used as example (these must be defined on the file /etc/one/auth/saml_auth.conf).
In this case, our FireEdge server is available on https://onelocal:8443/fireedge. Please, modify the URL accordingly to http(s)://<FIREEDGE_SERVER>:<FIREEDGE_PORT>/fireedge/api/auth/acs.
:sp_entity_id: 'onelocal'
:acs_url: 'https://onelocal:8443/fireedge/api/auth/acs'
On the Microsoft Cloud Entra interface
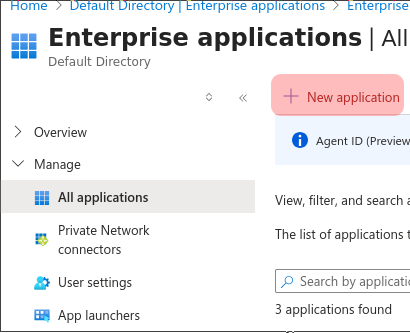
- Select Enterprise applications

New Application
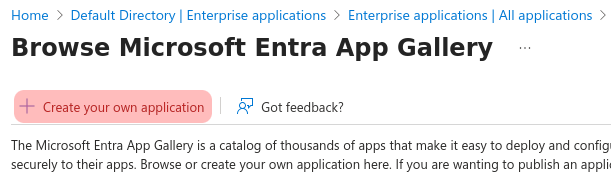
Create your own application
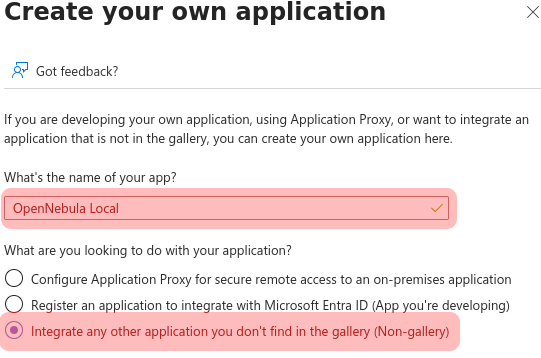
- A name for the application must be introduced. In this document, the name will be “OpenNebula local”
- The option “Integrate any other application you don’t find in the gallery (Non-gallery)” must be selected before pressing the button “Create”
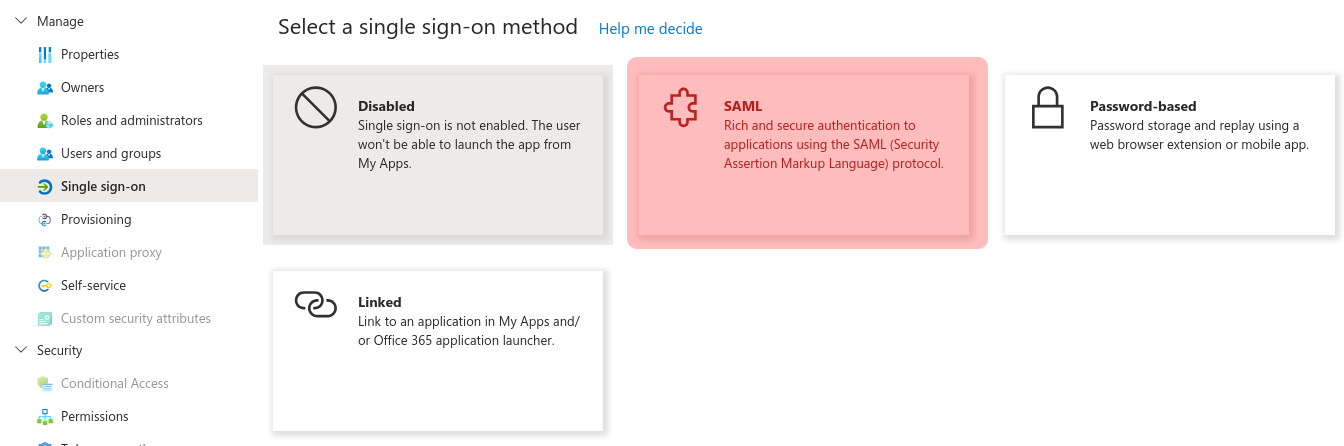
- On the option “Single sign-on” of the menu, the option SAML must be selected.
- The Basic SAML configuration section requires two fields
- Identifier (Entity ID) must match
:sp_entity_id - Reply URL (Assertion Consumer Service) must match
:acs_url
- Identifier (Entity ID) must match
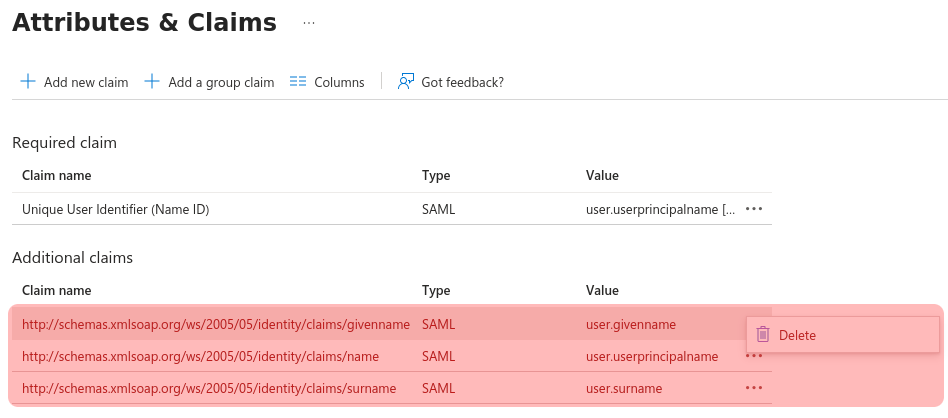
- The Attributes and claims section requires two claims (the other ones can be deleted because OpenNebula won’t use them)
- The Unique User Identifier (name ID) will be the field of the user name in OpenNebula. By default is the full email of the user, so using
user.mailnicknameis recommended. The changes must be saved and will be applied immediately.
- The Unique User Identifier (name ID) will be the field of the user name in OpenNebula. By default is the full email of the user, so using
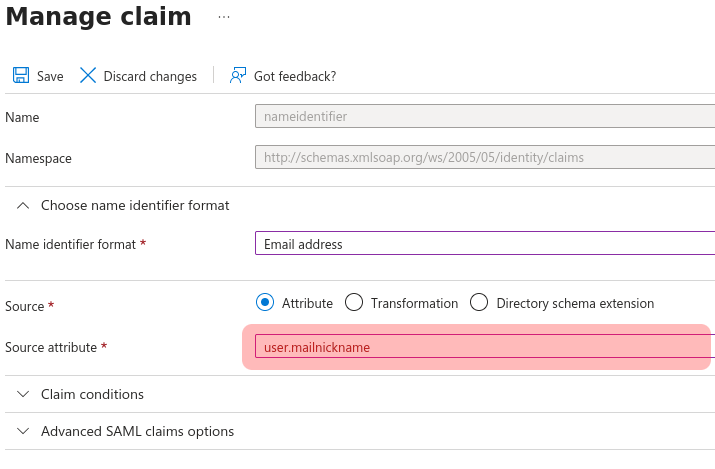
As commented previously, the default additional claims can be deleted (pressing the … close to the name).
To do OpenNebula group mapping, a group claim must be created, pressing “Add a group claim” and setting one of the group options, normally “Security groups”. The changes must be saved.
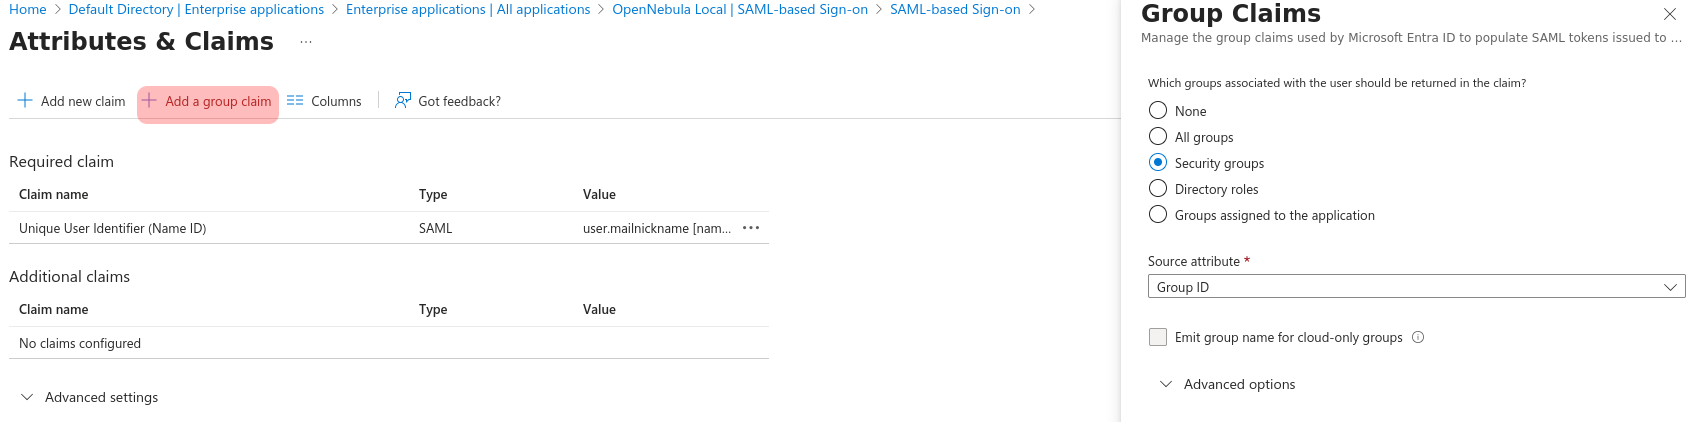
Groups/Roles in Entra ID
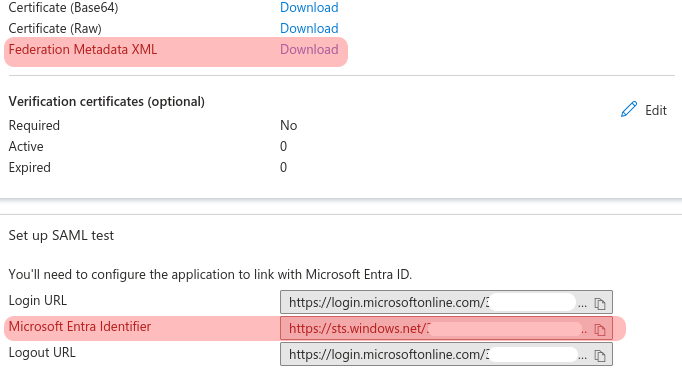
This claim will provide Entra ID groups and roles, because they are treated as if they were the same. Note that in some Azure tiers roles cannot be created but groups can.- On the SAML Certificates section, the Federation Metadata XML file must be downloaded to extract the idp certificate (the parameter
:idp_certof the OpenNebula configuration file). The certificate is the value of the field/EntityDescriptor/Signature/ds:KeyInfo/ds:X509Data/ds:X509Certificateof the XML file. Supposing that the file was downloaded toDownloads/OpenNebula Local.xml, it can be done easily using the commandxpathas shown in the following commandline
 cat "Downloads/OpenNebula local.xml" | \
 xpath -e '/EntityDescriptor/Signature/ds:KeyInfo/ds:X509Data/ds:X509Certificate/text()' 2>/dev/null
- On the Set up OpenNebula local (or the name of the app that was chosen), the field Microsoft Entra Identifier will be needed for further configuration as the
:issuerfield for OpenNebula Entra identity provider
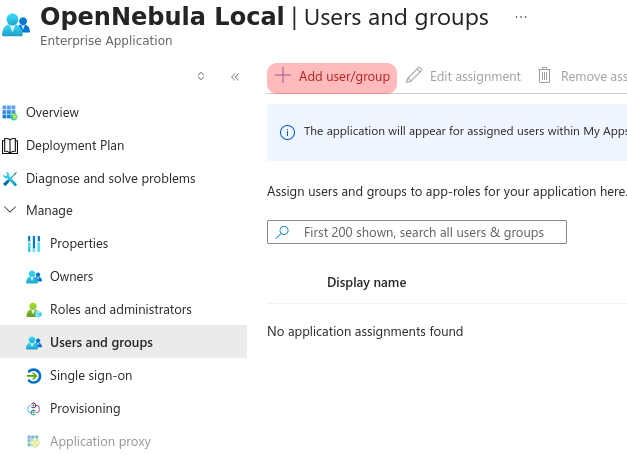
After the application has been created users/roles must be added to have permissions. As commented previously, on some Entra ID plans roles cannot be assigned, so users must be added one by one (selectint the link “None selected”, choosing the desired users and pressing “Select” and then “Assign”).
A Entra ID required and admin group should be configured in OpenNebula. The group UUIDs are the field Object Id shown on the All groups list.
After these steps, the configuration file /etc/one/auth/saml_auth.conf will look like follows.
:sp_entity_id: 'onelocal'
:acs_url: 'https://onelocal:8443/fireedge/api/auth/acs'

:identity_providers:
  :entra:
    :issuer: 'https://sts.windows.net/<TENANT_UUID>/'  # URL for the Microsoft Entra Identifier
    :idp_cert: 'MIIC...'                               # Certificate extracted from the Federation metadata XML
    :user_field: 'NameID'
    :group_field: 'http://schemas.microsoft.com/ws/2008/06/identity/claims/groups'
    :group_required: '<ACCESS_GROUP_UUID>'             # Group UUID for the users that can log in OpenNebula
    :group_admin_name: '<ADMIN_GROUP_UUID>'            # Users on this group will also be group admins on their groups
    :mapping_generate: true                            # Generate mappings between Entra groups and OpenNebula groups
    :mapping_key: 'SAML_GROUP'                         # Parameter on OpenNebula groups that will be matched on Entra groups
    :mapping_default: 1                                # Default group for all entra users
    :mapping_mode: 'strict'
    :mapping_timeout: 300
    :mapping_filename: 'entra_groups.yaml'
On the other hand, FireEdge configuration must be modified as well redirecting to the “User access URL” field value on the properties page of the application.
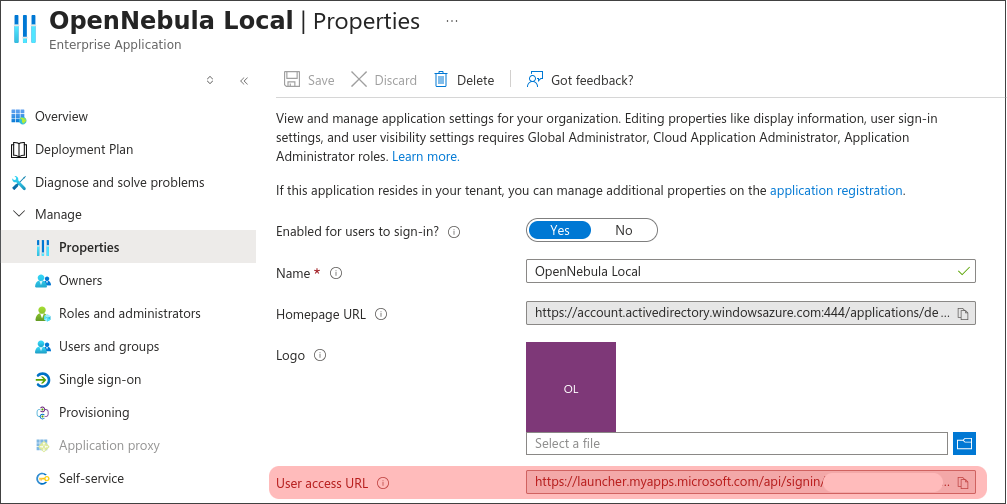
That is set modifying the value of the following two parametes on the file /etc/one/fireedge-server.conf
auth: 'saml'
auth_redirect: 'https://launcher.myapps.microsoft.com/api/signin/................'
We value your feedback
Was this information helpful?
Glad to hear it
Sorry to hear that