Deploy OpenNebula on-prem with an ISO
Introduction
OpenNebula provides an ISO image for rapid deployment of an OpenNebula Front-end or processing node. The ISO installs a pre-configured deployment of OpenNebula Enterprise Edition running on a minimal installation of AlmaLinux 9. The ISO image can be flashed to bootable, removable media (such as a USB disk) for local installation or mapped via IPMI Virtual Media for remote hardware management.
Once the ISO has booted and finished setup, a pre-configured OpenNebula cloud will be ready for immediate use, installed on a single bare-metal server, complete with the OpenNebula Front-end server and a KVM hypervisor node. The same ISO can be used to install other KVM hypervisor nodes on the same infrastructure. The installed software includes a menu and a set of ansible playbooks to make the OpenNebula infrastructure management simpler.

Requirements
The OpenNebula ISO is based on AlmaLinux 9, thus it shares the same requirements to run. Note that only the x86-64-v2 instruction set (2008) is supported. The following table outlines the minimum requirements for installing the ISO.
| Component | Required |
|---|---|
| CPU | - Recent CPU (after 2016) - Virtualization enabled at BIOS level |
| Memory | - Over 32 GB for frontend and nodes |
| Disk | - 512 GB NvME |
| Network | - At least one NIC for management* - Recommended 2 NICs (management and service) |
*Not needed for installation
ISO Download and Installation
Download the OpenNebula ISO (based on Alma Linux). Currently, the following versions are available:
Once the image is downloaded, there are two installation options:
- Using a remote hardware managment platform such as IPMI, ILO, iDRAC or RSA to mount the ISO and install on a remote server.
- With physical access to a server with USB ports, the ISO can be installed from a bootable USB flashed with the ISO image.
From Linux or MacOS, the image can be dumped on the USB with the following command
dd if=/path/to/your/opennebula-7.0.1-CE.iso of=/dev/sdXX
/dev/sdXX is the drive for the USB drive. It’s recommended to check it twice to avoid catastrophic data loss.On Windows, use Rufus to create the USB drive.
With the media inserted (or virtually mounted) on the server, after rebooting it, set the right boot device in the BIOS. Some BIOS may be able to boot the media as MBR and UEFI. We recommend to boot is as UEFI for compatibility reasons.
The bootloader will show the following screen
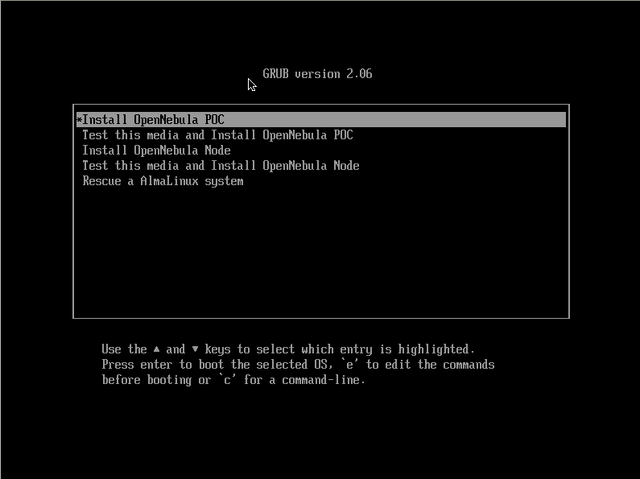 | 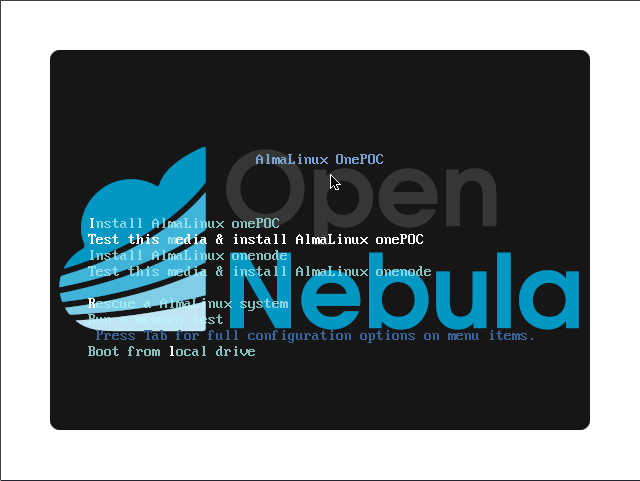 |
|---|---|
| UEFI boot screen | MBR boot screen |
The recommended options are the following:
Install OpenNebula POCwill install a full OpenNebula Front-end and the necessary software to make it an OpenNebula KVM hypervisor node.Install OpenNebula Nodewill install only the KVM hypervisor packages to create a compute node or host that can be managed by the OpenNebula Front-end.
Test this media and Install ... options are only recommended for installation from fast local media (like a USB pendrive). These options will be slow when installing to remote infrastructure..The installation interface will be in text mode and will only ask for confirmation before deleting all the data on the first disk that it finds on a screen that looks like the following:
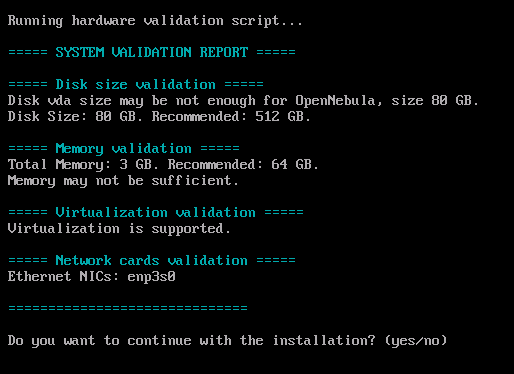
After that, a little menu showing all the available, non-removable disks, will be shown in the format disk|sizeGB. After choosing the disk, a confirmation menu with the options yes and no will be shown.

Answer yes to continue. You may be prompted to choose the disk to which you want to install. After choosing the disk and confirming, the installation will commence. The installation will take several minutes:

Frontend Configuration
Once the installation is completed, the machine should reboot. No network card will be configured, so access to the server’s console must be provided to login. It will look like the following (the colours and the font may vary on different systems):
Welcome to OpenNebula Proof of Concept (onepoc) !

- Please, log in as user `root`
- For a basic configuration of the server, please execute `onefemenu`
- After the network is configured, the sunstone interface will be running in

  http://this_server:2616

- Please, check the manual page onepoc-quickstart with a

  $ man onepoc-quickstart 7

Thank you!
Enter user root at the onepoc login prompt and the default password 0p3nN3bul4. Run onefemenu on the command line to configure the installation. The Front-end menu will look like the following one (the colours and the font may vary). The options can be navigated with the cursor keys and the options can be selected with Enter:
            ┌──────────────────────OpenNebula node Setup─────────────────────────┐
            │ Setup menu                                                         │
            │ ┌────────────────────────────────────────────────────────────────┐ │
            │ │          check_host          Check host requirements           │ │
            │ │          netconf             Configure network                 │ │
            │ │          enable_fw           Enable firewalld                  │ │
            │ │          disable_fw          Disable firewalld                 │ │
            │ │          add_host            Add OpenNebula Host               │ │
            │ │          proxy               Configure proxy settings          │ │
            │ │          tmate               Remote console support            │ │
            │ │          show_oneadmin_pass  Show oneadmin password            │ │
            │ │          quit                Exit to Shell                     │ │
            │ │                                                                │ │
            │ │                                                                │ │
            │ │                                                                │ │
            │ │                                                                │ │
            │ └────────────────────────────────────────────────────────────────┘ │
            ├────────────────────────────────────────────────────────────────────┤
            │                   <  OK  >          <Cancel>                       │
            └────────────────────────────────────────────────────────────────────┘
Network and Hostname Setup
Now is time to configure the network using the option netconf on the menu. This will launch nmtui (the default ncurses configuration interface), that allows the setup of the network and hostname, as well as more complex network configuration (bonding, VLAN, etc.)
Before commencing with the network configuration, you need to determine the network address of the server on which you have installed the OpenNebula PoC ISO. In the example used for this tutorial, the network details are as follows:
- Static IP: 172.20.0.7/24
- Default gateway: 172.20.0.1
- DNS: 172.20.0.1
The following menu will appear upon selecting netconf:
           ┌─┤ NetworkManager TUI ├──┐
           │                         │
           │ Please select an option │
           │                         │
           │ Edit a connection       │
           │ Activate a connection   │
           │ Set system hostname     │
           │ Radio                   │
           │                         │
           │ Quit                    │
           │                         │
           │                    <OK> │
           │                         │
           └─────────────────────────┘
To configure the network, select Edit a connection. The following menu will appear showing all the available network interfaces. In this case the image only shows one named enp3s0, but there may be multiple. Select the one that will be used for OpenNebula management.
          ┌───────────────────────────┐
          │                           │
          │ ┌─────────────┐           │
          │ │ Ethernet  ↑ │ <Add>     │
          │ │   enp3s0  ▒ │           │
          │ │ Loopback  ▒ │ <Edit...> │
          │ │   lo      ▒ │           │
          │ │           ▒ │ <Delete>  │
          │ │           ▒ │           │
          │ │           ▮ │           │
          │ │           ▒ │           │
          │ │           ▒ │           │
          │ │           ▒ │           │
          │ │           ▒ │           │
          │ │           ↓ │ <Back>    │
          │ └─────────────┘           │
          │                           │
          └───────────────────────────┘
nmtui.Select the interface that must be configured for OpenNebula management access and press Enter. In the next screen navigate with the arrow keys to the <Automatic> option next to IPv4 CONFIGURATION press Enter and change the option to <Manual>.
           │                     ┌────────────┐                                      │
           │ ═ ETHERNET          │ Disabled   │                            <Show>    │
           │ ═ 802.1X SECURITY   │ Automatic  │                            <Show>    │
           │                     │ Link-Local │                                      │
           │ ╤ IPv4 CONFIGURATION│ Manual     │                            <Hide>    │
           │ │          Addresses│ Shared     │ ___________ <Remove>                 │
           │ │                   └────────────┘                                      │
Next press the right arrow key to select the field Show in the IPv4 CONFIGURATION at the right, press Enter.
Enter the network address, default gateway and DNS servers, check Require IPv4 addressing for this connection and Automatically connect underneath IPv6 CONFIGURATION. You may need to use the spacebar to select the option on some setups.
           ┌───────────────────────────┤ Edit Connection ├───────────────────────────┐
           │                                                                         │
           │         Profile name enp3s0__________________________________           │
           │               Device enp3s0 (XX:XX:XX:XX:XX:XX)______________           │
           │                                                                         │
           │ ═ ETHERNET                                                    <Show>    │
           │ ═ 802.1X SECURITY                                             <Show>    │
           │                                                                         │
           │ ╤ IPv4 CONFIGURATION <Manual>                                 <Hide>    │
           │ │          Addresses 172.20.0.7/24____________ <Remove>                 │
           │ │                    <Add...>                                           │
           │ │            Gateway 172.20.0.1_______________                          │
           │ │        DNS servers 172.20.0.1_______________ <Remove>                 │
           │ │                    <Add...>                                           │
           │ │     Search domains <Add...>                                           │
           │ │                                                                       │
           │ │            Routing (No custom routes) <Edit...>                       │
           │ │ [ ] Never use this network for default route                          │
           │ │ [ ] Ignore automatically obtained routes                              │
           │ │ [ ] Ignore automatically obtained DNS parameters                      │
           │ │                                                                       │
           │ │ [X] Require IPv4 addressing for this connection                       │
           │ └                                                                       │
           │                                                                         │
           │ ═ IPv6 CONFIGURATION <Automatic>                              <Show>    │
           │                                                                         │
           │ [X] Automatically connect                                               │
           │ [X] Available to all users                                              │
           │                                                                         │
           │                                                           <Cancel> <OK> │
           │                                                                         │
           └─────────────────────────────────────────────────────────────────────────┘
Navigate to <OK> at the lower right and then navigate to <Back> in the lower right of the next screen.
Optional: Select the option Set system hostname of the following menu if you need to change from the default hostname onepoc.
                       ┌─┤ NetworkManager TUI ├──┐
                       │                         │
                       │ Please select an option │
          ┌─────────────────┤ Set Hostname ├──────────────────┐
          │                                                   │
          │ Hostname ________________________________________ │
          │                                                   │
          │                                     <Cancel> <OK> │
          │                                                   │
          └───────────────────────────────────────────────────┘
                       │                    <OK> │
                       │                         │
                       └─────────────────────────┘
After modifying of the configuration, choose Quit on the menu. An ansible playbook will configure the needed services, it may take some minutes until finished.
....

PLAY RECAP *********************************************************************
172.20.0.7                 : ok=44   changed=2    unreachable=0    failed=0    skipped=10   rescued=0    ignored=0
frontend                   : ok=42   changed=8    unreachable=0    failed=0    skipped=28   rescued=0    ignored=0

Press any key to continue
Press any key and you will be returned to the onefemenu screen. If you are logged out, log in again as root and run onefemenu from the command line.
Configuring the Hypervisor Host
After the installation, the server runs only the Front-end and needs to be added as a OpenNebula hypervisor to run VMs. Select add_host from the onefemenu options.
localhost nor a loopback addres `127.x.x.x'.After selecting add_host, the IP for the host will be requested. In this case we are using the IP that was configured before, 172.20.0.7. In the User (with root permissions) field, enter root. The Host IP and User (with root permissions) fields may be displayed in sequential dialogs in some cases.
         ┌─────────────────────────────────────────────────────────────────┐
         │ Insert the IP for the node                                      │
         │                               ┌───────────────────────────────┐ │
         │ Host IP:                      │172.20.0.7                     │ │
         │                               └───────────────────────────────┘ │
         │                               ┌───────────────────────────────┐ │
         │ User (with root permissions): │root                           │ │
         │                               └───────────────────────────────┘ │
         ├─────────────────────────────────────────────────────────────────┤
         │                  <  OK  >        < Cancel >                     │
         └─────────────────────────────────────────────────────────────────┘
You may need to use Tab to escape the input boxes and select < OK > to move forward.
A confirmation dialog like the following will be shown, confirm with < Yes >:
        ┌──────────────────────────────────────────────────────────────────────────────┐
        │ Add node  172.20.0.7 logging as user root (with nopasswd root permissions)?  │
        │ Password will be asked. If not provided, an ssh connection using the ssh key │
        │ of onepoc user will be used                                                  │
        │                                                                              │
        │                                                                              │
        ├──────────────────────────────────────────────────────────────────────────────┤
        │                         < Yes >             < No  >                          │
        └──────────────────────────────────────────────────────────────────────────────┘
After that, an ansible playbook will run in order to execute all the needed operations on the frontend. This may take several minutes, once the output reaches Press any key to continue, do so to move forward.
...
PLAY RECAP *********************************************************************
...
...
172.20.0.7    : ok=52   changed=27   unreachable=0    failed=0    skipped=2    rescued=0    ignored=0
frontend      : ok=43   changed=11   unreachable=0    failed=0    skipped=27   rescued=0    ignored=0

Press any key to continue
After pressing any key you should be returned to the onefemenu options.
Sunstone User Interface
The Sunstone UI should now be accessible by visiting http://<frontend_ip>:2616 through a browser on a machine on the same network.
To obtain the oneadmin password run onefemenu on the command line of your Front-end server and select option show_oneadmin_pass
oneadmin default password is 32 hex chars long (128 bits of entropy). It is recommended to create a separate user to work with OpenNebula and to use oneadmin user for administrative task only.Networking
This ISO deployment does not automatically configure Virtual Networks. Instead Free Range Routing (FRR) is configured, allowing BGP-EVPN to automate creation of VXLANs that provide secure isolation between Virtual Machines. VXLAN is a technology that facilitates isolation between Virtual Machines using ’tags’ that allow for over 16 million unique, isolated Virtual Networks.
To set up a Virtual Network using VXLAN, in the Sunstone UI go to Networks -> Virtual Networks and select + Create. Name the network and click Next. Select VXLAN in the following page. Choose a number below the maximum 16777215 for the VLAN ID (e.g. 100) and select evpn for the VXLAN mode. The Physical device field should be set to the name of the network interface of the OpenNebula Front-end server that was selected earlier during the ISO installation. Run nmcli device status on the command line of your Front-end if you need to recall the name.
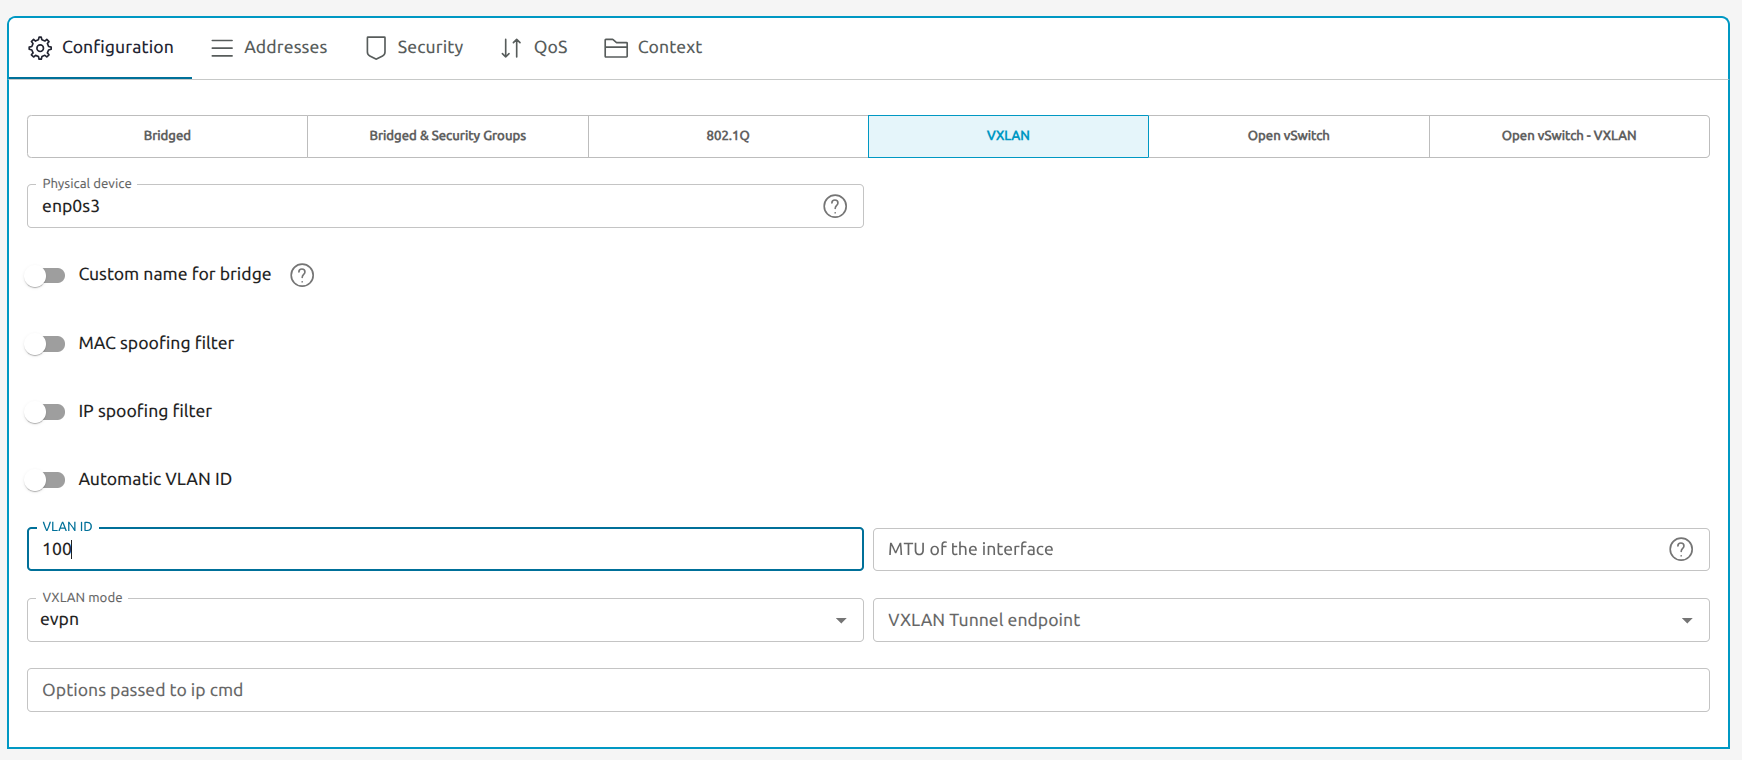
evpn in all cases.Select the Addresses tab and create a new address range with + Address Range. Select a starting address from a private range (such as 172.16.10.1 or 10.0.0.1) that is distinct from your host’s current IP network to avoid confusion. In this case we chose an IPv4 address range starting from 172.16.100.8 with 100 consecutive IPs (172.16.100.0-7 should be reserved for the network base address, the gateway and other infrastructure).
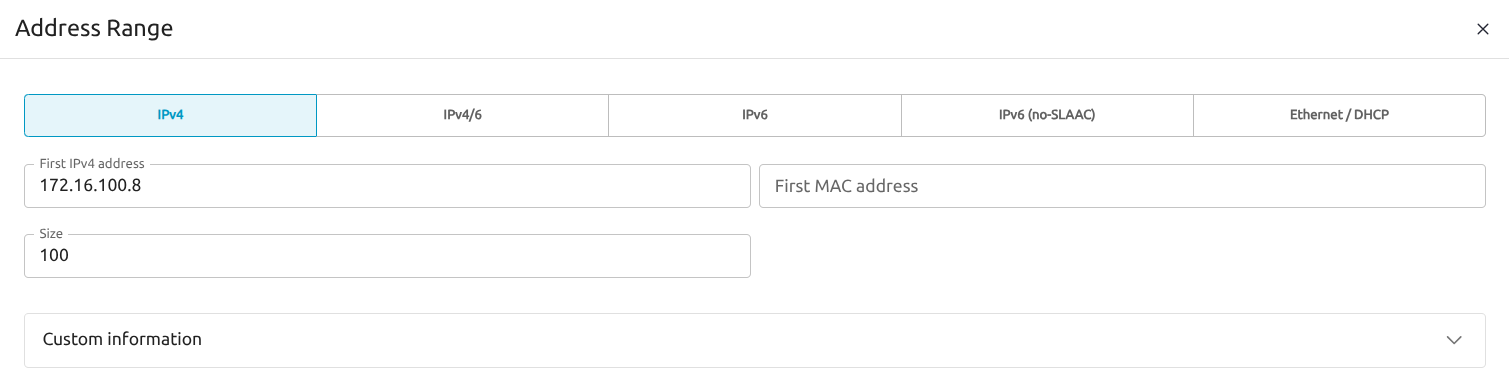
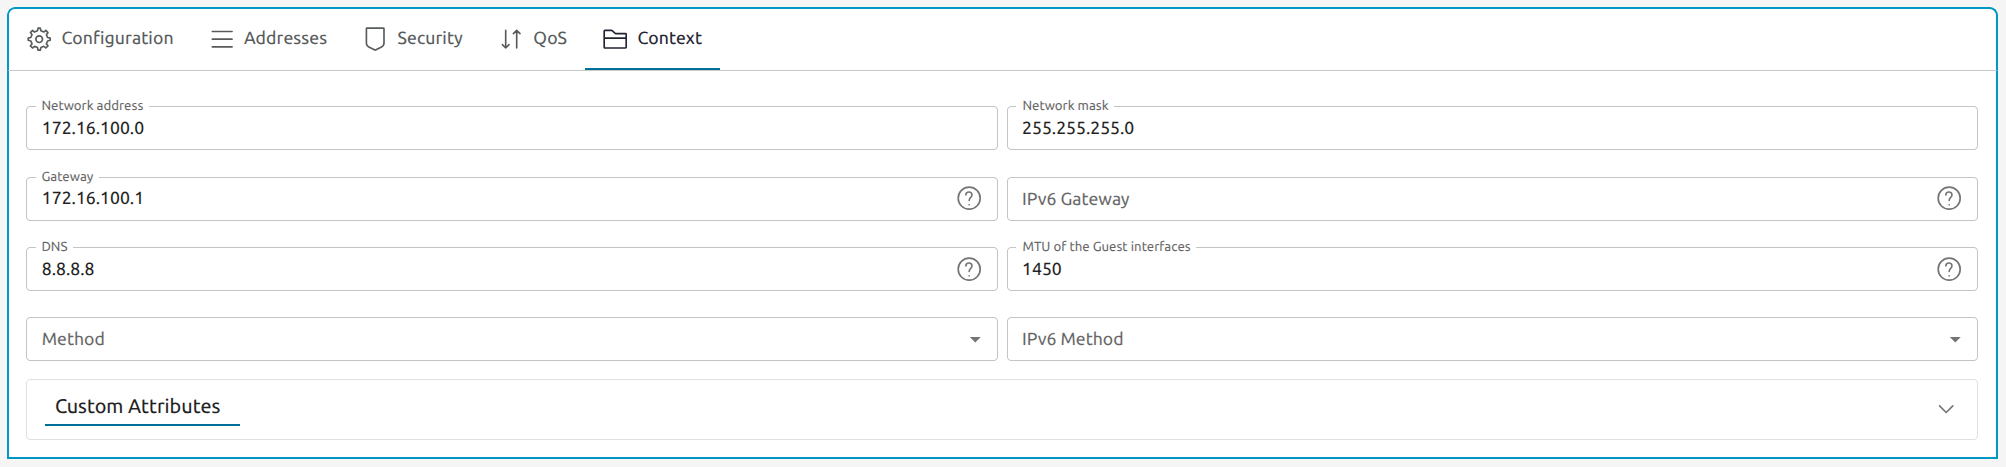
Select the Context tab and enter values similar to the following, based on the First IPv4 address you chose in the previous step:
| Parameter | Value |
|---|---|
| First IPv4 address | 172.16.100.8 |
| Network address | 172.16.100.0 |
| Network mask | 255.255.255.0 |
| Gateway | 172.16.100.1 |
| DNS | 8.8.8.8 (Google) |
| MTU of the Guest interfaces | 1450 |
Virtual Network Considerations
VXLAN networks are totally internal and have no access to external networks. By default they can be considered totally isolated. External access to/from these networks must be configured.
Determining the VM Identifier
To determine the Virtual Network that needs external access use onevnet list. This command will list the existent Virtual Networks, for instance:
onevnet list
ID USER     GROUP    NAME          CLUSTERS   BRIDGE    STATE    LEASES OUTD ERRO
 0 oneadmin oneadmin test_vnet     0          XXXXX     rdy           0    0    0
The ID and the NAME field of every row can be used for all operations on Virtual Networks.
Creating the Virtual Network Gateway (access from the frontend)
In this case, to create the default gateway on this virtual net, the command onevnet_add_gw followed by the ID of the Virtual Network should be executed. For example the following command will create the gateway for the network 0
onevnet_add_gw 0
To delete the gateway and make the network unreachable, reverting the behaviour, onevnet_del_gw <NETWORK_ID> should be executed in the same way
onevnet_add_gw <NETWORK_ID> must be issued again.Setting up NAT (access to the same networks as the frontend)
Virtual machines on this Virtual Network won’t be able to access to the same networks as the frontend because there is no NAT. A simple NAT can be created executing the command enable_masquerade
enable_masquerade command will allow ALL the Virtual Networks having a gateway. To disable this behaviour, execute disable_masquerade. After a reboot of the frontend, the NAT configuration will be deleted and must be applied again using enable_masquerade.Add Local Route (access from external networks to the Virtual Network)
After the gateway has been created and NAT masquerade has been enabled, the VMs in the Virtual Network 172.16.100.0/24:
- can communicate (bidirectionally) with the frontend
- can access to the same networks that the frontend (i.e. internet)
Currently, any machine (even if it has access to the frontend) cannot reach ths Virtual Network because doesn’t know how to arrive to it. For that, a route via the frontend external IP is needed. A route can be added locally.
On a workstation with access to the frontend, a local route to the virtual net can be created with the following commands depending on the operating system
- Linux:
sudo ip route add 172.16.100.0/24 via <frontend_ip> - Windows:
route add 172.16.100.0 MASK 255.255.255.0 <frontend_ip> - BSD:
route add -net 172.16.100.0/24 <frontend_ip>
After the route exists, the workstation should be able to reach the virtual machines running on the Front-end without further configuration.
Resizing Disks
The ISO installation creates the volume group vg_onepoc with three logical volumes:
root: mounted on/one-datastores: mounted on/var/lib/one/datastores/swap: mounted as swap
The volume group vg_onepoc leaves space on the disk to allow for filesystem growth. Available space in a volume group can be checked by executing the command vgs and inspecting the value in the VFree column. In the following example, there is 22.19GiB available:
vgs
VG        #PV #LV #SN Attr   VSize   VFree
vg_onepoc   1   3   0 wz--n- <77.44g <22.19g
You can query the logical volume sizes using the lvs command, in this case:
lvs
LV             VG        Attr       LSize   Pool Origin Data%  Meta%  Move Log Cpy%Sync Convert
one-datastores vg_onepoc -wi-ao---- <25.69g
root           vg_onepoc -wi-ao---- <25.69g
swap           vg_onepoc -wi-ao----  <3.88g
A filesystem can be extended online while maintaining availability using the commands lvextend and xfs_growfs. For example, to increase the /root filesystem by 10GiB use the following commands:
# Increase the Logical Volume root (on the volume group vg_onepoc) by 10 GiB
lvextend vg_onepoc/root -L +10G
Size of logical volume vg_onepoc/root changed from <25.69 GiB (411 extents) to <35.69 GiB (571 extents).
Logical volume vg_onepoc/root successfully resized.
Resize the filesystem to the new volume group size:
xfs_growfs /dev/mapper/vg_onepoc-root
meta-data=/dev/mapper/vg_onepoc-root isize=512    agcount=4, agsize=1683456 blks
         =                       sectsz=512   attr=2, projid32bit=1
         =                       crc=1        finobt=1, sparse=1, rmapbt=0
         =                       reflink=1    bigtime=1 inobtcount=1 nrext64=0
data     =                       bsize=4096   blocks=6733824, imaxpct=25
         =                       sunit=0      swidth=0 blks
naming   =version 2              bsize=4096   ascii-ci=0, ftype=1
log      =internal log           bsize=4096   blocks=16384, version=2
         =                       sectsz=512   sunit=0 blks, lazy-count=1
realtime =none                   extsz=4096   blocks=0, rtextents=0
data blocks changed from 6733824 to 9355264
The filesystem / now will be 10GiB bigger with no loss of service.
GPU Configuration
If the OpenNebula evaluation involves GPU management, GPU should be configured in pass-through mode. For the detailed process check this guide from the official documentation. Overall, a GPU configuration in OpenNebula consists from 2 main stages:
- Host preparation and driver configuration
- OpenNebula settings for PCI pass-through devices
Host Configuration
To prepare the OpenNebula host complete the following steps:
- Check that IOMMU was enabled on the host using the following command:
dmesg | grep -i iommu
If IOMMU wasn’t enabled on the host, follow the process specified in the official documentation to enable IOMMU - https://docs.opennebula.io/7.0/product/cluster_configuration/hosts_and_clusters/nvidia_gpu_passthrough/. At the next step GPU has to be bound to the vfio driver. For this, perform the following steps:
Ensure
vfio-pcimodule is loaded on boot:echo "vfio-pci" | sudo tee /etc/modules-load.d/vfio-pci.conf modprobe vfio-pciIdentify the GPU’s PCI address:
lspci -D | grep -i nvidia
0000:e1:00.0 3D controller: NVIDIA Corporation GH100 [H100 PCIe] (rev a1)
Set the driver override. Use a driverctl utility and the PCI address of the GPU device from the previous step to override driver.
driverctl set-override 0000:e1:00.0 vfio-pciVerify the driver binding: Check that the GPU is now using the
vfio-pcidriver.lspci -Dnns e1:00.0 -kKernel driver in use: vfio-pci
VFIO Device Ownership
For OpenNebula to manage the GPU, the VFIO device files in /dev/vfio/ must be owned by the root:kvm user and group. This is achieved by creating a udev rule.
Identify the IOMMU group for your GPU using its PCI address:
# find /sys/kernel/iommu_groups/ -type l | grep e1:00.0
/sys/kernel/iommu_groups/85/devices/0000:e1:00.0
In this example, the IOMMU group is
85.Create a
udevrule: Create the file/etc/udev/rules.d/99-vfio.ruleswith the following content:SUBSYSTEM=="vfio", GROUP="kvm", MODE="0666"Reload
udevrules:# udevadm control --reload # udevadm triggerVerify ownership: Check the ownership of the device file corresponding to your GPU’s IOMMU group.
# ls -la /dev/vfio/
crw-rw-rw- 1 root kvm 509, 0 Oct 16 10:00 85
OpenNebula Configuration
Configure the PCI probe on the front-end node to monitor NVIDIA devices in order to make the GPUs available in OpenNebula
Edit the PCI probe configuration file at
/var/lib/one/remotes/etc/im/kvm-probes.d/pci.conf.Add a filter for NVIDIA devices:
:filter: '10de:*'Synchronize the hosts from the Front-end to apply the new configuration:
# su - oneadmin
$ onehost sync -f
After a few moments, you can check if the GPU is being monitored correctly by showing the host information (onehost show <HOST_ID>). The GPU should appear in the PCI DEVICES section.
VM with GPU Instantiation
To instantiate VM with a GPU login into the OpenNebula GUI and navigate to the VMs tab. Click “Create”. Then select one of the VM templates On the next screen enter the VM name and click “Next”.

On the next screen select required Storage and Network options. In the “PCI Devices” section click “Attach PCI device”
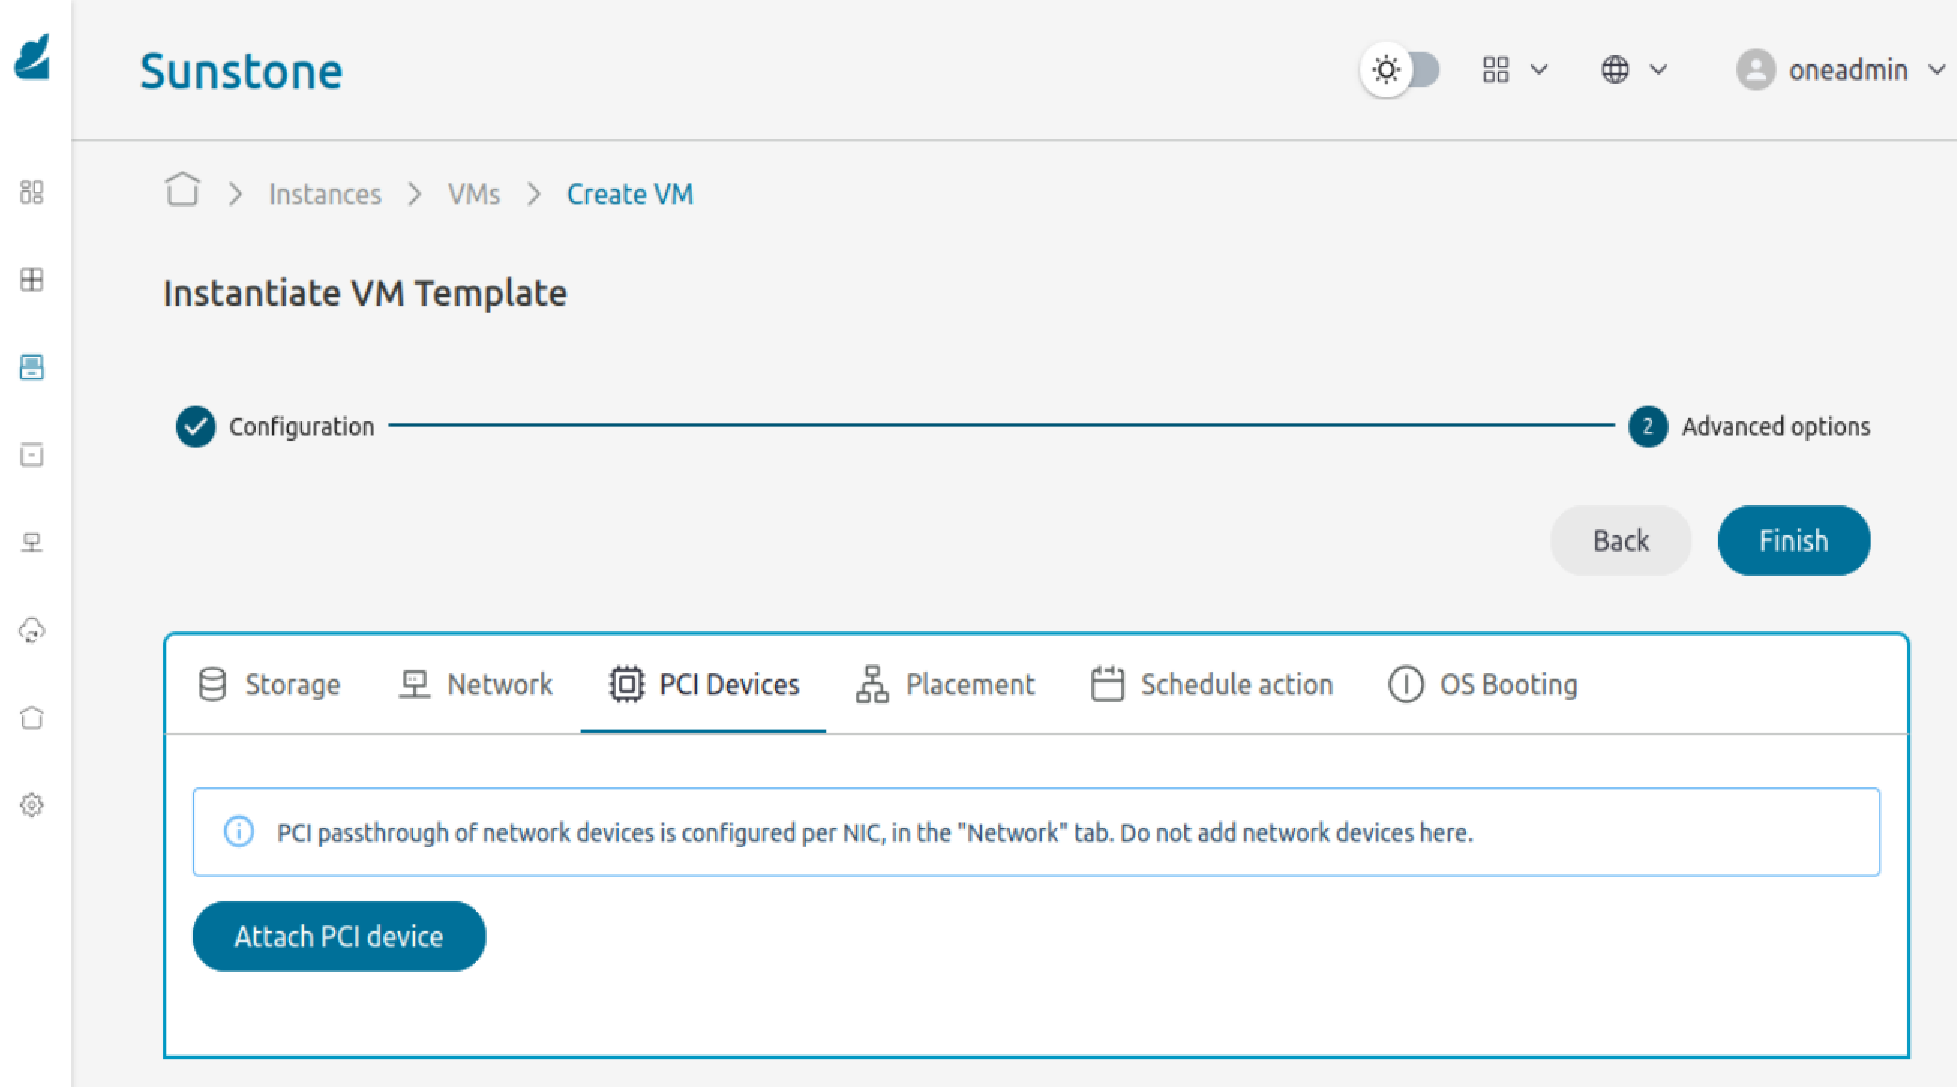
In the dropdown menu select available GPU device which will be attached to the VM. Then click “Accept” button and finalize VM configuration.
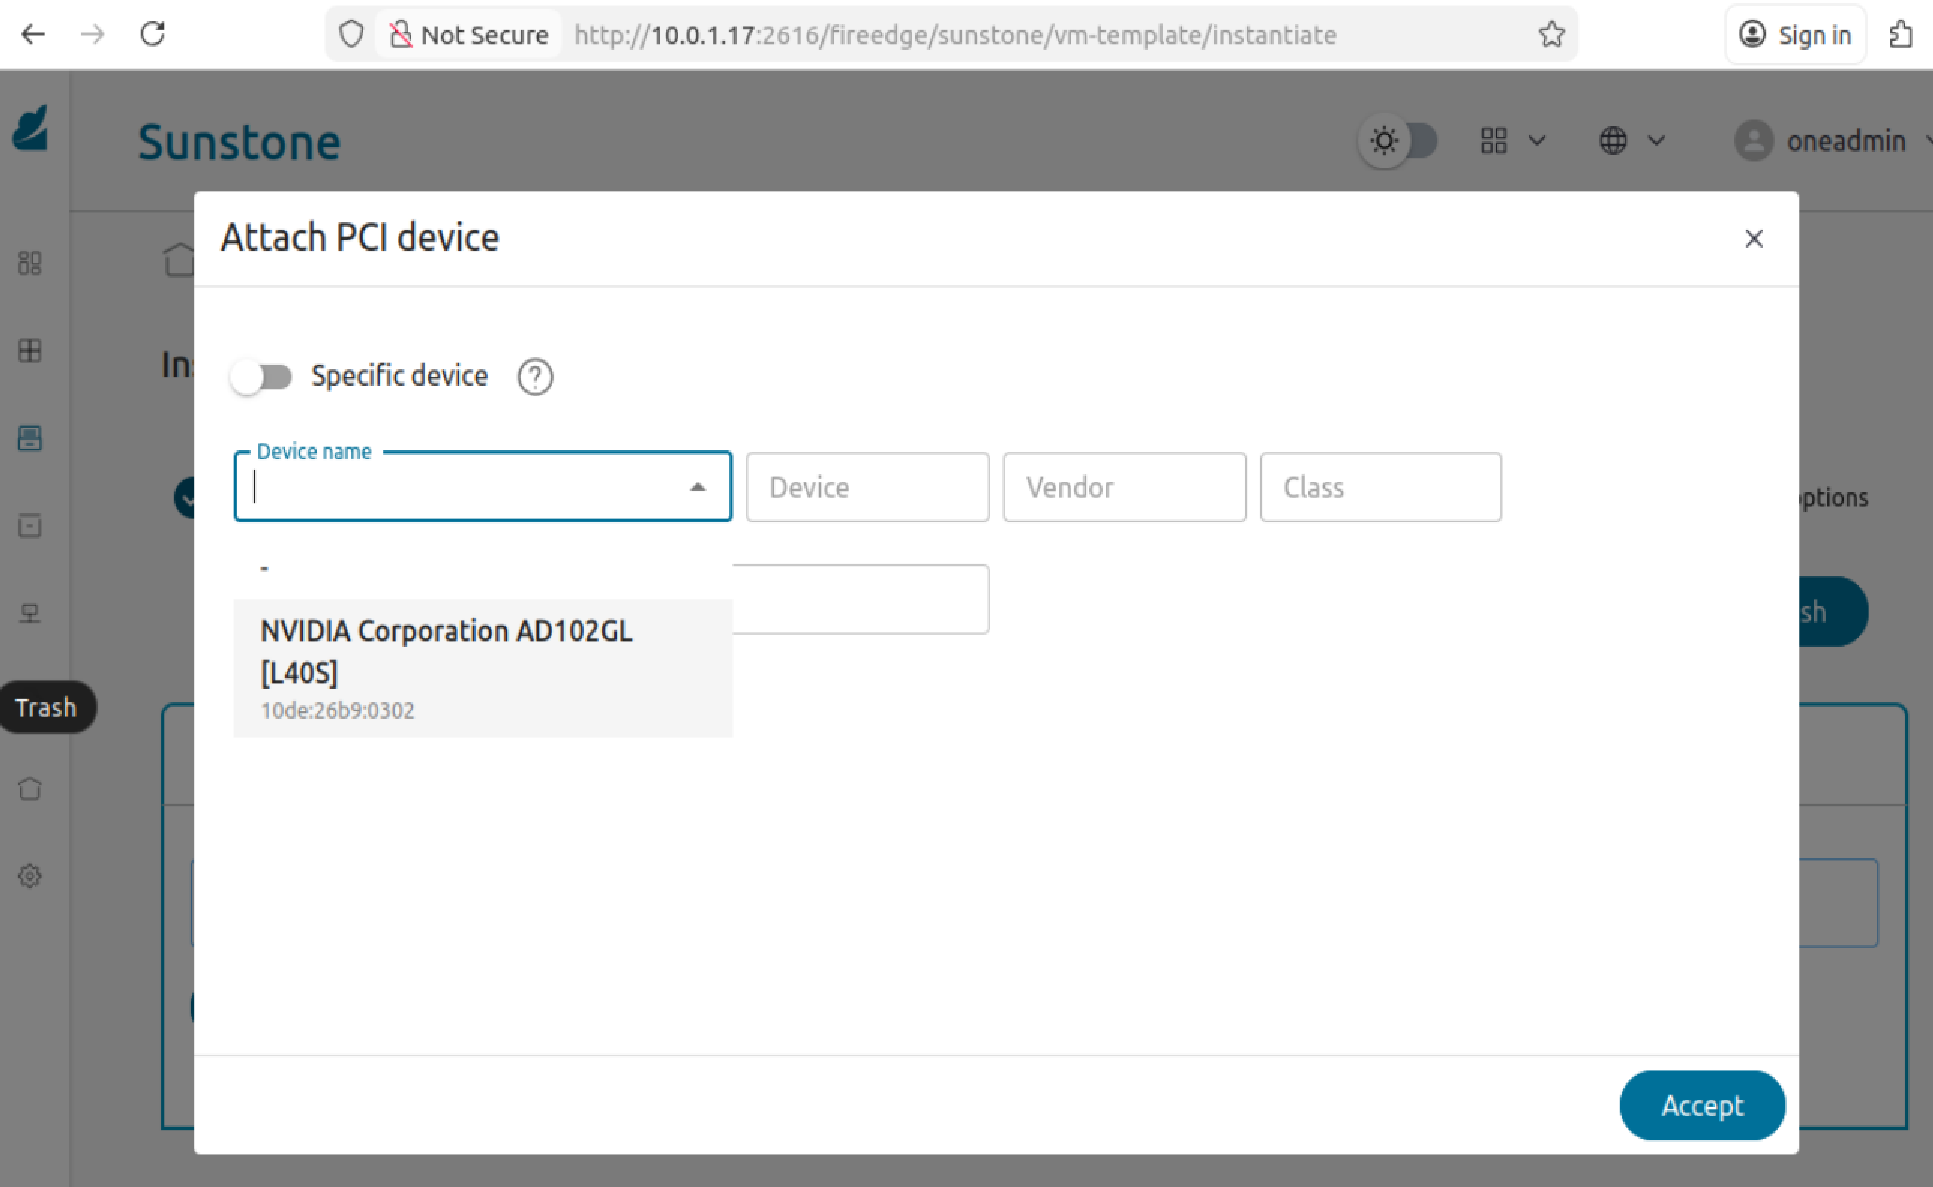
Click the “Finish” button to start VM instantiation. After a while, the VM will be instantiated and may be used.
vLLM Appliance Validation
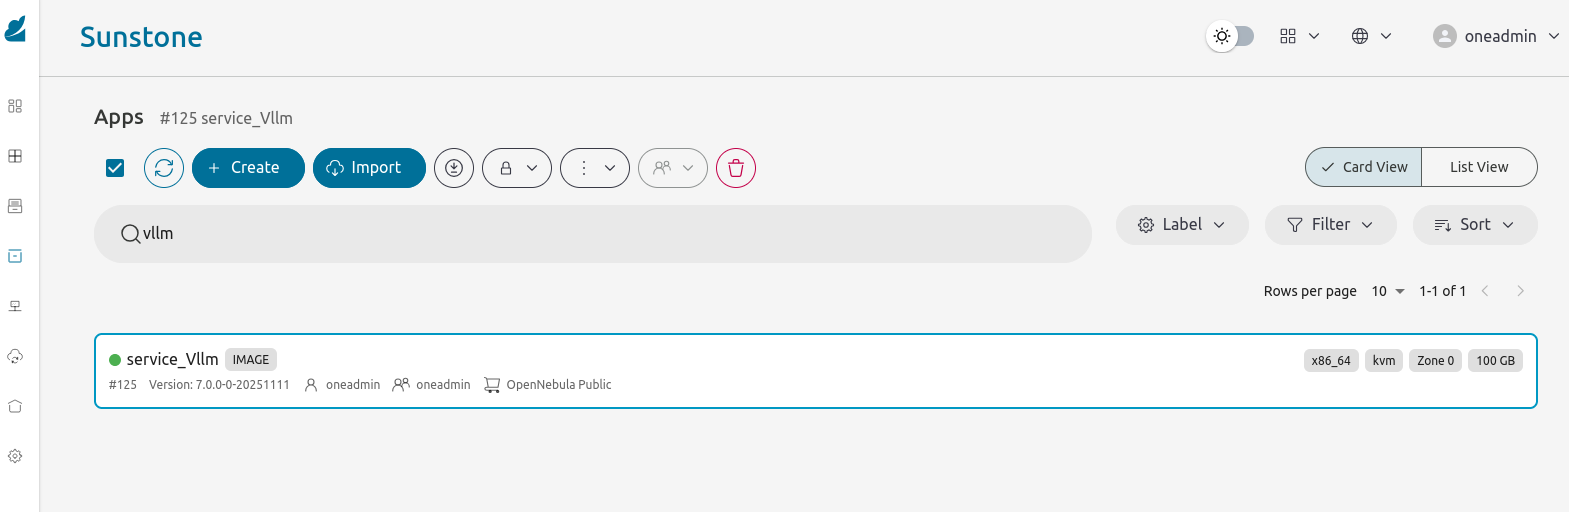
The vLLM appliance is available through the OpenNebula Marketplace. Follow steps from this guide from the official documentation. To download vLLM appliance and instantiate with a GPU in passthrough mode, the following steps have to be performed:
- Go to Storage -> Apps section. Search for vLLM appliance and import it. Select DataStore where to save image
Go to VMs section and instantiate vLLM appliance. Specify common VM parameters. In the “Advanced Settings” go to “PCI devices” and ensure that required GPU device selected for attachment to the VM. Click “Accept” and then “Finish” to instantiate vLLM appliance.
Once vLLM appliance instantiated, follow steps from the LLM inference guide to access a webchat app or execute benchmarking tests
Next Steps
Additionally, we recommend checking Validate the environment, that describes how to explore the resources installed and how to download and run appliances from the OpenNebula Marketplace.
Finally, you can use your OpenNebula installation to Run a Kubernetes Cluster on OpenNebula with minimal steps – first downloading the OneKE Service from the OpenNebula Public Marketplace, then deploying a full-fledged K8s cluster with a test application.
GIVE FEEDBACK
Was this resource helpful?
Glad to hear it
Sorry to hear that