On-Premises Edge Cluster
Edge Cluster Types
On-Premises metal edge clusters use bare-metal servers in your datacenter. Metal provisions can run the LXC or KVM hypervisors.
On-Premises Edge Cluster Implementation
An On-Premises Edge Cluster consists of a set of servers with the following requirements:
Host Subsystem |
Configuration & Requirements |
|---|---|
Operating System |
Ubuntu 20.04 Focal installation. |
SSH is configured in the host to grant root passwordless access with the |
|
Networking |
Configured management interface. The OpenNebula front-end can reach the hosts through this network. |
Separated interface connected to the Internet. VMs will access the Internet through this network. Do not configure any IP address for this interface. |
|
Your network should allow inbound connections to ports 22 (TCP), 179 (TCP) and 8472 (UDP) on the management network. The Internet/Public network should not restrict any access. You can later set Security Groups for your VMs. |
|
Storage |
Hosts should have enough local storage mounted under |
The overall architecture of the On-Premises cluster is shown below.
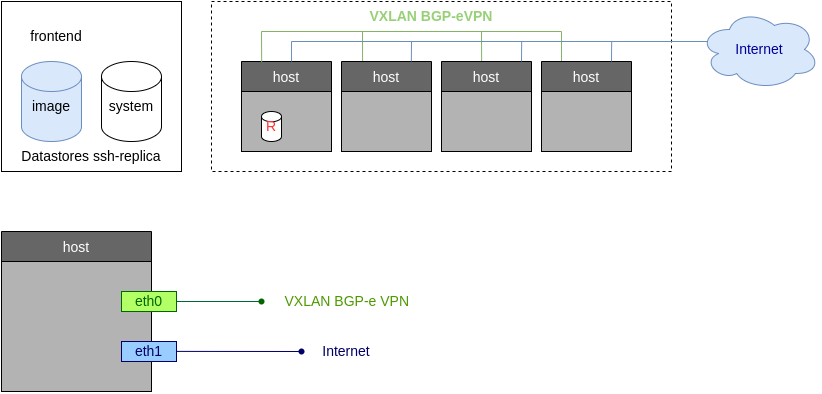
OpenNebula resources
The following resources, associated to each Edge Cluster, will be created in OpenNebula:
Image and System datastore for the cluster. The storage is configured to use the Hosts local storage through OneStor drivers. On-Premises clusters also include access to the default datastore, so you can easily share images across clusters.
Public Network, bound to the Internet interface through a Linux Bridge.
Private Networking, implemented using a VXLAN overlay on the management network.
Tutorial: Provision an On-Premises Cluster
Step 1. Check your hosts
Before we start we need to prepare the hosts for our on-prem cluster. We just need a vanilla installation of Ubuntu Focal with root passwordless SSH access. In this tutorial we’ll use host01 and host02.
ssh root@host01 cat /etc/lsb-release
Warning: Permanently added 'host01,10.4.4.100' (ECDSA) to the list of known hosts.
cat /etc/lsb-release
DISTRIB_ID=Ubuntu
DISTRIB_RELEASE=20.04
DISTRIB_CODENAME=focal
DISTRIB_DESCRIPTION="Ubuntu 20.04.3 LTS"
ssh root@host02 cat /etc/lsb-release
Warning: Permanently added 'host02,10.4.4.101' (ECDSA) to the list of known hosts.
cat /etc/lsb-release
DISTRIB_ID=Ubuntu
DISTRIB_RELEASE=20.04
DISTRIB_CODENAME=focal
DISTRIB_DESCRIPTION="Ubuntu 20.04.3 LTS"
Step 2. Create your On-premises cluster
Check that you have your On-Premises provider created (if not, see above):
oneprovider list
  ID NAME                                                                    REGTIME
   0 onprem                                                           04/28 11:31:34
Now we can create our On-Premises Edge Cluster, grab the following attributes for your setup:
Attribute |
Content |
|---|---|
Hostnames |
host01;host02 |
Hypervisor |
LXC |
Public Network Interface |
eth1 |
Public IP block |
172.16.0.2, and the next 10 consecutive addresses |
Private Network Interface |
eth0 |
The command, using a verbose output mode, looks like:
oneprovision create -Dd --provider onprem /usr/share/one/oneprovision/edge-clusters/metal/provisions/onprem.yml

2021-04-28 18:04:45 DEBUG : Executing command: `create`
2021-04-28 18:04:45 DEBUG : Command options: debug [verbose, true] [provider, onprem] [sync, true]
ID: 4
Virtualization technology for the cluster hosts

    0  kvm
    1  lxc

Please select the option (default=): lxc

Physical device to be used for private networking.
Text `private_phydev` (default=): eth0

Comma separated list of FQDNs or IP addresses of the hosts to be added to the cluster
Array `hosts_names` (default=): host01;host02

Physical device to be used for public networking.
Text `public_phydev` (default=): eth1

First public IP for the public IPs address range.
Text `first_public_ip` (default=): 172.16.0.2

Number of public IPs to get
Text `number_public_ips` (default=1): 10

2021-04-28 18:05:15 INFO  : Creating provision objects
...
2021-04-28 18:05:17 DEBUG : Generating Ansible configurations into /tmp/d20210428-3894-z6wb1x
2021-04-28 18:05:17 DEBUG : Creating /tmp/d20210428-3894-z6wb1x/inventory:
[nodes]
host01
host02

[targets]
host01 ansible_connection=ssh ansible_ssh_private_key_file=/var/lib/one/.ssh-oneprovision/id_rsa ansible_user=root ansible_port=22
host02 ansible_connection=ssh ansible_ssh_private_key_file=/var/lib/one/.ssh-oneprovision/id_rsa ansible_user=root ansible_port=22

...

Provision successfully created
ID: 4
Step 3. Quick tour on your new cluster
Let’s first check the hosts are up and running, in our simple case:
  $ onehost list
ID NAME                  CLUSTER    TVM      ALLOCATED_CPU      ALLOCATED_MEM STAT
 4 host02                onprem-clu   0       0 / 200 (0%)     0K / 3.8G (0%) on
 3 host01                onprem-clu   0       0 / 200 (0%)     0K / 3.8G (0%) on
And similarly for the networks. You’ll have a public network and a network template to create as many private networks as you need:
  $ onevnet list
ID USER     GROUP    NAME                      CLUSTERS   BRIDGE   STATE    LEASES
 4 oneadmin oneadmin onprem-cluster-public     102        onebr4   rdy           0

  $ onevntemplate list
ID USER     GROUP    NAME                                                  REGTIME
 0 oneadmin oneadmin onprem-cluster-private                         04/28 18:08:38
For example let’s create a 192.168.0.100/26 network from the private network template:
onevntemplate instantiate 0 --ip 192.168.0.100 --size 64
VN ID: 5
Step 4. A Simple test, run a container
As a simple test we’ll run a container. For example let’s pick the nginx base image from Tunrkey Linux Market:
onemarketapp list | grep -i 'nginx.*LX'
 107 nginx - LXD                                         1.0    5G  rdy  img 11/23/18 TurnKey Li    0
and add it into our cloud:
 $ onemarketapp export 107 nginx_market -d default
  IMAGE
      ID: 2
  VMTEMPLATE
      ID: 3

 $ oneimage list
ID USER     GROUP    NAME                    DATASTORE     SIZE TYPE PER STAT RVMS
 2 oneadmin oneadmin nginx_market            default      1024M OS    No rdy     0
The final step will be adding a network interface to the template just created (3 in our example):
netemplate update 3
...
NIC = [ NETWORK_MODE = "auto", SCHED_REQUIREMENTS = "NETROLE = \"public\"" ]
Now we can create the VM from this template:
onetemplate instantiate 3
VM ID:10
onevm show 10
VIRTUAL MACHINE 10 INFORMATION
ID                  : 10
NAME                : nginx-10
USER                : oneadmin
GROUP               : oneadmin
STATE               : ACTIVE
LCM_STATE           : RUNNING

...

VIRTUAL MACHINE MONITORING
CPU                 : 0
MEMORY              : 332.7M
NETTX               : 103K
NETRX               : 102K

...
VM DISKS
 ID DATASTORE  TARGET IMAGE                               SIZE      TYPE SAVE
  0 default    sda    nginx                               5G/5G     file   NO
  1 -          hda    CONTEXT                             1M/-      -       -

VM NICS
 ID NETWORK              BRIDGE       IP              MAC               PCI_ID
  0 onprem-cluster-publi onebr4       172.16.0.2      02:00:ac:10:00:02
If you connect through SSH to the VM, the setup screen for the appliance should welcome you:
Operating Providers & Edge Clusters
Refer to the cluster operation guide to check all of the operations needed to create, manage, and delete an Edge Cluster. Refer to the providers guide to check all of the operations related to providers.
You can also manage On-Premise Clusters using the OneProvision FireEdge GUI.
