KVM Node Installation
This page shows you how to configure OpenNebula KVM Node from the binary packages.
Note
Before reading this chapter, you should have at least installed your Front-end node.
Step 1. Add OpenNebula Repositories
Refer to OpenNebula Repositories guide to add the Enterprise and Community Edition software repositories.
Step 2. Installing the Software
Installing on CentOS/RHEL
Repository EPEL
OpenNebula depends on packages which aren’t in the base distribution repositories. Execute one of the commands below (distinguished by the host platform) to configure access to additional EPEL (Extra Packages for Enterprise Linux) repository:
AlmaLinux
yum -y install epel-release
RHEL 8
rpm -ivh https://dl.fedoraproject.org/pub/epel/epel-release-latest-8.noarch.rpm
RHEL 9
rpm -ivh https://dl.fedoraproject.org/pub/epel/epel-release-latest-9.noarch.rpm
Install OpenNebula KVM Node Package
Execute the following commands to install the OpenNebula KVM Node package and restart libvirt to use the OpenNebula-provided configuration file:
yum -y install opennebula-node-kvm
systemctl restart libvirtd
For further configuration, check the specific guide.
Installing on Debian/Ubuntu
Execute the following commands to install the OpenNebula KVM Node package and restart libvirt to use the OpenNebula-provided configuration file:
# apt-get update
# apt-get -y install opennebula-node-kvm
# systemctl restart libvirtd
For further configuration check the specific guide.
Step 3. Host OS Security Configuration (Optional)
Warning
If you are performing an upgrade skip this and the next steps and go back to the upgrade document.
Disable SELinux on CentOS/RHEL
Depending on the type of OpenNebula deployment, the SELinux can block some operations initiated by the OpenNebula Front-end, which results in a failure of the particular operation. It’s not recommended to disable the SELinux on production environments, as it degrades the security of your server, but to investigate and workaround each individual problem based on the SELinux User’s and Administrator’s Guide. The administrator might disable the SELinux to temporarily workaround the problem or on non-production deployments by changing following line in /etc/selinux/config:
SELINUX=disabled
After the change, you have to reboot the machine.
Note
Depending on your OpenNebula deployment type, the following may be required on your SELinux-enabled nodes:
package
util-linuxnewer than 2.23.2-51 installedSELinux boolean
virt_use_nfsenabled (with datastores on NFS):
setsebool -P virt_use_nfs on
Disable AppArmor on Ubuntu/Debian
Depending on the type of OpenNebula deployment, the AppArmor can block some operations initiated by the OpenNebula Front-end, which results in a failure of the particular operation. It’s not recommended to disable the apparmor on production environments, as it degrades the security of your server, but to investigate and workaround each individual problem, a good starting point is AppArmor HowToUse Guide. The administrator might disable the AppArmor to temporarily workaround the problem or on non-production deployments the steps for disabling it can be found here.
Note
Depending on your OpenNebula deployment type, the following lines might be required at /etc/apparmor.d/abstractions/libvirt-qemu profile:
/var/lib/one/datastores/** rwk,
Step 4. Configure Passwordless SSH
The OpenNebula Front-end connects to the hypervisor Nodes using SSH. Following connection types are being established:
from Front-end to Front-end,
from Front-end to hypervisor Node,
from Front-end to hypervisor Node with another connection within to another Node (for migration operations),
from Front-end to hypervisor Node with another connection within back to Front-end (for data copy back).
Important
It must be ensured that Front-end and all Nodes can connect to each other over SSH without manual intervention.
When OpenNebula server package is installed on the Front-end, a SSH key pair is automatically generated for the oneadmin user into /var/lib/one/.ssh/id_rsa and /var/lib/one/.ssh/id_rsa.pub, the public key is also added into /var/lib/one/.ssh/authorized_keys. It happens only if these files don’t exist yet, existing files (e.g., leftovers from previous installations) are not touched! For new installations, the default SSH configuration is placed for the oneadmin from /usr/share/one/ssh into /var/lib/one/.ssh/config.
To enable passwordless connections you must distribute the public key of the oneadmin user from the Front-end to /var/lib/one/.ssh/authorized_keys on all hypervisor Nodes. There are many methods to achieve the distribution of the SSH keys. Ultimately the administrator should choose a method; the recommendation is to use a configuration management system (e.g., Ansible or Puppet). In this guide, we are going to manually use SSH tools.
Since OpenNebula 5.12. On the Front-end runs dedicated SSH authentication agent service which imports the oneadmin’s private key on its start. Access to this agent is delegated (forwarded) from the OpenNebula Front-end to the hypervisor Nodes for the operations which need to connect between Nodes or back to the Front-end. While the authentication agent is used, you don’t need to distribute private SSH key from Front-end to hypervisor Nodes!
To learn more about the SSH, read the Advanced SSH Usage guide.
A. Populate Host SSH Keys
You should prepare and further manage the list of host SSH public keys of your nodes (a.k.a. known_hosts) so that all communicating parties know the identity of the other sides. The file is located in /var/lib/one/.ssh/known_hosts and we can use the command ssh-keyscan to manually create it. It should be executed on your Front-end under oneadmin user and copied on all your Nodes.
Important
You’ll need to update and redistribute file with host keys every time any host is reinstalled or its keys are regenerated.
Important
If default SSH configuration shipped with OpenNebula is used, the SSH client automatically accepts host keys on the first connection. That makes this step optional, as the known_hosts will be incrementally automatically generated on your infrastructure when the various connections happen. While this simplifies the initial deployment, it lowers the security of your infrastructure. We highly recommend to populate known_hosts on your infrastructure in controlled manner!
Make sure you are logged on your Front-end and run the commands as oneadmin, e.g. by typing:
# su - oneadmin
Create the known_hosts file by running following command with all the Node names including the Front-end as parameters:
ssh-keyscan <frontend> <node1> <node2> <node3> ... >> /var/lib/one/.ssh/known_hosts
B. Distribute Authentication Configuration
To enable passwordless login on your infrastructure, you must copy authentication configuration for oneadmin user from Front-end to all your nodes. We’ll distribute only known_hosts created in the previous section and oneadmin’s SSH public key from Front-end to your nodes. We don’t need to distribute oneadmin’s SSH private key from Front-end, as it’ll be securely delegated from Front-end to hypervisor Nodes with the default SSH authentication agent service running on the Front-end.
Make sure you are logged on your Front-end and run the commands as oneadmin, e.g. by typing:
# su - oneadmin
Enable passwordless logins by executing the following command for each your Node. For example:
ssh-copy-id -i /var/lib/one/.ssh/id_rsa.pub <node1>
ssh-copy-id -i /var/lib/one/.ssh/id_rsa.pub <node2>
ssh-copy-id -i /var/lib/one/.ssh/id_rsa.pub <node3>
If the list of host SSH public keys was created in the previous section, distribute the known_hosts file on each your Node. For example:
scp -p /var/lib/one/.ssh/known_hosts <node1>:/var/lib/one/.ssh/
scp -p /var/lib/one/.ssh/known_hosts <node2>:/var/lib/one/.ssh/
scp -p /var/lib/one/.ssh/known_hosts <node3>:/var/lib/one/.ssh/
Without SSH Authentication Agent (Optional)
Warning
Not Recommended. If you don’t use integrated SSH authentication agent service (which is initially enabled) on the Front-end, you’ll have to distribute also oneadmin’s private SSH key on your hypervisor Nodes to allow connections among Nodes and from Nodes to Front-end. For security reasons, it’s recommended to use SSH authentication agent service and avoid this step.
If you need to distribute oneadmin’s private SSH key on your Nodes, proceeed with steps above and continue with following extra commands for all your Nodes. For example:
scp -p /var/lib/one/.ssh/id_rsa <node1>:/var/lib/one/.ssh/
scp -p /var/lib/one/.ssh/id_rsa <node2>:/var/lib/one/.ssh/
scp -p /var/lib/one/.ssh/id_rsa <node3>:/var/lib/one/.ssh/
C. Validate Connections
You should verify that none of these connections (under user oneadmin) fail and none require password:
from the Front-end to Front-end itself
from the Front-end to all Nodes
from all Nodes to all Nodes
from all Nodes back to Front-end
For example, execute on the Front-end:
# from Front-end to Front-end itself
ssh <frontend>
exit

# from Front-end to node, back to Front-end and to other nodes
ssh <node1>
ssh <frontend>
exit
ssh <node2>
exit
ssh <node3>
exit
exit

# from Front-end to node, back to Front-end and to other nodes
ssh <node2>
ssh <frontend>
exit
ssh <node1>
exit
ssh <node3>
exit
exit

# from Front-end to nodes and back to Front-end and other nodes
ssh <node3>
ssh <frontend>
exit
ssh <node1>
exit
ssh <node2>
exit
exit
Step 5. Networking Configuration
Network connection is needed by the OpenNebula Front-end daemons to access, manage and monitor the Hosts, and to transfer the Image files. It is highly recommended to use a dedicated network for this purpose.
There are various models for Virtual Networks, check the Open Cloud Networking chapter to find the ones supported by OpenNebula.
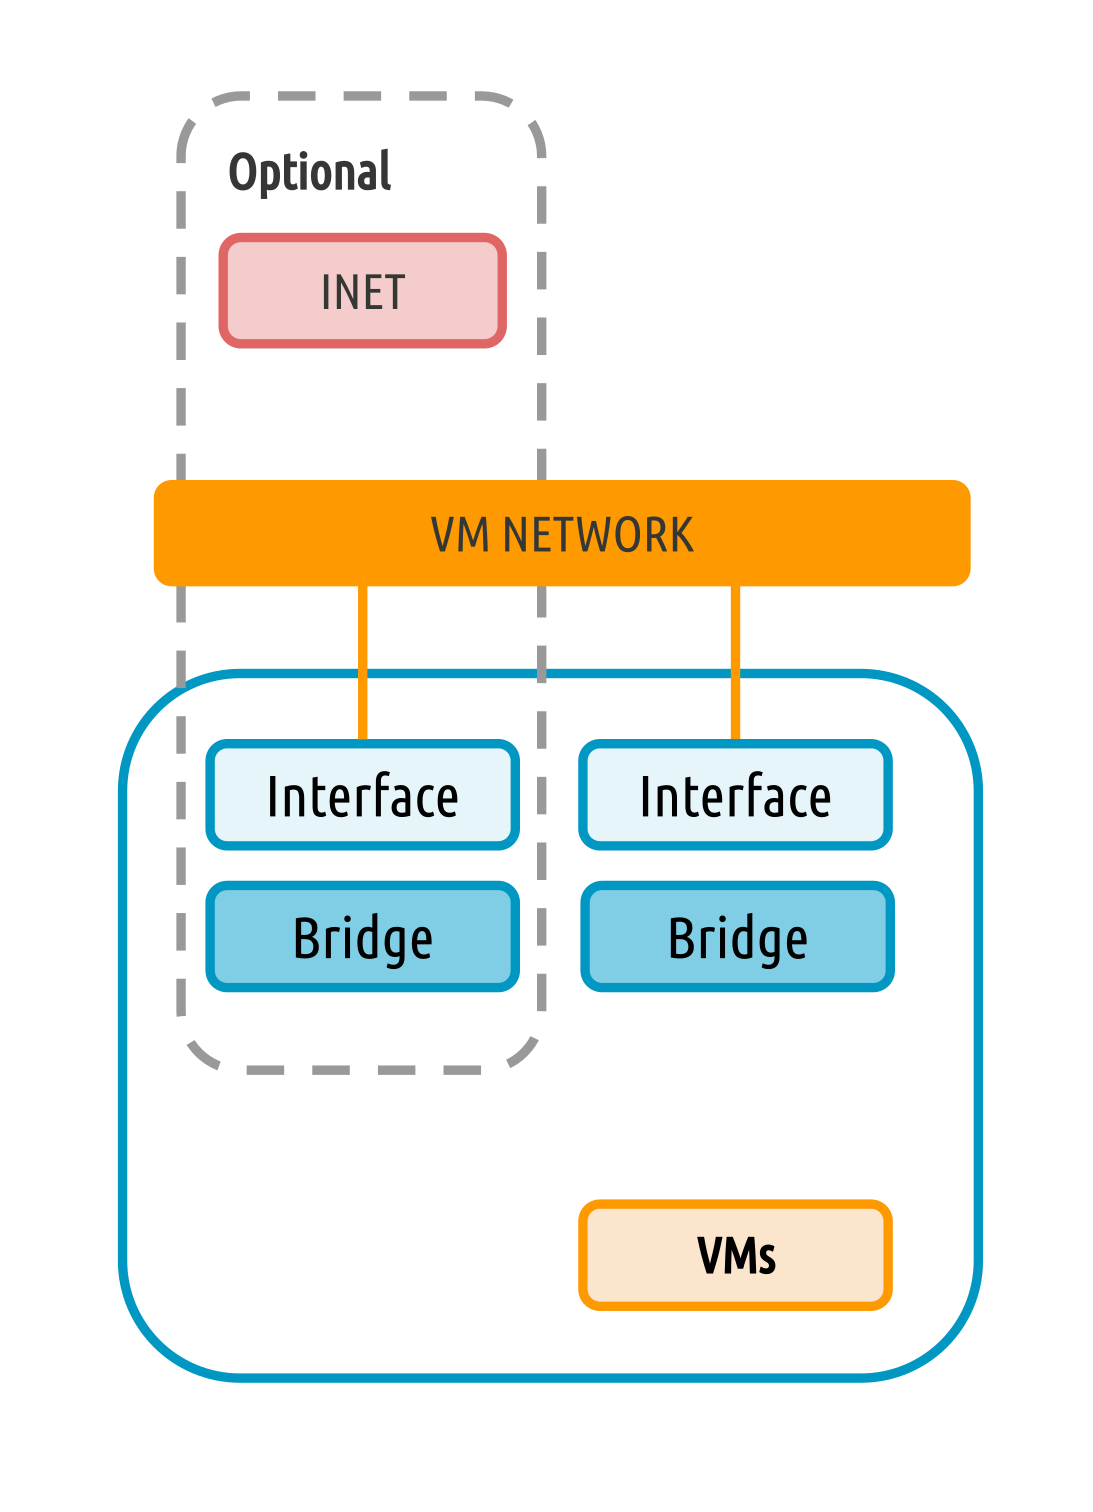
You may want to use the simplest network model, that corresponds to the bridged driver. For this driver, you will need to setup a Linux bridge and include a physical device in the bridge. Later on, when defining the network in OpenNebula, you will specify the name of this bridge and OpenNebula will know that it should connect the VM to this bridge, thus giving it connectivity with the physical network device connected to the bridge. For example, a typical host with two physical networks, one for public IP addresses (attached to an eth0 NIC for example) and the other for private virtual LANs (NIC eth1 for example) should have two bridges:
ip link show type bridge
4: br0: ...
5: br1: ...
ip link show master br0
2: eth0: ...
ip link show master br1
3: eth1: ...
Note
Remember that this is only required in the Hosts, not in the Front-end. Also remember that the exact name of the resources is not important (br0, br1, etc…), however it’s important that the bridges and NICs have the same name in all the Hosts.
Step 6. Storage Configuration (Optional)
In default OpenNebula configuration, the local storage is used for storing Images and running Virtual Machines. This is enough for basic use and you don’t need to take any extra steps now unless you want to deploy an advanced storage solution.
Follow the Open Cloud Storage Setup guide to learn how to use Ceph, NFS, LVM, etc.
Step 7. Adding Host to OpenNebula
In this step, we’ll register the hypervisor Node we have configured above into the OpenNebula Front-end, so that OpenNebula can launch Virtual Machines on it. This step is documented for Sunstone GUI and CLI but both accomplish the same. Select one of the two options only.
Learn more in Hosts and Clusters Management.
Note
If the Host turns to err state instead of on, check OpenNebula log /var/log/one/oned.log. The problem might be with connecting over SSH.
Add Host with Sunstone
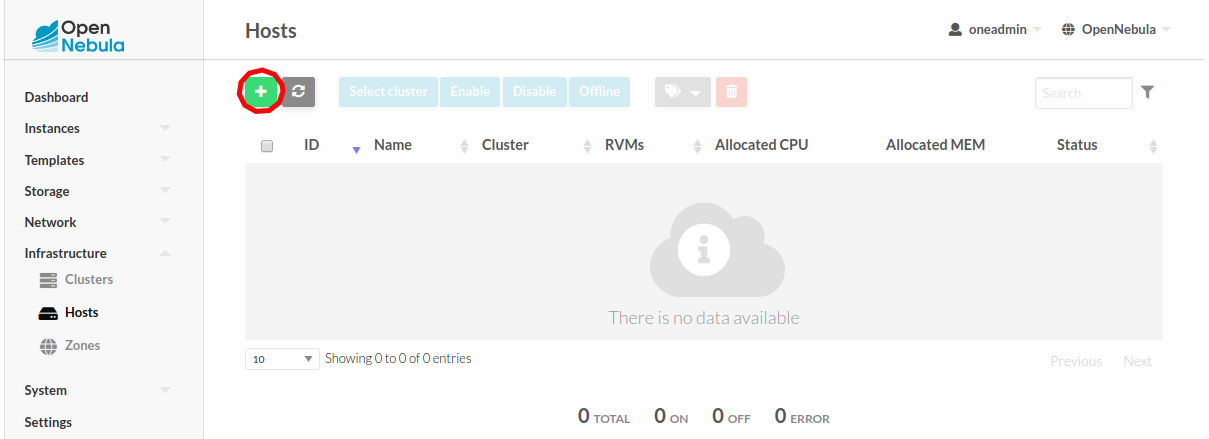
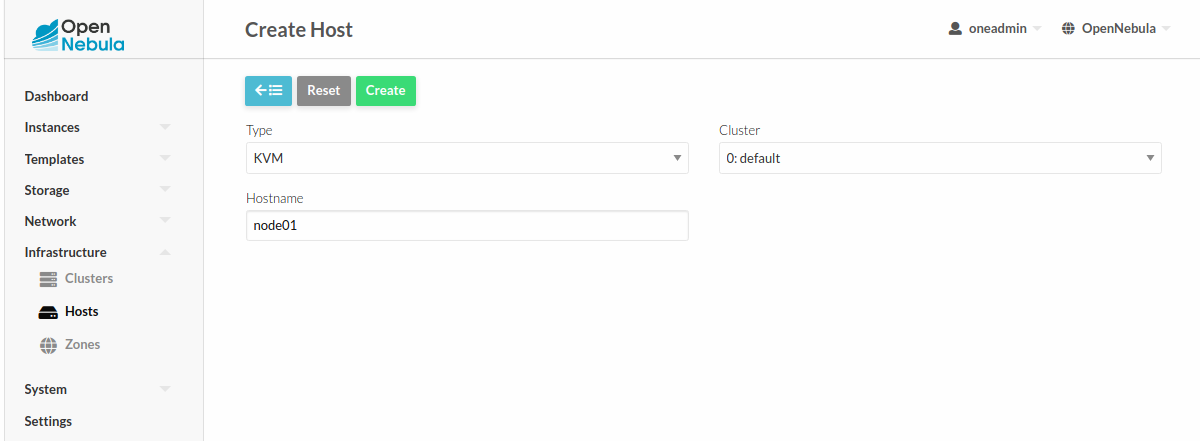
Open Sunstone as documented here. On the left side menu go to Infrastructure → Hosts. Click on the + button.
Then fill in the hostname, FQDN, or IP of the Node in the Hostname field.
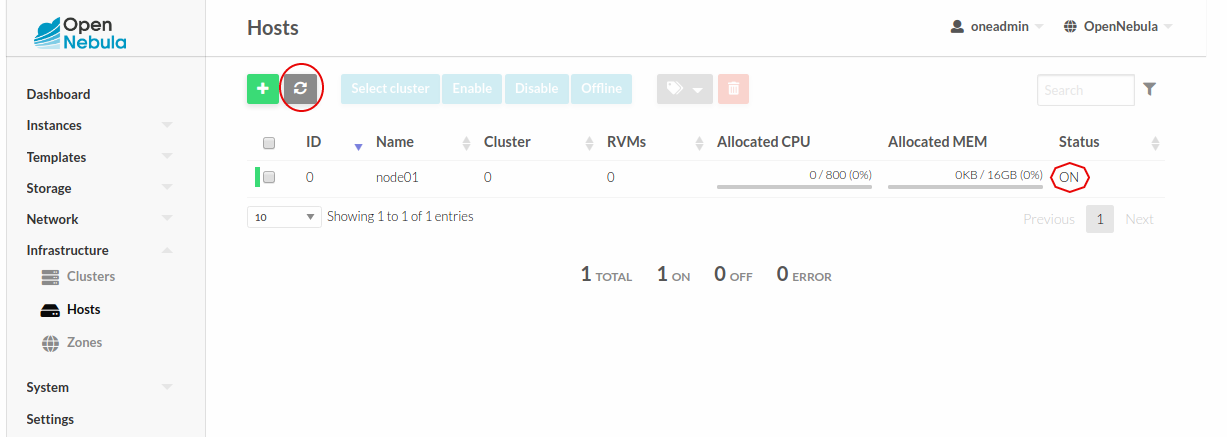
Finally, return back to the Hosts list, and check that the Host has switched to ON status. It can take up to 1 minute. Click on the refresh button to check the status more frequently.
Add Host with CLI
To add a node to the cloud, run this command as oneadmin in the Front-end (replace <node01> with your Node hostname):
$ onehost create <node01> -i kvm -v kvm

$ onehost list
  ID NAME            CLUSTER   RVM      ALLOCATED_CPU      ALLOCATED_MEM STAT
   1 localhost       default     0                  -                  - init

# After some time (up to 1 minute)

$ onehost list
  ID NAME            CLUSTER   RVM      ALLOCATED_CPU      ALLOCATED_MEM STAT
   0 node01          default     0       0 / 400 (0%)     0K / 7.7G (0%) on
Step 8. Import Existing VMs (Optional)
Optionally, you can import virtual machines already running on the Host. You’ll be able to control such virtual machines from OpenNebula, although the set of operations is vastly reduced (when compared to the virtual machines started from OpenNebula). Follow the Importing Wild VMs guide.
You can import wild VMs anytime later.
Next steps
Now, you can continue with:
configuring Storage and Networking
exploring Management and Operations guide
to extend and control your cloud.